Think of Stage 4 as a vertical presentation of the first stage of Gradius. Rather than dealing with terrain above and below you, it will be to the left and right of you. Enemy releasing domes and walking cannons will dot the landscape on either side, including the occasional rock spewing volcano. The first power up opportunity that you are presented with is a Force Field, so make sure you collect it. You may also notice that in addition to the missiles that you fire to the left and right, you also begin to bomb into the landscape beneath you. While it doesn't have much practical application, it can bomb some of the hatches which release Ugu ships.
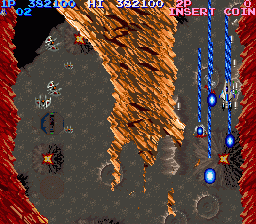
When the terrain begins, you won't have any difficulty navigating the early portion of it. Continue to fire your main weapons and missiles to get rid of the majority of enemies, and fly out of the way of any bullets that get fired at you. You will be given a few opportunities to collect the Laser weapon, and it's worth having. After passing a single volcano, you will pass two more volcanoes back to back. The rocks they emit are easily destroyed with Lasers. After the third volcano, you will reach a collection of dirt that you must pass. The right route is a little safe, but if you choose the shoot through it, lock into a particular location, fire constantly and don't move until you are completely through the dirt.
Once you get beyond the dirt, you will pass through a small open section before a hail storm of gray rocks fills the screen. Stay near the bottom of the screen, and preferably toward the left side where the flow of rocks generally seems to be weaker. As these indestructible rocks fall some Ugus, both gray and gold, will fly up from the bottom. While you may reveal power-ups from the gold Ugus, particularly Options and Lasers, do not recklessly fly over to them to collect them. Make sure that the path is safe from falling rocks above before you attempt to collect them. Ironically, if you have a full complement of Options, Missiles, and Lasers, and you fire constantly, you can slow the screen down and make it a little easier to navigate.
The next threat you must deal with comes in the form of giant boulders that slow float down the field. By themselves, they are large but easy to dodge and rather harmless. However, if you are recklessly firing all over the screen, you are likely to damage these boulders to the point where they fracture and fill the screen with more indestructible rocks which then become difficult to avoid. Furthermore, the path through the stage begins to split up, forcing you to choose one side of the other. The right side is blocked by a boulder that is almost as wide as the path, so you are better off staying to the left. Don't fire unless you have to, or you risk fracturing more boulders.
After the last boulder flies by, you will be presented with the choice to go down three different paths. No path is any better than another, although the left path tends to be the straightest and least interrupted. There are occasions where the paths reconnect and split back apart. If you are concerned with points, have a fully array of Options and have collected enough Speed Ups, it's possible to stretch yourself all the way across the bottom of the screen, and have weapons firing in every pathway.
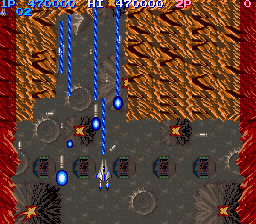
The last obstacle you must face before you reach the boss, is two screen-wide patches of dirt that you must blast your way through. Just before each patch are a series of hatches on the ground which release an upgrade form of the Ugu, known as the Ugu Mark II. These Ugu do not waste any time reaching your altitude and move in a particular pattern that sends them flying at you in very little time. Unless you manage to bomb one of the hatches they fly from, do not stick around in that area. Move into the dirt once you've blasted away a safe zone for yourself. A few remaining Ugus and cannons will be waiting for you in the fortress interior.
This is easily one of the most difficult bosses in the game. Although it is entirely motionless, it uses a form of defense that it nearly impossible to avoid. The three cores at the top of the screen are all protected by three layers of shields. These shields are easily removed, and can even be destroyed before the boss attack fully begins. This occurs when the cores begin to send out blue orbs. These orbs bounces around the fortress on a trajectory determined when they are fired. It doesn't start out too badly, but eventually the room becomes full of blue orbs and dodging them all becomes nearly impossible. There are two strategies which are known to work against the fortress. The first method is very safe, but incredibly slow and boring. It is possible to wait this entire boss out and survive the whole ordeal if you park your ship in the lower right hand corner of the fortress (shown right) before any orbs are fired. You will literally have to sit there a few minutes and wait for the cores to open and shut before the fortress self-destructs. While boring, this strategy will allow you to survive the fight.
If you wish to be more aggressive and active, you will need at least two Options. Prepare yourself by removing the shields before the first blue orb is fired, then park your ship halfway between the middle and right core so that at least one option is lined up to fire at the right core. Let the first few blue orbs fly out and wait for the cores to open up. When they do, begin firing and let the option remove the right core. When it is safe to do so, zip over to the space between the left and middle cores and let your Option remove the middle core. Then fly left below the left core, and back to the space in between, and let your option remove the final core. It's not easy, but it's safer than occupying the space in the middle with all the orbs.