Stage 17[edit]
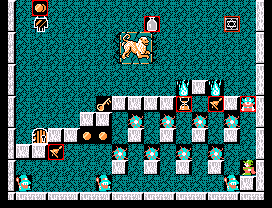
This board may take a few tries, but once you understand the pattern, you will find it surprisingly easy to proceed.
- Unless you have fireballs for all three wizards, don't bother trying to take the more obvious path along the bottom. The easiest way is to traverse through the Sparkie forest.
- Wait for the closest Sparkie to pass and then build a brick immediately to your left
- Jump onto the new brick and surround yourself with bricks. This blockade will protect you as long as you stay in it, however, you need to move on quickly in order to stay in sync with the Sparkies' pattern.
- The instant the Sparkie from above clears your blockade, break the left block and fill the next gap to your left.
- Stand on the gap you just filled and build another blockade
- Repeat this blockade-and-pause pattern until you cross all four gaps
- Jump above the Sparkie forest and make your way to the right, pushing them out of your path with well-timed blocking. However, if you are really good, you can trap them in the left corner prior to ascending.
- Drop the blue flames, ascend, and finish the board.
- Additional Bonus
Should you get through the room without dying, tap the right most unbreakable brick with your head eleven times. This will release Mighty Bomb Jack, the hero of another Tecmo game. Chase the jumping hero down and every enemy on the stage will turn into a fairy!
Stage 18[edit]
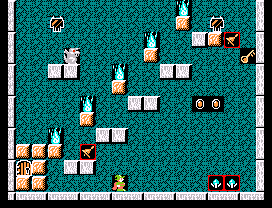
- Build a block immediately to your left.
- Use the block as a stepping stone to obtain the hidden fairy bell before the skulls drop the flame.
- Ascend up the right side, keeping yourself as close to the wall as possible.
- Create a drain directly under the Skull generator.
- Drop the blue flames if the Skulls have not done so already.
- Exit
Note: Dropping the Gargoyle should produce a fairy.
Stage 19[edit]
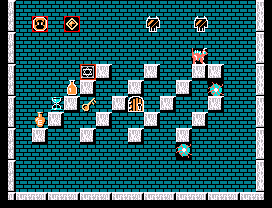
This is one of the hardest boards in the game. The combination of the Salamanders, the speedy-sparkies, and the time crunch makes this very difficult. If you do not clear this board quickly, expect a very long and frustrating trial.
If you have the ammo, kill the Sparkies and anything else in your path as you grab the key and go. If not, then:
- Make a Sparkie trap near the lower right corner. Keep it off the ground and away from the falling Salamanders.
- Trap one of the Sparkies and release the other to cruise around the board.
- Scale up the right wall while avoiding falling Salamanders, the loose Sparkie, and the Dragon perched above.
- Drop the Dragon (which will produce a fairy) and continue upward until you are clear of the Salamanders.
- Be sure to stay above the falling Salamanders and move to the left. Collect the goodies but save the bottle for last.
- Use the orange bottle to zap all of the salamanders immediately after the left generator discharges. This will buy you just enough time to get the key and climb back out before more salamanders force you to the bottom. If you are forced to the bottom, then try to work your way up the right side in a similar fashion as in the beginning of this board--only this time, drop into the exit chute to finish the board.
Alternatively, build a row of bricks all along the third from top row, leaving three gaps; under each dragon mirror and at the far left side. Run to the far right, jumping over the mirrors and avoiding the dragons. Immediately after a dragon drops out of the right mirror, close the gap and wait for the dragon to come out of the second mirror. Then close the gap and run to the left. Drop through the last gap and fall onto the free life. Now you can take your time getting the key, fairy, and making it to the door.
Stage 20[edit]
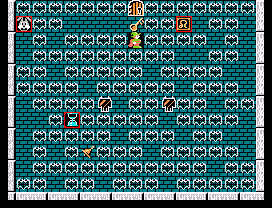
Obviously the main task is to determine the right path to the key and the exit, while still making it within time.
- Build three initial blocks
- One on the ground to your right. Jump onto this first block.
- Jump up and build in the space to your left
- Build the third block in the open space closest to the lower right corner.
- Ascend up the left side and across the board so you land on top of your second initial block. From there, jump on top of the third and ascend up the right side.
- Once about half way up, make a bee-line toward the key. Build a block directly below the key.
- Walk off the left side of the block you are standing on, and build a block in the first open space as you are falling.
- Re-ascend up the right side and this time land on the block you just built.
- Traverse to the left side and ascend to the key and exit.
- Note
IF you dropped into the door of the previous stage, hold up on the controller when this room begins. This will allow you to grab the key immediately as the stage begins.
Stage 21[edit]
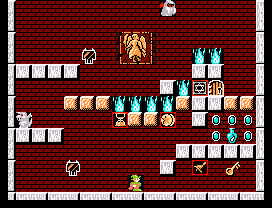
- Get the key. If you don't, the dropping blue-fire will make it impossible to retrieve later.
- Drop the Gargoyle on the left side.
- Ascend to the top and move to the right side.
- Collect the goodies and exit.
Stage 22[edit]
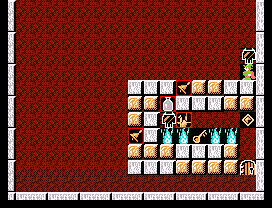
- Make Salamander jail by digging out the three blocks to your left.
- Build a row of six blocks just above the floor. Add another row of six directly on top of the first.
- Open the drain below the Salamander generator and retreat to the left. The second row will slow the approaching Salamanders.
- Once the Salamanders on the ground floor disappear, drop down and move toward the exit door.
Stage 23[edit]
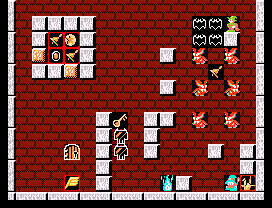
- Drop through the Bat-swarm
- At the start of the board, immediately walk off to the left.
- Pull to the right as you are falling...
- ...But try to avoid landing on the Wizard at the bottom.
- Build a block next to the upper mirror that is below the key
- Climb up past the lower bat-pair
- Retrieve the key, goodies, and exit
Stage 24[edit]
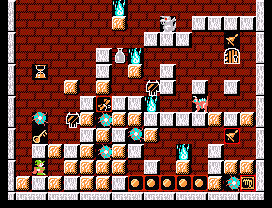
Just make sure to drop and cover the middle of the three flames before you climb up to enter the upper door chamber.
In this case, "cover" means: place a block over the flame so you have something to land on after the gargoyle shoots the top flame down when you get close.