The stages that are described below are the areas where combat takes place. Some stages have more of an advantage for certain characters than for others, so having a good knowledge of each stage will change how one approaches a fight. Get to know these stages, as winning is influenced by the level of understanding that an individual has about each arena of battle.
Kirby's Dreamland

This is the most balanced level in the game due to how flat and symmetrical it is. A small level with three platforms floating above a waffle cone-like base, its size lends itself to 1 vs 1 matches. Watch out for the tree, as they will periodically blow a gust of wind either to the left or right, influencing the characters movement. Because of the wind, characters may find it very difficult to return to the stage and those who are edge guarding may find themselves blown off the edge, preventing them from attacking the returning player as planned. Attempting to recover from a low position near the stage can also prove dangerous, sometimes resulting in characters getting trapped under the stage.
Yoshi's Island

This fanciful level necessitates agility and power in the air. The stage is designed with angled platforms hovering over the main stage with an angled surface in the shape of a V. Because of this design, attacks can miss over the heads of small or crouched opponents. The angled platforms also provide a unique challenge to a projectile user, as the top of the platform will deflect your projectile while the bottom and sides will let it through.
One of the most important things to note on this level are the cloud platforms. With two residing to the right of the stage and one to the left, they are a mixed blessing. The platforms allow characters (especially ones with a bad recovery) another chance at life. However, if stood on for too long, the cloud will disappear, dropping everything that was resting atop them into the depths. One should be aware of this, as opposing players may try and lure a person into attack, only to leave them with no cloud to land on.
Yoshi's Island, even more so than Dreamland, has been known to trap many a player underneath the stage. Make sure that the recovery is done far enough away if approaching the stage from below.
Planet Zebes
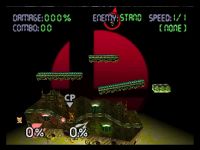
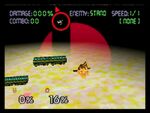
This level has a bottom stage with a great deal of variety in its gradient, making attacks done at the wrong time prone to missing either high or low. Above the main stage is a flat platform on the left, one short angled platform on the right, with a short, flat platform above them both in the middle. Just off of the right side of the stage is a platform that ascends and descends. Underneath the stage is a layer of acid lava. The yellow lava, if touched, damages the character and then bounces them back up at a slight angle away from the stage, allowing for another chance to ![]() +
+![]() recover.
recover.
The lava will come up and engulf portions of the stage from time to time, making the highest platform the only safe place to sit for 100% of the time. Because the lava is present, the spike death is rarely seen, unless the character is at a high enough percentage and is sent out the top by the acid. Though it prevents spikes from killing instantly, the molten acidic material still finds itself unloved. Having been sworn at many a time by smashers everywhere, the acid lava will often obscure the edge that was so vitally needed to recover. For this reason, the level is usually banned from tournaments.
Using one's ![]() +
+![]() maneuver away from the stage will result in the acid shooting the character at an angle toward the stage. By doing this, one can increase the odds of recovering.
maneuver away from the stage will result in the acid shooting the character at an angle toward the stage. By doing this, one can increase the odds of recovering.
Sector Z
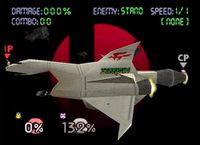
Ah, the uplifting strains of the Star Fox theme. On this stage, you and your opponent(s) will duke it out on the back of the Great Fox, which, as the name implies, is very large. If you've played Star Fox 64, you'll recognize the surroundings as Sector Z. The largest level in the game, the stage starts at the nose of the ship, gently slopes up and then down into a small valley, and then slopes back up a bit more steeply to the tail fin of the Great Fox. Here, it drops down onto the fighter launch surface and the big engine. Because the nose and engine of the Great Fox are only so big, it is possible to accidentally go under them and then, unless you are Pikachu, you are done (no, you can't land on the Great Fox's main guns).
You can also grab onto the top of the tail fin, allowing characters with a weaker ![]() +
+![]() to return to the main part of the Great Fox. However, most of the fighting usually takes place in the area behind the tail fin, because of the ability to bounce your opponent off of said tail fin for longer, more damaging combos. Beware the Arwings, though, who will come by every now and shoot at the combatants. You can stand on top of the horizontally-moving ones when they are right-side up, but just don't get caught on top of one when it flies away from the ship, because it'll take you through one of the KO walls when it disappears.
to return to the main part of the Great Fox. However, most of the fighting usually takes place in the area behind the tail fin, because of the ability to bounce your opponent off of said tail fin for longer, more damaging combos. Beware the Arwings, though, who will come by every now and shoot at the combatants. You can stand on top of the horizontally-moving ones when they are right-side up, but just don't get caught on top of one when it flies away from the ship, because it'll take you through one of the KO walls when it disappears.
Hyrule Castle
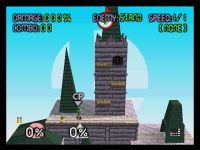
The Legend of Zelda theme plays on this level. This is another large stage, as you and your opponent are fighting on top of a castle, but can be conceptually split into three different parts. On the far left, there is a roof that gently slants down towards the edge, allowing for brutal edge-guards. It connects with the stone floor of the main portion of the level at about a Mario-height below the surface, essentially separating it from the main. The middle of the level is a flat, stone floor that comprises 2/3 of the total level. Towards the right of the middle of the level float three platforms, staggered so that one would have to jump back and forth (as well as up) to get to all of them in sequence. Then there is a drop-off, just above the height of a single jump from most characters that leads down to the third area. This part is combo city. A short portion of flat stone floor with a green tower near the edge allows for one to bounce their opponent back and forth between wall and tower until they are at high enough damage to kill them with a smash.
The thing to look out for here are those pesky blue tornadoes. If you get caught in them, they will spin you around and then shoot you straight up, damaging you and possibly killing you as well. They appear in 4 places, the roof on the left, the main stone floor, the rightmost platform above the main floor, and the lower section on the right. All of these whirlwinds usually move back and forth rather slowly, but the tornado on the main level has a mean streak, so watch out. It will rush towards you every now and then very quickly, so always be alert. In the bottom right portion, you can't be killed if the tornado catches you under the tower, as it will just slam you into the top and drop you, so if you must be caught by it, do it there.
You may have noted that when Jigglypuff's shield breaks, she goes flying upward at speeds approaching Mach 2. However, if you have your shield broken under the tower, Jiggly will simply slam herself against the underside of the tower for about three seconds, and then drop back down, ready to fight.
Peach's Castle

This level is simply weird. Most definitely one of the strangest of all of the stages, the main portion of this level is a stone block about a Donkey Punch and a half wide. This stone block, like all other portions of the level, has no grab-able edge. Above this is a wooden, railroad-looking thing that slopes up on the left and down on the right, with a flat part in the middle. Out to either side of the level are right-triangular cheesegrater-like, gravity-defying blocks that have their short side parallel to the ground and their pointed end up (hypotenuse on the stage side). These triangles often cancel out secured KOs. And that is the end of the immobile parts of the level. The annoying parts are as follows:
- There is a bumper that floats back and forth over the top of the stage, bouncing people off of it and inflicting one damage whenever it is touched. This can severely hamper kills, as no matter the strength of the attack hitting the character into the bumper, the character just bounces off gently and floats down.
- Through the base of the stone block that makes up the foundation for the stage, is a long stone block. This stone block moves back and forth to either side, slowly but inexorably. Throwing characters like Link or Captain Falcon off of the side where the block is not causes instant death, as they have nothing to grab onto, and this is compounded when the block is moving away from them.
Strategies for this level heavily involve spiking and throwing off of the un-recoverable side. A good move is to hit your opponent upwards with a smash so that they hit the bottom of one of the triangle blocks, bouncing them off and down in an improvised spike, for those characters lacking one.
Saffron City
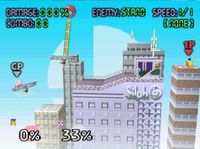
Pikachu's home turf, Saffron City is also reviled by many a smasher because it gives unfair advantages to a few characters (though not abhorred quite as much as Planet Zebes). It consists of three separate buildings and a few floating platforms. The leftmost building (much lower than the others), is separated from the main building by a gap that is covered above by a vertically moving platform that goes into motion periodically. Down to the left of the leftmost building, there is another floating platform of the same type, except angled slightly down towards the left KO wall. At its low point, this platform is flush with the building. The main building is wide, with a floor that is flat on the left and slopes up slightly on the right. Then, there is a box that sits on the right of the building, with a door that retracts much like a car garage. Pokémon of different types come out of this door, if someone gets too close while it is open.
Then there is the final building. A small, flat unit that resembles a helicopter pad, it is separated from the middle building by a gap. A little lower than the top of the Pokémon garage, this building can be used by players as a fortress from which to spike and edge-guard their way to victory.
Kongo Jungle

Welcome to Donkey Kong country. The main wooden platform is flat on either end, but slopes down on either side to a flat spot in the middle, so that a barrel thrown at normal speed will roll gently back and forth on the level, ad infinitum, until someone runs into it, attacks it, or otherwise destroys it. There are two slightly outward angled platforms above the edges of the level, and two small, flat platforms that rotate around one another in a circle. Below the level is a barrel, like the ones in Donkey Kong Country that, if you jump into it, will carry you around until you hit a button for it to shoot you out, or the barrel time runs out. Watch out, because this barrel will turn upside down periodically, shooting you out at odd angles. Also, the base of the main stage is permeable, meaning you can jump and recover up through the bottom of it. This makes this level great against an unsuspecting opponent, because as they come over to edge-guard, you can ![]() +
+![]() right into them, through the level, or simply move past them.
right into them, through the level, or simply move past them.
Mushroom Kingdom
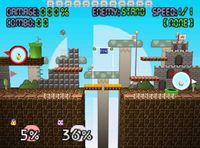
To unlock this hidden level, you have to beat the single-player game with all eight original characters (no time, stock, difficulty, or continue limits). In addition, you must have played on all eight original stages in VS mode.
There are two main parts to this level, separated by a gap in the middle, the only place on the level where you can fall to your death. To the left and right of this gap are flat brick floors, stretching off into infinity. This is the only level on which you can literally walk into the KO wall, which is embarrassing. On the left side there is a platform above the edge of the gap, and then a higher platform that goes all the way into the KO wall on the left. You cannot jump or drop through this upper platform, as it is really thick. However, if you have a long-range upward air attack (Mario, Captain Falcon, Link, Donkey Kong), you can smack your opponent through the platform when they're not expecting it, as your attack will reach through. There is a green pipe, like the ones in Super Mario Bros., on the very right edge of that top platform, making it a nice little wall to bounce opponents off of.
To the right of the gap, above the floor, float two platforms; the lower one slightly to the right of the upper one. Just to the right of the lower one, there is another, lower, green pipe, and then nothing else until you reach the KO wall. There is also a pipe on the surface of the left wall of the gap itself.
Covering the middle gap are two platforms, connected by a rope and pulley. If a character stands on either one of the platforms, the platform that he/she is standing on will start moving down, and the other will start moving up. If he/she stays on the platform, eventually both platforms will plummet into the depths. However, if another fighter stands on the other platform at the same time, then the two platforms will stay where they are, as they have been balanced (this works even if it's Donkey Kong on one and Jigglypuff on the other). After they fall, they will reset after about 5 seconds.
Another phenomenon on this level is the POW block, straight out of Mario Bros. They will appear periodically floating in the air, and if you hit one, anybody touching the ground at that time (except for yourself) will be rocketed into the air. This can kill, at around 80% on average, so if you see someone going for a POW, jump.
One more thing about this level that is critical for good performance is knowledge of the pipes. If necessary, you can get atop one of the green pipes and tap ![]() to pull a Mario and go from one pipe to the other. Remember, though, that there are 3 pipes, and you can end up at any of the other two. However, you know that Nintendo never makes it that easy, so watch out for the carnivorous piranha plants that come out of the pipes whenever someone gets near (they don't come out of the gap-pipe, though). They will send you flying in an upward direction if you run into them, but they would have a hard time killing someone directly.
to pull a Mario and go from one pipe to the other. Remember, though, that there are 3 pipes, and you can end up at any of the other two. However, you know that Nintendo never makes it that easy, so watch out for the carnivorous piranha plants that come out of the pipes whenever someone gets near (they don't come out of the gap-pipe, though). They will send you flying in an upward direction if you run into them, but they would have a hard time killing someone directly.
This level is a throwing character's level. Getting your opponent over on the far side of either of the vertical pipes means that you can likely throw them to death at low, maybe even 0% damage. That means Ness, Donkey Kong, Pikachu, Captain Falcon, etc. do very well on this level.


