This level has an interesting concept. The door to the next take is visible from the first room, but it is blocked by 5 barriers. There are several switches scattered throughout the level disguised as men sitting at a bar that toggle one or more of these barriers. The key is to toggle the correct switches to remove all the barriers. The catch is that when you hit the switch, you can't immediately see which barriers it modifies.
Wild Wild West[edit]
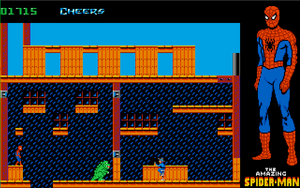
Heal yourself at Take 4, then climb up and out the top. You'll see that this level has a western theme. Godzilla's back- not exactly the first thing that comes to mind when you think of westerns, but who are we to judge Mysterio's movie ideas? Jump up and hit the lower switch on the wall to get the block moving. Then jump up to the ceiling (the platforms under the windows here don't like you standing on them) and hit the upper switch on the wall to open the gate.
On the other side, you'll find a guy sitting on a bar stool. Step on his hat and watch what happens. There are several of these guys scattered throughout the level. Although it would make sense for you to switch all the cowboy-at-a-bar switches you see, that's not how it works. Each one toggles different orange boxes and you have to hit only certain switches to clear all the orange boxes. Don't worry, though, it's not as complicated as it sounds.
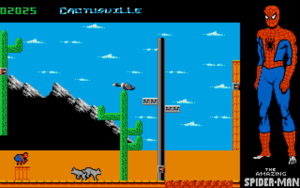
Crawl through the opening to enter Cactusville. The first thing you want to do is crawl up the cactus on the left side (Don't worry, it's not a REAL cactus). The switch at the top clears the power line so you can jump across to the other cactus without tangling with the two monster-sized cats patrolling the bottom. Does that vulture look weird to you? Well it's not real either. Stand on the bottom of it's neck (no, really) to activate a switch. The branch on the opposite side of the cactus lowers (see? I told you it wasn't real), allowing you to reach the switch on the bottom of the black pole. This switch opens the door on the bottom right. Climb back over and go through the opening at the top. Hit the switch up here to remove another set of power lines, then go back, climb down and go through the lower opening.
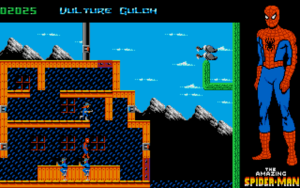
On the other side, you'll find two more cowboys at a bar. Ignore them for now and, instead, check out the two buttons on your left and right. Hitting them will cause floor sections above to move. Wait until Annie Oakley is on the left side of her platform before hitting the button on the right wall. If you don't, she will fall down to where you are and nobody wants that. This opens up a small alcove on the right side with a switch. Hit this switch to open the red wooden gate on the bottom. Walk through and drop down to enter the mine.
Mine![edit]
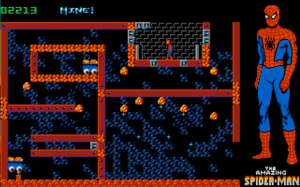
Wow, that's a lot of switches. Here's a breakdown of what they do: The buttons on top move a cart up and the buttons on the ground move a cart down. The buttons on the left wall move a cart left and the buttons on the right wall move a cart right. How convenient. You'll also notice that the buttons are grouped in pairs. The right button of a pair controls the cart that starts on the right and the left button of a pair controls the cart that starts on the left. As for the buttons on the walls, the ones on top control the cart that starts on the right and the bottom wall buttons control the cart that starts on the left. Confused yet? There's not really anything you can do that is permanent, so just mess around with them and you'll figure out what each one does.
The goal here is to get the cart on the left to hit the dynamite-like switch in the lower left corner. Once you do this, you'll need to steer the second cart into the out-of-the-way alcove that this switch opened in the upper left corner. To do this neat little maneuver, you will need to step on the bottom right button then jump up and shoot a web at the switch on the wall to make the cart move right while it is in the process of moving down. Check the picture on the right to see what you are going for.
When they are in this position, jump up and to the right out of the control room using the little black stump as a stepstool. It helps to be facing to the left when you jump. When you get up to the next screen, shoot webs up and to the right to move in that direction. It may take a couple of tries, but it is possible. Make your way down to the cart on the bottom, steering clear of the shimmering orange rocks that will hurt you if you touch them. When you're standing on the bottom cart, shoot a web to the right and hit the blue switch to open the door below you.
When it is open, crawl back up to the control room and move the first cart up, then back down to open the alcove where the first one is stored. If it is already open, cool, you can ignore that last part. Move the first car all the way to the left (don't worry, it won't exit the screen) and all the way down. Bring the second cart down and make it stop under the second or third floating shimmering orange rock in the bottom right and bring it all the way down. Both carts should now be in the bottom right chamber on the ground. You'll use these as platforms to stay off the harmful ground.
Crawl back down to the bottom, sticking to the ceiling and walls where you can. When you reach the bottom right chamber, leap onto the nearest cart. From here, jump and sling a web on one of the shimmering orange rocks. Try to land on the second cart if you can. If you miss, it doesn't hurt you that much, just make sure you get off the ground as soon as possible. Jump onto the ceiling from the second cart and crawl into the next room.
The Illusionary Mineshaft[edit]
Through the doorway is yet another puzzle room, only this one cheats because a good few of the walls are fake. Hit the switch below you to open the way to the switch above you. Hit the switch second from the bottom on the far left to open accessibility to 2 more switches. Hit the upper right one of the ones available and go up through the new opening in the top left corner. Make sure not to hit the switch directly under the opening in the top left corner or the opening will close and you'll have to find your way to the switch in the very top right corner to get it back open.
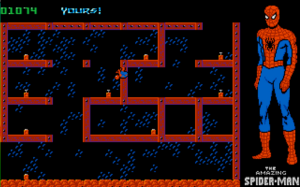
When you've reached the "Behind Bars" screen, hit the blue switch on the wall to open the gate in the ceiling. Crawl through the opening and hit the switch on the cactus to remove the power lines. Then hit the third switch where the lower Annie Oakley is patrolling. When you hit it, it should remove a barrier on top so Annie Oakley now walks in the blue part. When you've done that, jump back down the way you came and hit the switch directly under the opening. After you hit this switch, you want to hit the bottom center switch. What's that you say? It's completely blocked in? Well actually, if you crawl in from the bottom, you will find that it has actually been accessible to you this whole time. Crawl in there and hit the switch. The location of the boards will change again. This configuration should have a single red square in the upper leftish region. This configuration gives you access to the upper right corner. Though it looks blocked off, one of the boards is an illusion (see the screenshot to the right). Being careful not to hit any other switches, crawl through the illusionary board and up through the top right opening.
Back in "Behind Bars", you will surface where two more guys are at a bar. Ignore them for now. Hit the blue button on the wall and watch what it does. Hit the button until Annie Oakley drops down onto the bottom red beam. Shoot her with a web, then drop down and hit the blue button again. She'll get squished up against the wall and take damage. If she frees up before she takes enough damage, hit her with a web and do it again. After the second or third time doing this, she will disappear. When she's out of the way, hit the switch again until the two red beams are on the right side. Before you exit this side, hit both of the drinking cowbows here so that their heads are facing down. When they are, jump back down and hit the switch under this opening. The top opening will switch. Crawl back through the illusionary barrier and up into the left opening in the ceiling.
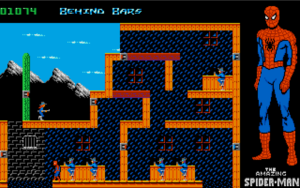
Crawl back up to where Annie Oakley was and drop down to the lower red beam. This next part is a little tricky and might take a couple of tries. If you mess it up, just go down to the mineshaft below, hit the switch, come up the other side and reset it. What you're trying to do is hit the left switch on top (the one the platform usually hits), then crawl down under the platform before it moves all the way to the left. It is probably the best to jump up from the orange part just in front of the platform and hit the switch on the way down. You'll land on the platform, but you should be able to make it under taking a little bit of damage. Don't worry, you won't get trapped down there when you make it. Once you get down to the other two guys sitting at the bar, the switch on the wall will open up a passage so you can get out no problem. Hit the guy on the left on the head to make him look down, while letting the other one look up. Before you leave this area, make sure that the cowboys sitting at the bar switches look identical to the screenshot shown. If they are, great, you are 99% done with this level.
Crawl back through the mine shaft and mine, back through Cactusville and Vulture Gulch to the first screen. Make sure that both cowboys sitting in Vulture Gulch are looking up. If you did it correctly, the way through to the top should be open (make sure the cowboy here is looking down as well). If the way isn't open, then go back and make sure that all the cowboys are looking the correct direction. The two in Vulture Gulch should be looking up. The top one in Behind Bars should be looking up. Both cowboys in the bottom right of Behind Bars should be looking down. At the bottom left bar of Behind Bars, the left cowboy should be looking down and the right cowboy should be looking up. If the passageway is open, however, congratulations on getting through another Take. You're one step closer to catching Mysterio and getting back with MJ.
