Breaching the Castle[edit]

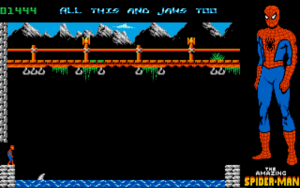
Heal up and close the movie clacker to open the way into the next level. Beyond the opening in a rather large moat which you will have to cross in order to get into the castle. There's a perfectly good bridge above you, but you can't access it so we'll have to cross the water another way. Thank goodness you're spider-man. Sling a web up and swing across the gap into the next screen. Near the top of the wall, there is a red switch that opens a gap in the bridge. Unfortunately, the gap is at the other end of the bridge. So swing back across to the left side of the moat. Actually, you could probably just jump across. You'll take massive damage, but you'll be passing by the healing room anyway.
On the other side, climb the left wall to access the bridge. Be careful as you cross; however, because the bridge will collapse in two places. If you look at the underside of the bridge, you will see hooks and moss hanging down as well as places where it looks like somebody took a bunch of bites out of the bridge. These "bitten" parts will collapse as you touch them. To get across, you'll have to jump and desperately sling webs. If you fall, it's no big deal since the healing room is literally right next door.
Crossing the bridge will bring you into the first room of the castle. Hit the orange button on the ceiling to open a hole in the floor. Drop down and hit the red switch again. While the chest in the bottom is in motion, swing past the mummy and down to the bottom floor. Jump over the moving chest and crawl through the hole in the bottom right corner.
Puzzle Room[edit]

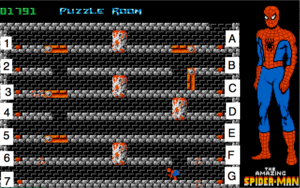
Ah, the puzzle room. A standard part of any medieval castle. This room can be annoying if you don't know what you're doing. Each of the orange buttons on the ground move a different set of pillars and trapdoors. In lieu of a written walkthrough, which could get confusing quickly, here is a list of the order you need to hit buttons in. Each of the buttons are labeled. The buttons on the left are marked with a number and the buttons on the right are marked with a letter (see the picture on the right). Make sure you have the correct button before you walk over it because if you stray from the list, it will be of no use to you. By that, I mean that leaving the room and coming back doesn't reset the puzzle. Good luck, I'll see you on the other side.
| 7 | G | 6 | D | 4 | 6 | F | G | G | E | G | F | 6 | C | C | G | D | G | F | F | 6 | 6 | 1 | B | B | 5 | 5 |
Inside the Castle[edit]
Above the puzzle room is the pits of fire. Here, you'll get tested on your swinging skills. The fire at the bottom is probably the most damaging thing you will encounter in the game. That being said, this part is relatively easy, strategy-wise, but hard to actually do. Swing across and hit twice to sling another web at the peak of each swing. There's no ground to land on, so stick to the walls. The opening through the top leads to the torture chamber.

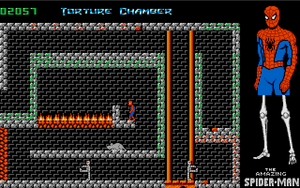
Hopefully you didn't get too severely hurt traversing the fiery pits. Hit the button at the bottom of the slimy-walled pit to close the door to the fire room. When the door has become a solid wall, stand with one square between you and the right wall facing left. Shoot a web up and climb it all the way to the top. Near the top, hold to stick to the closed door once the web automatically cuts itself. From here, jump to the left onto the orange lift.
The lift will take you down and release the mummy. Go to the left before it can catch you and climb up to where the rat is roaming around. It's better to brave the rat than to walk on the ceiling under the fire, especially since you're so close to the next Take. Hit the middle of the three orange buttons over the rat on the far side of the fire to open a door on the left wall into the next room. Jump up to the platform above the rat.
Watch what happens to the far wall as mummies walk over the button on the bottom. It changes from chains, easily passable, to a slime wall, which will drop you into the fire. Time your jump accordingly so you go through the opening while it is in its chains phase, then crawl through the opening to Take 6, the final level.
