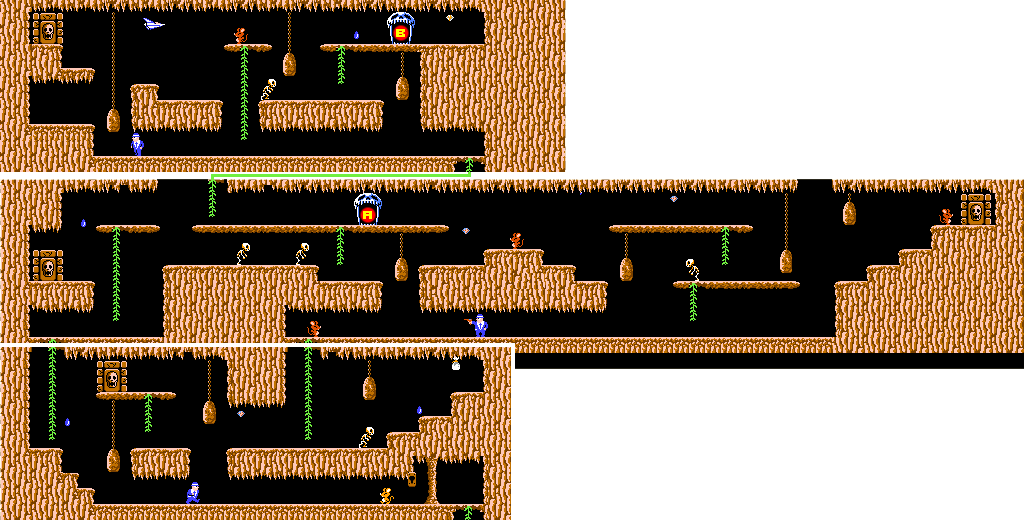
One-Eyed Willie didn't think anyone would make it this far, but he made sure that no one would make it any farther. Many huge boulders line the ceilings, wrapped in strong vines and connected to a booby-trap system designed to squash any unwitting intruder that happens this way. Steer clear of them when they fall to the ground.
Maps[edit]
Part A[edit]
Part B[edit]
Part C[edit]
Walkthrough[edit]
The approach to Stage 4 is very similar to the approach used in Stage 3. It is best to work your way to the top before heading back down to the bottom. Large boulders drop from the ceiling with regular timing, so they are easy to dodge once you watch them for a while and get the rhythm. Most of them drop twice in a row before taking a small break. In addition, skeletons join the fray, so watch out for the bones they throw. The other threat to your health is the drops of water that fall from the ceiling, but if you collected the Raincoat from Stage 2, then you have little to worry about.
You'll start off on the right side of the middle level of part A. Head to the right first and open the door in the dead end. Then return to the left, and stay towards the top. When you reach skull mouth A, pass through it to visit part B. In part B, there is a skull door all the way to the right, and another all the way to left. Try to remain above the floor and open them in any order that you choose, then return to part A.
Once back in part A, climb up the vine to the top section. Climb up the vine off the floor, and head to the left to open the skull door. Then return to the right, and pass through skull mouth B to reach part C. In there, open the skull door at the bottom right, then make your way all the way to the left. Open the skull door by the water. After you do that, there is an important item to search for on the other side of the platform that hovers above the water. Return to skull mouth B and go back to part A.
Now work your way to the vine that leads you back to the middle layer of part A. Head to the far left to open the skull door waiting there. Now, instead of climbing down the vine below you to reach the lower level, cross back over to the right. Carefully drop down the gap below skull mouth A, and run to the left to climb down the vine you find there. In the lower section, another incredibly useful item can be found to the right. If you found three keys and the captured Goonie, you can ignore the remaining skull door and proceed to the exit. Otherwise, or if you're just curious, jump across the gap to the left of the vine you climbed down when the boulder is on its way up, and climb up the next vine to open the door.
Items[edit]
The two items that you find here are very useful. It's a shame you don't find them until this late in the game. One will protect you from a number of attacks, and the other will double your bomb carrying capacity. Another hidden character makes an appearance on this stage, but it is incredibly hard to capture.
Backpack[edit]

The backpack can really cut down on the time it takes you to clear the remaining stages. It allows you to store up to two bombs at a time instead of only being able to hold on to one. So you don't necessarily have to go searching for another bomb every time you destroy a skull door. Of course, you'll have to continue searching for bombs, but you can do it more leisurely.
Armor[edit]

The Armor grants protection against of lot of things that the flamesuit, raincoat, and helmet can not. The armor makes you invincible to the bullets that the gun-toting Fratelli brother shoots, the most deadly attack in the game. It also helps you avoid the bones and skulls that skeletons throw at you, and makes bats completely harmless. Don't miss this one.
Vic Viper[edit]

The famous Vic Viper from the Gradius series can be found in this stage, but it is far easier to make appear than it is to collect. To make it appear, stand just to the left of the middle of three falling boulders that occupy the top portion of part A. Enter the input necessary to make hidden items appear, and the Vic Viper will appear, flying from left to right. The problem is, it will only fly along for a short period of time before disappearing. The instant you make it appear, you must immediately run to the right and climb up the nearby vine and jump to the left to collect it. If especially helps if you scroll the screen to the right first before running back to the left of the boulder. If you miss it, you will still collect 1000 points for making it appear, but if you manage to catch it, you will earn 5000 points instead.


