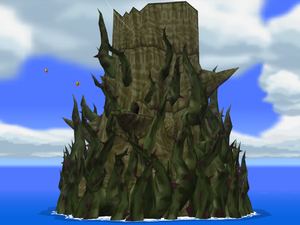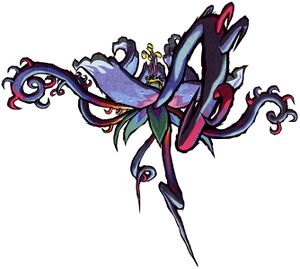
As soon as you enter, you should notice a strange plant on the door. It will keep you from opening it, so you need to destroy it first. For the moment, be careful, because several Green ChuChus inhabit this part of the woods. If you want the Dungeon Map, go up the path on the right to find the chest. For a treat, kill Green ChuChus to get Chu jelly. Now it's time to tackle the door. Go to the left and you'll find a Deku Nut on a stump in the grass. Pick it up and then go to the door and throw it at the plant. The Deku Nut is strong enough to kill the plant and will let you move on.
The next room requires your Deku Leaf. Jump into the nearby Boko Bud, and as soon as it spits you out, use the Deku Leaf to fly to the stump in the middle of the room. Drop into the bud and fly to the higher stump with a Boko Bud nearby. Keep launching yourself into the air and head for the higher Boko Buds on the other stumps with the Deku Leaf (It takes a bit of searching and correct positioning to reach them). Keep aware of the thorny vines in the room because they may interfere. Eventually, you'll reach the top and find a door with another plant on it. Head right and kill the Green ChuChus, and then you'll see a Bomb Flower. Pluck it and throw it at the plant to make it blow up and open the door.
In the third room, you will be greeted by a trolley. Hop onto it, and on your left and right are switches. Take your Deku Leaf and blow a gust of wind at either so it turns clockwise to make the trolley move forward and you can proceed on. In the following room, you will encounter several Peahats and Boko Babas. With your Deku Leaf, blow the Peahats out of the air to attack them, then use it to stun the Boko Babas, and kill them with your Grappling Hook. After they're gone, you can grab a few green Rupees and hop in the flower one resided in to reach another bud and then a door with a third plant. There is a switch here that you can blow counterclockwise to make a trolley come up to you. Blow it and the proceeding switch clockwise to travel to another Deku Nut behind a boarded-up alcove. Smash away the board with your sword, grab the nut, lay it on the trolley, and then take your Deku Leaf and blow the switches counterclockwise to take you back to the door. Finally, toss the Deku Nut into the plant to head forward.
The narrow passage you'll enter seems quiet, but only for now. There are several thorny vines that spring up as you cross the corridor. In the middle is a Baba Seed. Blow a gust of wind with the Deku Leaf at it to knock it to the door, the run up the far left of the corridor to avoid the vines. Take the bud and kill the plant to reach the main area of the woods.
The first thing you need to do here is head up the path on you right and climb up to a platform to reach a branch above you with the Grappling Hook, then swing to the next one. Here, there are two strange plants that you can use as platforms. Either wait for them to get near, or use the Deku Leaf to reach them and find a Deku Nut next to a locked door. Grab it and hop over to the big plant (which holds a few Rupees inside) and then head right to reach a door and kill the plant.
In the next room, you will find swarms of Morths waiting in the shrubs above. They like to latch onto you, but a few spin attacks will kill them. After they're gone, you can get a Yellow Rupee out of a chest below and proceed safely onward. When you reach the room ahead, you must navigate your way through several thorny vines to find a Bomb Flower. You can use it to blow open an alcove nearby to find the chest with the Compass. Now, take the Bomb Flower and throw it at the other boarded-up alcove to blow it open without getting attacked by vines. Then, make your way through the horde of them carefully to it. Inside is a chest with a Small Key. Backtrack to the main room with the aid of the Boko Buds. As you head back, there will be more Morths and now Green ChuChus to deal with. When you reach the main room, open the locked door you saw earlier.
In here are several Peahats and another trolley. Use the switches to travel across the pool below. Be warned: things get a lot harder if you mess up because it takes awhile to get back up to the trolley. When you cross to the next room, kill the Boko Babas to reveal their flowers, and then you will have to deal with a Mothula. This beastly insect can spawn Morths, so be careful when killing it. Make your way up with the Boko Buds and Deku Leaf, but be wary of the Peahats. Travel across the leaf canopy to find another bud to hop into to head higher up. Open the door to face the mini-boss.
Miniboss: Winged Mothula[edit]

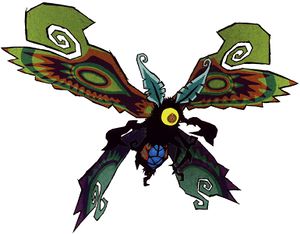
As soon as Link enters the room, he notices colorful specks of pollen coming from above. When he looks up, he sees they are coming off of a pair of glowing wings. However, they belong to a giant insect that springs off the wall! It is a winged Mothula, the mini-boss of the woods.
This Mothula is simply a tougher version of the Mothula you encountered before, however, it sports a set of wings. As it flies around, it will spawn Morths to slow you down, then come in for the kill. To stop this insect from doing that, simply blow wind gusts at him with the Deku Leaf to knock it out of the air, then swing your sword to clip its wings. Once it loses them, it becomes wingless and more aggressive on the ground, spawning more Morths. Fight your way through them and finish off Mothula to unlock a new treasure chest. Inside is the Boomerang.
New Item: Boomerang[edit]

With the Boomerang, you can reach enemies from a distance and target up to five things at once, which really helps here in the woods. Equip it, and then target the two switches above the door. Throw it so it triggers them and opens the door so you can get out. Now that you have the Boomerang, you can quickly dispose of the Peahats and you can kill the plants on the doors with it. At the moment, there is a treasure in this room sitting a high alcove high. Look up to the right for a pole when you come back in here and then use the Grappling Hook on it. Stop and climb up the grappling hook onto the pole and look up again for another one. Use your grappling hook on the 2nd pole and swing over and drop onto the platform. Look around for a vertical moving plant and then jump on it. Jump on another moving plant and then finally, jump on the ledge up there with some trees and a chest. Chop down the trees with your sword and then open the chest behind it to find a Joy Pendant inside. Go back down to the leafy canopy where you were on and search for a door with two plants on it, which you can kill with the Boomerang.
The next room makes use of your Boomerang, because you need to clear a path through the nuts hanging from above. Take them out until you have plenty of room to glide forward to the door on the other side. Don't go in yet: there is a chest on the left with a Joy Pendant inside.
You will find yourself back in the main room, but higher up to where you can see several vines holding the giant flower plant up. Sever them to make it fall through the floor into the water below, which will create a path you can follow. Jump down the hole it created onto the flower and enter the next room.
In here is a Peahat and many Morths. Take the Boomerang and kill them, then cross the platforms the Morths covered to the other side to find another room, while avoiding the ChuChus and tentacles that pop out.
The room you head into has a flower in the middle, which, for the moment, serves as a platform to a chest with Rupees inside. Once you get them, take the Boomerang and cut the flower down from its vines to the water below, then jump onto it. Watch out for the Octorok when you land.
If you want to pick up another Treasure Chart, to the left of the you is a ledge with a Bomb Flower. Pluck it and throw it at the boarded-up corridor on the right, which reveals a door. Head through that door to the next room.
Treasure Chart Room[edit]
As soon as you make your way into the room, you will find it occupied by several Peahats, a few Morths, and Boko Babas. Go across the platform in front of you to the big tree stump in the middle of the room, and then cross the ones off to the right. Make sure to kill all the Morths and the Boko Baba along the way to proceed. Jump into the Boko Bud and then ride your Deku Leaf up onto the tree ledge above, and then trigger the trolley over to you with the switches by use of a gust from the Deku Leaf once more. Once you use the switches to reach the other side, there will be a Bomb Flower you can pluck. Once you have it, jump onto the trolley and throw it into the center of the tree stump from where you are. The resulting blast will blow open the top of the stump, and you can jump down inside it. In the stump is a chest with a Treasure Chart. Once you have the chart, go through the crawlspace behind the chest to get out of the stump, and head back to the previous room.
If you are ready to move on from here, make sure you're on the flower and have killed the Octorok, because now the flower will serve as a raft. Stand on it facing the wall behind you and use your Deku Leaf to push the flower downstream with gusts of wind. As you head further downstream, you will encounter two more Octoroks you need to kill. After you kill them, guide the flower around the corner and you'll reach a ledge you can hop onto. Head for the door straight ahead, and watch out for Tailsparan coming at you.
Big Key Room[edit]
When you enter this room, several thorny vines will block the door. In here are several switches you have to hit with the Boomerang. To reach them, head up the ledge near the barred alcove and run up to the top. Up here, you can easily trigger all five switches at once, which will open up the alcove, revealing the chest with the Big Key. However, the moment you get the key, two Kargoroks will drop a couple of Moblins into the room you'll have to defeat. Once you kill both of them, a door at the top of the room will open. In order to reach it, go back up to the top of the tree stump and get out the Grappling Hook. Above you is a branch you can latch onto and use to swing over to the door. This will lead you back to the room you saw the Morths, Peahats and ChuChus before, except all you have to do is head out the door on your right to take you back to the main room.
The moment you enter the main room, hop onto the giant flower. Near it is a switch. Blow a wind gust with the Deku Leaf to get it spinning, which will make a huge updraft of wind come up from below. Ride up on it with the Deku Leaf until it takes you up to the room above. There, land and target the two plants on the door in this room with the Boomerang to kill them. Head through that door and you will encounter two more Mothula you must kill. When both are defeated, the path ahead will open up, and a chest will appear. It has a Joy Pendant inside. From here, simply head on forward and you will finally reach the boss. Here, you can smash a pot open to find a Boko Stick, and light it with a torch and burn open a warping jar in the room. You can also catch a few fairies, and then you'll be ready to face the boss.
Boss: Kalle Demos[edit]
Once you head into the boss room, you'll find Makar at last. However, there isn't time to celebrate, because a hungry plant comes up and gobbles him! Apparently, it also sees YOU as a tasty morsel, so it attacks!

This nasty overgrown plant is Kalle Demos, the Forbidden Woods boss. He is a major reason why the Forbidden Woods are true to their name, and now you have to tangle with him!
As soon as the battle begins, Kalle Demos will transform and latch himself to the ceiling above, all the while going after you with several tentacles. Make sure you dodge his attacks, and then you can go after him. Above, the vines he uses to stay up are weak enough to be severed with the Boomerang. Take them out one by one. You can only cut five at once, which makes it hard to get them cut quickly. Once they're all severed, Kalle Demos will fall back down and open up, revealing his vulnerable head. Attack as many times as you can, then make a run for it. Otherwise, Kalle Demos will close back up and spit you out, causing a heart of damage. After you get a few attacks in, Kalle Demos will be more aggressive and try to slap you with his all his tentacles at once, which will really injure you. His worst attack is when he burrows his vines into the ground, because they'll come out thrashing. Once you get Kalle Demos knocked down again, you can attack him enough to finish him.
After enough hits, you'll sever Kalle Demos's head. The creature will try to breathe, but without a body, it dies, spitting up Makar and a Heart Container. The body will die as well, making a warp appear. You'll receive Makar's thanks, and then he'll realize he's late for the Korok's ceremony. Grab the Heart Container, and then both you and Makar can warp out of the Forbidden Woods.
When you return to the Great Deku Tree, he will thank you for saving Makar with Farore's Pearl, and the ceremony will begin. Makar shows his thanks to you by playing his cello harder than normal, and causes the Deku Tree to produce an abundance of seeds. Each of the Koroks fly off, carrying the seeds off to a place where they can grow and restore the land.