| A | |
|---|---|
| B | |
| C | |
| D | 
|
| E | |
| F | 
|


|

|

|

|

|
| Eyemon | Spajyan | Nishiga | Nyuru | Hop Egg |
|---|

|

|

|
| Nigito | Suneisa | Joyraima |
|---|
Narrow pathways[edit]
Compared to the absence of warp doors in the last stage, this stage has an abundance of them, and a couple of them are one-way trips. And since you won't find any springs for a while, you're going to want to preserve your health as much as possible. It will take some time before you reach the boss. Smaller enemies fill the narrow passages. Since they are the weaker enemies, take your time and defeat them instead of trying to crash through them. Be very careful around the boss-class enemies and the Nyurus. The boss-class enemies occupy the higher portions of the stages.
Recommended route[edit]
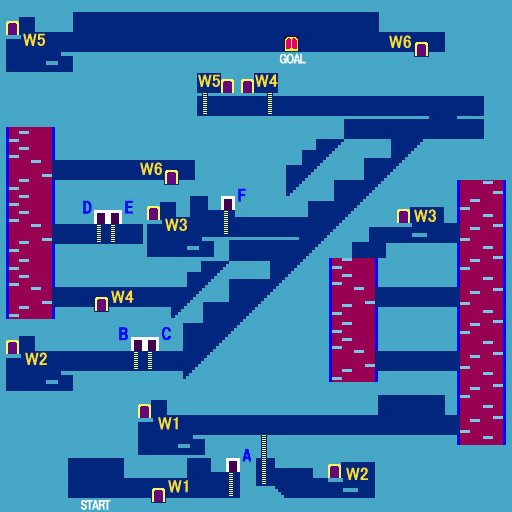
Because a number of warps are one-way only, you'll want to be careful when approaching a warp. For example, right when you begin, you'll have an opportunity to collect the first Smasher weapon on the other side of warp door W1. However, if you hit W1 on your way to door A, you will lose the chance to collect it since you can't return. So hop over W1 and be sure to collect the Smasher before you return to the warp.
After you warp, drop down to the floor below, and continue right until you reach the ladder. Climb down and head over to warp door W2. Enter it and proceed right to doors B and C. Nyurus may begin to appear at this point. Collect the Magic Bomb from door B and the life extending Jar from door C. Be careful of the Spajyans while climbing back down to the floor. From door C, continue right and begin ascending the flight of steps. Your next goal is door F which happens to be the boss room (see below.)
After you defeat the boss, there are a couple of paths you can take. You will want to visit doors D and E, and that will involve using warp doors W4 and W6. Using W4 to arrive below D and E is quite fast, but it is also quite dangerous, as climbing up the Nyuru-filled shaft is much more difficult to do than dropping down, and preserving your health should be the bigger priority. If you have a lot of MP, you can counter the Nyurus with Flash. However, it might be easier to go the longer route by using W5 to arrive at the top level, cross all the way to the right, jumping over the goal so that you don't leave the stage too early. This method is not without its dangers either.
Boss-class enemies occupy the top floor. If you are brave, you can run across the floor and jump over each boss as you encounter them, or you can use a safer method to avoid them. The enemies closest to W5 on the left are the slow moving Nigitos. If you run to the right and get a Nigito to appear behind you, you can keep the Nigito on the screen and no other enemy will appear in front of you. If you keep the Nigito behind you the entire way (don't forget to leap over the exit), you can reach W6, and use it to arrive above D and E. This way, you can drop down to D and E, collect their contents (a Jar and a Magic Book), and drop down to W4. (Watch out for the Suneisa that occupies the level with the two doors.) Once you take W4, you will then take W5 back to the top level again and walk to the stage goal door and move on, allowing a Nigito to trail you once again if you're not confident about jumping over the enemies.
Boss: Bunyon[edit]

|
HP: 1610 (Large)
|
Power: 350 (Large)
|
The boss from the 8th Stage returns, only he's got a new trick up his sleeve. This time, when he runs out of hit points, he will divide into four medium Bunyons, and each medium Bunyon will divide again into four small Bunyons. There are a couple of strategies that you can employ against this Bunyon. One way is to use your Flame Sword on it until it breaks into four pieces, and then use up Flash on the smaller parts until you run out of MP and switch back to the Flame Sword.
Another method is to attract the Bunyon, and bring it back to the entrance doorway. From here you have two choices. You can either climb up the ladder, stand in the doorway and detonate Magic Bombs until the Bunyon breaks apart, and the smaller Bunyons are defeated. Another more daring method is to stand in the far corner and wait. You may notice that the large Bunyon has trouble following you into the crevice, so you can safely stand there and hit it with your Flame Sword. Once it breaks apart, squat down and continue; even the Medium Bunyons will have trouble getting to you for a while. If you're fast enough, you can defeat everything before they can do much damage to Lucia.