| A | 
|
|---|---|
| B | |
| C | Nothing |
| D | |
| E | 
|


|

|

|

|

|
| Nishiga | Eyemon | Nyuru | Spajyan | Hop Egg |
|---|

|

|

|
| Suneisa | Nigito | Joyraima |
|---|
The most challenging stage[edit]
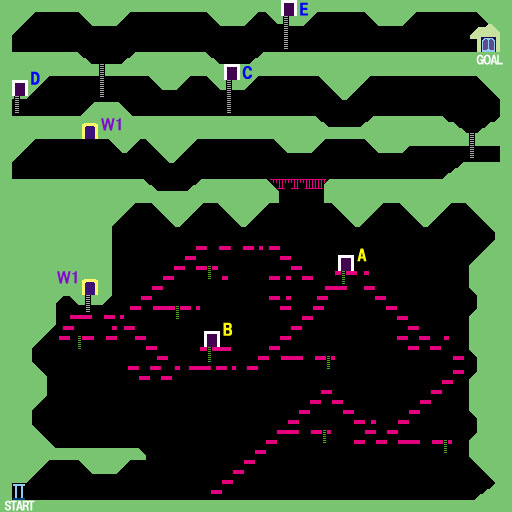
With so few opportunities to replenish your health, this may very well be the most difficult stage to survive. Nyurus will fly throughout the cavernous expanse in which you much climb a staircase made of small platforms. They can either be your saviors or your defeat. If you are not patient enough, they will sap your remaining health. If you wait around and slash enough of them, you may earn red potions which will heal you. However, this process can be very tedious. The most important thing is not to advance up the platforms unless it is absolutely safe to do so. You can't outrun the Nyuru, but you can keep them at your back if you're fast enough. Watch out for Nyurus that appear from below. Even if you're squatting, these can still hit you.
Recommended route[edit]
There is only one warp door in the entire stage, and to reach it, you'll first have to hop along numerous small platforms which are guarded by the Nyuru. Before you reach these platforms, you'll have to walk to the right along the floor, which is occupied by Suneisas. Jump over them as they approach until you reach the platforms. If a Suneisa is stuck on a platform scroll them off the screen and return to remove them.
As you begin climbing the platforms, the Nyuru will begin to appear, along with some other enemies. It is especially important to stop and deal with the Nyurus as you climb in order to hold on to your precious health. You'll want to follow the platforms to the right, first climbing, then dropping, then climbing again until you reach the right wall. Then you will continue climbing to the left until reach door A, which contains an MP boosting Magic Book. You must especially careful of the Nigito that like to hang around door A, not so much because of their power, but because of the fireballs that they throw which can knock you off the platforms and down to the floor below.
From door A, continue to the left. You can choose between the high road and the low road. Not only is the low road easier to take, it's also the direction of the next door. Behind door B, you will finally find the second Bound Ball, a useful upgrade. Exit the door and proceed left, eventually climbing upward again towards warp door W1. Enter the warp, and start running to the right. Don't hang around too long or a Joyraima may appear. Minor enemies will attack you along the way, and don't forget to stop and take care of the Nyurus if they get in your way. Continue to the bridge, and be very careful to pay attention to which bridge planks have rope connected to them. You will fall through any other plank. Beyond the bridge, you will face Spajyans and Hop Eggs until reach the bridge. If you have to get hit by one or the other, definitely hit the Spajyans.
Climb up the ladder and proceed to the left. This next level is a little less occupied than the previous one. Have your Flame Sword ready so that when you encounter the Hop Eggs that hang around door C (which contains nothing), you can kill them in one attack. Walk all the way to the left end by door D and enter it to collect a precious health restoring Apple. Then return to the right and climb up the first ladder. Now comes a very difficult section. The platform to the left will typically contain challenging Nigitos, but there is a way to prevent this if you are willing to allow the screen to become flooded with Nyurus and Nishigas. Doing this will stop the Nigitos just long enough for you to pass through that section and arrive safely at door E, which contains the stage boss. From here, it is a simple walk to the right to reach the goal, but you'll have to survive an encounter with the incredibly strong Byforce first.
Boss: Byforce[edit]

|
| HP: 2560 Power: 800 |
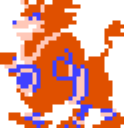
The Byforce is not to be taken lightly, but by the time you reach him, you're nothing to underestimate either. With a full strength Flame Sword or your Flash weapon, you can do this enemy in rather quickly. It's all about knowing how he moves, avoiding getting hit, and keeping him on the screen.
If you use the Flame Sword, you'll have to stay much closer to him, so knowing how he moves is more important. When Byforce first appears, he rushes at you with a burst of speed. If you don't retreat, he will hit you and take away 800 HP. Back off a little and stay out of his reach. As soon as his rush is finished, he actually backs up a little bit. This is when it becomes easy to scroll him off the screen accidentally. You'll need to move back with him to keep him there. Once he retreats, he throw fireballs at you for a while before rushing again. As soon as he starts to retreat, nail him with the Flame Sword.
When Byforce is roughly half way through his HP, the lower portion of his body will disappear, and the torso will begin floating around. Byforce becomes much more dangerous at this point because there is nothing to stop him. He is also a bit slower, and thus easier to avoid. Keep flailing your Flame Sword at him from a safe distance, and he will actually be defeated in three or four more hits. Of course, if you have 2500 in spare MP, you can just use Flash from a safe distance, and Byforce will go down in five Flashes.