| A | 
|
|---|---|
| B | |
| C | 
|
| D | |
| E | 
|

| |
 |

|

|

|

|

| ||
| Nipata | Dopipu | Kikura | Nomaji | Fire | Mantle Skull |
|---|
A tricky bridge[edit]
The ability to traverse the suspension bridges depends not only on the presence of wooden planks along the bottom, but also the presence of ropes that hang down from the top. Even if you attempt to stand on a solid platform, you will fall through to the bottom if there is no rope connecting it to the lines above. You will also begin to encounter Fires in this stage. Although they move slowly, they should be avoided at all costs, as they are capable of inflicting as much damage to Lucia as Hop Eggs. Squatting down and swinging the Flame Sword is an effective method of removing them. This is also the first stage in which a Spring of Strength can be found, and it should be your first destination.
Recommended route[edit]
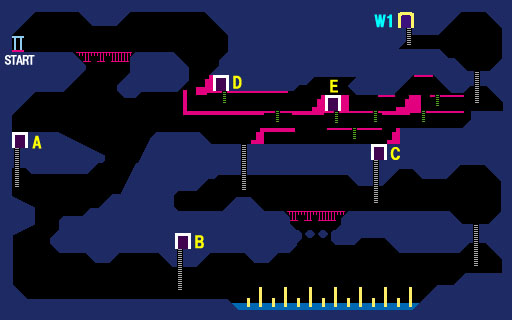
Your first goal with be the Spring of Strength in door A. Don't worry about trying to successfully navigate the suspension bridge, and allow yourself to fall through it. Wind your way to the right as you fall, and double back to the left in order to reach the ladder to door A. Of course, if you're already at maximum health, entering the door and visiting the spring will have no benefit. Otherwise, head inside and refuel your strength.
From door A, drop down to the bottom floor and continue right until you reach the ladder to door B. Be sure to enter this door and collect the third set of boots inside. You will now be able to run at maximum speed and jump the highest. Continue along the bottom to the right until you reach the ladder at the far right. Climb up and continue to the left. Before you cross the bridge, you can climb up to door C and collect a Scroll if you consumed a large amount of MP using your Flame Sword. Back outside, you will have to make it across the broken bridge, but with the third set of boots, your speed and jumping ability should enable you to jump over a majority of it, and pass with ease. Climb up the ladder on the other side.
Once you reach the top, make your way back to door D in order to pick up your second magic weapon, the first Magic Bomb. You won't need this weapon to beat the boss on this stage, but it will certainly come in handy in the future. Once you have it, return to the right and drop down a level in order to reach the boss inside door E. Many Nomajis can be found hopping around this area, so approach carefully, and remove the ones that get in your way.
Boss: Suneisa[edit]

|
| HP: 1290 Power: 400 |
The half woman, half snake Suneisa serves as the boss of this stage. It travels straight towards Lucia at a fast pace, although it is not capable of tossing fireballs at her. If you jump over it, it will continue on off the screen. You can safely fight it from a distance using the Flame Sword, and unlike the Nigita from the previous stage, the Suneisa does stop when it gets hit. Compared to the Nigita, this boss is much easier, even though it has more health. Never the less, be very careful to avoid collision with the Suneisa at all costs.
Once the Suneisa is defeated and the Ball is collected, return outside, and continue running to the right. Climb up the far ladder and enter warp door W1. This leads outside to a very small stage that leads immediately to warp door W2. W2 leads immediately to the stage's goal door.