Mission Objectives[edit]
- Main Quest - The Sunwell
- Defeat the Sunwell's Guardians.
- Optional Quest - Sylvanas Windrunner
- Destroy Sylvanas' base.
- Optional Quest - Silvermoon Runners
- Eliminate every runner Sylvanas sends.
- Do not alert Silvermoon to your presence.
Starting units[edit]
This is the first mission in the Undead campaign, and perhaps the entire linked campaign, that presents a significant challenge. You will need to ramp up your play.
For this mission you will start with 3 Crypt Fiends, 1 Necromancer, 5 Acolytes harvesting gold from a Haunted Gold Mine, 2 Ghouls chopping wood, and Arthas.
Build up your base[edit]
Save the game as soon as the cutscene ends, because you will want to restart this one several times right at the beginning, until you figure out what's going on.
Start by assigning a control group to your Crypt Fiends (and perhaps your other units), move your Necromancer to the Graveyard, and pull one Acolyte off gold. By the time you figure out that you will want to build a Temple and a Slaughterhouse, you will be attacked by Sylvanas, although you might have been able to explore your base a bit. Run Arthas and your Crypt Fiends over there immediately, otherwise you will start to lose buildings.
After the first fight is over, build one more Spirit Tower at that location, and then one more at the SW entrance to your base. It will shortly be obvious that the south entrance to your base does not need to be defended. Start researching.

You won't have done much more than start a few of these processes before Sylvanas starts sending runners to appeal for reinforcements. Because it is a game quest that you have to stop all of them, you will stop all of them. FAILURE IS NOT AN OPTION. Aside from the humiliation, bad things will happen to you if you let one get through. You are given 4 Gargoyles at this time, and you can now produce more.
When your 2 new production buildings come online, you should take stock. You will be able to produce Meat Wagons in addition to the types of units you currently have, and you are at 28 food. As you build up, you want to stay in the no-upkeep zone, so you need to design your force carefully. Get one more Gargoyle for scouting, leaving the other 4 dedicated to stopping runners. Get one Meat Wagon and start loading corpses, and get one more Necromancer. You now have only 4 food left. The best choice appears to be another Meat Wagon.
Assign a control group to your Gargoyle interdiction force. Leave them near where they killed the first runner for now. You will note that the second one is already preparing to depart. Just hang around and await developments for now. Of course, keep the research going.
Pretty soon, the second Elven attack arrives; it arrives at the SW entrance to your base. You should be able to deal with this one handily with Arthas and your Crypt Fiends. After this attack, build some strong defenses at that location.
Kill the second runner. You will note that the runners reveal a fair bit of the map for you.
Explore![edit]
Here's where it gets tricky. If you take a relaxed (i.e. lazy) approach to this scenario, you will shortly be in deep trouble. If you are playing the game mainly to watch the scenery, you need to lose that attitude right now. The first thing that you will need to do is explore aggressively with all your scouting assets in the intervals between enemy attacks and runners. Remember that 4 of your Gargoyles are dedicated to the interdiction role, so keep moving them back to their jump-off point as the runner is about to depart. A good location is approximately near the middle of the map, but somewhat to the left.
You will find that there is no source of gold available to you outside your initial base. This should worry you right away, because it is not a big mine. It will become a major concern shortly. You will find that Silvermoon occupies a large island in the south of the map. Silvermoon is heavily defended, and your scouts dare not approach too closely. You will find that there are 4 creep groups on the map. One is fairly tough and just NE of your base. Kill them as soon as you get a chance. One is at the middle of the map. Keep your Gargoyles away from them, because they may have AA capacity. One is fairly weak, but is in the far SE corner of the map, so ignore them till much later. One is at the SW corner of the main landmass, and is too tough to even consider until much later. You will find that there is a pool of mana in the middle of the map. You will use this later. You will find that there is a pool of health in the SE map corner. That's nice, but it's not clear how you can use it. You will find that there is a Goblin Merchant NW of your base. When Arthas checks out the wares, you will find that it has the usual product line, i.e. nothing of any real practical value. (Arthas is already discarding items unused.) The tough creep group guards a mercenary camp. You will be able to sneak Arthas in at night, later on.
You will find that there are 3 exits to Sylvanas' base, and the Elves will use either the SE or the east one to attack you. Since you can only have one rapid reaction force, this presents a serious strategic problem. Here's the problem: you need to deploy your rapid reaction force OUTSIDE your base, so that an enemy attack fixates on them and not your base defenses. Otherwise, you will be losing buildings, especially when the enemy artillery starts arriving, which happens very soon. However, if you defend one approach to your base, your mobile troops will have difficulty getting back to the other side if the attack shows up there instead. You will really need to be on your toes.
One thing you can and should do to help decrease your reaction time when the Elves try something is to toggle the minimap colours back and forth. If you want to see a runner, use the regular mode. If you want to see an enemy attack, use the red/white/orange mode.
You will note that the time between runners starts to get smaller. Eventually, it does stabilize at 2 minutes. Nevertheless, with no new sources of gold available, and constant heavy pressure from the Elves, and considering the possibility that the Elves may have an infinite supply of gold, and considering that new bad things could happen, you must recognize that you cannot simply sit back and defend.

Did we say heavy pressure? In addition to the runners, after the first few Elven attacks, those attacks include about a dozen swordsmen and archers in total, plus some spell-casters, plus either a Ballista or a Hero as powerful as Arthas. This force has the capacity to do some serious damage unless you are very careful.
Did we say that there is no more gold available? Actually, there is a mine; it's just in Sylvanas' base, and is being used by the Elves. Accordingly, you need to start attacking. The sooner you capture that mine, the more gold you will get.
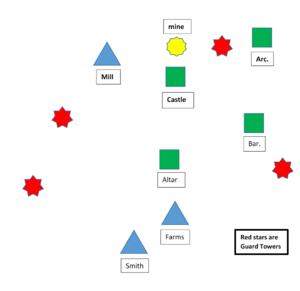
In your scouting, you should have seen that there isn't a huge force defending Sylvanas' base. Essentially, the Elves build up their next attack wave of about 15 units as described above and send it all at you. If you attack Sylvanas' base, the defenders will be that force, in whatever state of readiness it happens to be. There are also 4 Guard Towers (see diagram), plus a Castle, a Barracks, an Altar, a Sanctum, a Mill, a Smith, some Farms, and some Peasants that can become Militia. It’s not a huge force, but it’s quite enough to easily wipe out anything that you might send at your current level of mobilization.
Destroy Sylvanas' base[edit]
Before you attack, you should have got all your upgrades, and your gold mine will likely be exhausted. Now you can go over the zero-upkeep limit without penalty, although you can always stop mining to avoid paying your taxes. Allocate 30 more food or so to new units. It doesn’t really matter what you get, although air units tend to be pretty useless. Go in all at once and raze Sylvanas’ base to the ground. Don't get too attached to your troops, because a bunch of them will die.
Prepare to invade Silvermoon[edit]
This would be a good time to get some R&R and to take stock. As long as you don't provoke them, Silvermoon won't attack you, so you can take as much time as you want. You DID stop all the runners, right?
You should have about 10,000 gold in the bank, and about 15,000 in your undeveloped mine. It seems like this will be plenty to finish the scenario, but that doesn't mean that you should start spending wastefully.
You can now produce Banshees, although they don't get their major spell yet.
If you haven't already done so, wipe out all the creep groups on the map and open every box. There are two good items that can be obtained in this scenario alone. One is Sylvanas' cloak, which gives +4 Agility and Intelligence, and one is a Ring of Regeneration. Arthas should also have a pendant that gives +150 mana and a ring that gives +2 armour. There are several decent choices for the fifth item.

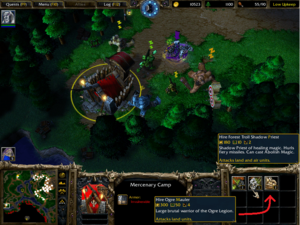
With nothing else to concern you, the creep group near the mercenary camp is not so tough. You should definitely hire some mercenaries. You could even sneak in at night and avoid the nearby creeps, except surprise! your hires can't move past them. Alright then, the verdict is death!
The plain Forest Troll is about as strong as one of your Crypt Fiends, i.e. it offers nothing new but if you need a quick unit it is easier to get one here than to train a crypt fiend. However, the other two are quite useful. Get a bunch of the Forest Troll Shadow Priests for healing and anti-magic. They're not as good as the Elven priests, but are much better than nothing. Get some of the Ogre Maulers as well, because you cannot produce large melee units yet.
Crush Silvermoon[edit]
It is now time to provoke Silvermoon. In the spirit of international cooperation, you may provoke them gently. It doesn't matter. They get very upset, and send a mixed force of about 10 units into your base, including a level 6 Archmage. They will all die there, but they may do some damage. There are several ways to do the provoking. One is to use the 10 Skeletons from the mercenary camp guards. They will all die without doing much damage, but they are free.
Due to the strong defenses in Silvermoon, including the many Towers, none of which can be reached from the shore of the mainland, the best approach is to build up a huge gang of units and just let the hammer fall. A good choice is to build up to population 70, just in case you decide to start mining again. The exact mix doesn't matter, but you want to have a fair number of good units - Crypt Fiends for the air units, artillery for the many Towers, and so forth. Ghouls alone is not a good choice.
You can minimize the effect of Silvermoon's first attack if you can get them to fixate on one of your mobile units, and then drag the attack force through your static defenses. After that, it looks like Silvermoon just gives up.
It turns out that your first big attack will cripple Silvermoon, so anything you do will win, but a cautious approach will have you advance your Spirit Towers right to the NE entrance to Silvermoon before your assault. This assault should carve a big hole in the defense. When the smoke clears, pull back and regroup. You should have made it as far as a Castle, and there should be no further hint of enemy activity. From now on, you will only face remnants and undefended Towers and the final Well guardians. All of this should have cost you no more than 5,000 gold.
Bring up your artillery and start smashing things. Silvermoon has two Castles. Eliminate the first one and you acquire a new gold mine worth 25,000 or so. The other Castle is just being used for wood, so it doesn't matter.
In this mission, you don't have to destroy Silvermoon, but you might as well raze it to the ground, because that way, you know that there will be no side issues when you take on the Well guardians. Take as long as you want, because Silvermoon isn't mining your gold anymore. Resistance is feeble.
The Sunwell guardians[edit]

At the very end, you need to defeat 4 level 9 Granite Golems, supported by 4 Towers. You could just rush them with a bunch of units, but if you prefer to avoid losing units, build 5-10 Spirit Towers around your newest gold mine. The Golems just stand around and ignore you until you tag them. Give Arthas an Anti-magic Shell and go taunt a couple of the Golems. (Granite Golems have a lot of mana, and probably some very nasty spells.) Drag them through your tower line and watch them die. Even with all that firepower, they die rather slowly, and Arthas half-dies, so you can imagine what would happen if you tried to fight them on the open field. Rinse, and repeat. Job's done.
Inventory Juggling[edit]
You can carry six items through to the next mission. Drop an item near the circle of power without activating it, retrieve the item left behind elsewhere, activate the circle and claim the item near the circle in the brief window of time between the urn's disappearance from inventory and mission end.
Arthas has (example): Gloves of Haste, Pendant of Energy, Health Stone, Ring of Regeneration, Hood of Cunning and Scroll of the Beast. This setup gives him 98% attack speed (Gloves, Hood, Unholy Frenzy active), 1.2 armor (Hood), 4.5 health regen on top of normal regen (Unholy Aura, Stone, Ring which is more than Unholy Frenzy drains), 210 mana (Pendant, Hood), 0.2 mana regen (Hood), 30% movement speed (Unholy Aura) and the ability to boost allies attack damage by 25% (Scroll).
Creeps[edit]

There are four groups of neutral units: a couple of Golems to the north of your main base, 4 Gnolls to the south of your main base, 4 Gnolls south of your second base, and 2 Forest Trolls with 3 Ogres by a mercenary camp north of the western part of Silvermoon. The Gnoll Overseer to the south of where Sylvanas had her base drops a potion of greater mana, the Gnoll Overseer to the south of your first base drops a scroll of the beast, and one of the Golems drops a Ring of Regeneration.
Treasures[edit]
- Ring of Regeneration rock golem - north east.
- Scroll of the Beast gnoll overseer - under the main base.
- Potion of Greater Mana gnoll - under the Sylvannas base.
- Hood of Cunning after Sylvannas defeat.