Room 1: Carefully jump over the lava when the lava burst is away, then move right. Ignore the path above.
Room 2: You will encounter the main enemy not found in other stages - Boulder Tossers. They cannot be stunned or slammed that, you can only stomp them while dodging the boulder they throw. Get past the lava burst on the right and proceed. Ignore the Gems out of reach.
Room 3: To the right of second platform above first lava burst, the wall can be broken. Inside you can find a pipe to Bonus Room A under two more blocks. Continue to the right, take out a Bounder Tosser, get past the second lava burst and enter Door B below. Ignore the door on the wall and the ladder going up.
Bonus Room A: First hit the green switch and fall below, then let the Malletape smash you into Spring Wario, then jump. Dodge the green switch, and hit the purple switch right above. Shall you have succeeded, get Spring Wario again, hit the green switch, and take the Big Diamond on the left.
Room B: Jump over the lava pits. You may see a Big Diamond above, but ignore that now. At the third lava burst, there is a pipe to Bonus Room 4. A Boulder Tosser is guarding the first Stone Chest. Jump over another three lava bursts and enter Door C at the right end. You can see the Key Ghost, but ignore him now.
Bonus Room 4: Go down, pick up the old man and use to clear the upper left tunnel. Then move to the left, pick up the old man again and use to hit the switch in the wall. Now move down, walk to the right while dodging lava bursts, and pick up the old man for a third time, and throw him pass the spike to hit the switch on the right. You can finally grab the Big Diamond and leave.
Room C: Beyond the lava burst on the left is Room 5 with treasure. When it is done, move to the right. Clear the Boulder Tossers in the way and reach Door D at the end, then dodge the lava burst and enter.
Room 5: Break the blocks and claim the second Stone Chest. Watch the lava burst on the left carefully, pick a good timing to make a super charge and jump over the lava, reaching the left portion with a Big Diamond, then use the upper path to return.
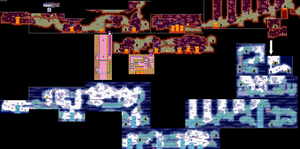
Room D: Break a hole on the left to land on the Frog Switch. Hurry up! Now the "Fiery" cavern becomes "Icy" cavern, and all Boulder Tossers have been replaced with Ice Yetis, as shown on the right. Take out the yeti on the right and enter Door E.
Room E: Beware of falling ice spikes and snow piles. Get to upmost floor and enter Door F. While you can stomp on the left to enter Door H now, it is not suggested to skip the treasure.
Room F: Jump over the platforms on the right, run to the end and go down the ladder to find the third Stone Chest. Then break the block on the right and move in to find a falling snow pile. Use the snow to get Snow Wario and use the slope on the right to start rolling all the way to the left. You will stop at Door G, but before leaving, a Big Diamond is hidden in the block above, use headbutt to claim that. Door G will send you back to Room E, then, enter Door H below.
Room C (revisited): Use the first snow pile on the right to get Snow Wario, then roll to the left to break into a small cave with a Big Diamond. Return to the right, dodge the snow and go up. You will eventually return to Door D, which is now behind a frozen lava burst. Now run all the way to the left, take out the Ice Yetis, and finally enter Door I (Door C when you come).
Room B (revisited): Now you can use frozen lava bursts to claim the Key Ghost above, but beware of the Ice Yeti. Super-slam the hard block on the left. Before leaving from Door J, do not forget the Big Diamond on the left end, since you can reach it with frozen lava burst.
Room 3 (revisited): You have no choice but go up the ladder. In order to get the CD Chest at lower left corner, you can either crouch-jump over the ice breath and reach the Ice Yeti at the end and clear him, or bring another yeti and let him blow you to the left and clear the path. There is a Big Diamond at the ceiling. In order to reach that, use the Ice Yeti nearby to Goomba Jump on the platform below first. Before leaving from the left, start running and jump over the platform so that you run out of the room.
Room 2 (revisited): If you are running, you can break into the enclosed 400 Gems, then quickly go down for the dropped coin. From here, move left, take out the Ice Yeti above and go up, breat the block at upper left corner to find the fourth Stone Chest, then break the block on the right and drop below, clear the path and run to the left. You will finally return to Room 1 from upper path, and escape.