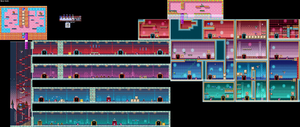
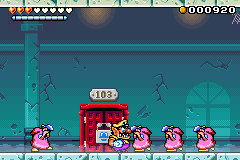
1F Hallway: You start outside of Room 101 which cannot be accessed. The hallway leads to Room 102, 103 and 104. Room 103 has a frog cardboard, meaning that the Frog Switch will unlock it. Take the treasure from Room 102 and then enter Room 104. Beware of the roaming Axe Killers. At the end of hallway sits the first Stone Chest.
Room 102: Take out the Axe Killer, grab the Gems, and use the Bat to get Bat Wario in order to reach the Big Diamond above.
Room 104-304: The red switch will change the state of ladders. Move up to Room 204 and hit another switch. You can choose to exit to 2F Hallway and clear the path, but you will eventually run to Room 203 which is also frog-sealed. Now proceed to Room 304 and exit to 3F Hallway.
3F Hallway: More Axe Killers. Take a stop in Room 303 and clear the Axe Killer inside, then return to hallway and proceed left. The second Stone Chest is outside Room 302.
Room 302-201: You will need to exit from Room 301 and take a detour to outer wall for the Key Ghost. When it is done, return here, hit the green switch and go downstairs.
Outer Wall: There is a Flying Skeleton near the top. Use him to get Zombie Wario and fall through the platforms, reach the bottom, and climb up for a Big Diamond. There is a passage at the basement which leads you back to entrance, but instead of going this way, climb to the top to find a pipe to Bonus Room A, and the short hallway to Room 401.
Bonus Room A: The flashing walls will warp you back to entrance. Get Fat Wario from the left shaft, and warp back to get the Big Diamond below. Get Spring Wario from the right shaft, warp back and jump to get another Big Diamond above.
Room 401: Clear the Spear Mask first, then face left and let the Walking Torch ignite you. As Fire Wario, repeat jumping over the platforms to reach the upper left corner, break the block for the Key Ghost. Now it is time to return to Room 201 and exit.
2F Hallway: Like other parts, an Axe Killer welcomes you. The third Stone Chest is outside Room 202.
Room 202-402: Break the blocks on the right first, then get Bat Wario, fly into the right shaft, go all the way up to Room 402. You will see a Big Diamond at upper left corner, reach there without touching the rock (that will break it for good), return to normal, then use the rock to break the left wall to reveal a pipe to Bonus Room B. When it is done, exit Room 402.
Bonus Room B: Run to the right, get on the platforms, and let the Ice Yeti blow you to the left. You will squash over some Black Spinies and grab their coins. Do not forget the yeti himself.
4F Hallway: The fourth Stone Chest is on the left. You may want to clear the blocks and Axe Killer in Room 403 before proceeding to Room 404.
Room 404: Stun the Apple Ape, bring to upper right, get Fat Wario and break the hard block. Now wait until back to normal, hit the Frog Switch and run to Room 403. Hurry up!
Room 403-303: There will be Axe Killers at both floors, and some blocks at Room 403. Get Zombie Wario from the Flying Skeleton above, and fall through the platforms to go downstairs. Now return to Room 204, exit, run through the hallway and enter the now opened Room 203.
Room 203-103: Axe Killers again. Break the blocks above and move to right shaft, get Zombie Wario, watch the light below and fall right at it, to reach Room 103 while getting extra Gems. You will find the CD Chest here, but remember to lure the Axe Killer and take him out before crawling through the tunnel. The rest thing is to return to 1F Hallway and escape.