When the research team sent out their distress beacon, the Galactic Federation sent out an elite Search & Rescue team to bring them home. Unfortunately, they became lost in their efforts to locate the research team, and wound out far lower beneath the planet than intended. Upon reaching the area, you will need to learn their fate before triggering the earthquake that allows you to proceed.

Reaching the hideout
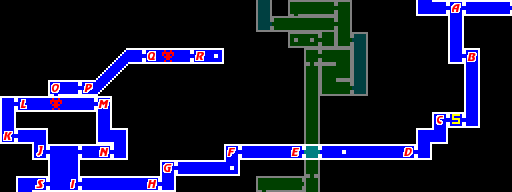
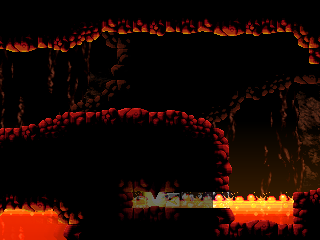
From the Distribution Center, you will return to the room labeled room A on the map above. Previously, the lava level was at the height of the pit, but it was receded dramatically. Drop down to the bottom of room A, taking any of the three routes through the middle, and head left into room B.
Freeze the barrier at the top and shoot it with a missile to proceed. On the next level down, you can bomb the wall, or simply Screw Attack through the floor to reach the next level below. When you hit the next bottom, the fastest way down is to detonate a Power Bomb that will reveal a hidden passage through the rock. Continue to the bottom, and head left into the next room to find a save station.
Save your game and continue left to room C. This room takes you down and to the left. It is occupied by two winged enemies. Destroy them quickly with the Screw Attack and continue to the bottom. Go left into room D. Room D has a couple of flying enemies along with some ground. Using the Screw Attack is the fastest way to deal with them. Continue all the way over to the left side.
You'll pass through a tunnel that wraps around the elevator shaft which lead down to the Geothermal Plant. Keep going through the tunnel to reach room E. This room is also very tunnel-like, with large rock formations creating branching paths through the room. Watch out for the enemies which burst out of the rock and hover above. Continue left to room F.
Room F drops you down a bit and then levels out over a pool of lava as you head to the left. More flying enemies and enemies which burst from the rock occupy the room. Continue left to room G which is a short vertical chamber. Drop down either side of the rock, and go left to room H. Room H is another long corridor over lava. The enemies from earlier that are embedded in the rock and come out with two spinning blades make there return here, as do the wingless birds that rise out of the lava and fly straight. Head left into room I.
Item gathering

- Missile Tank A (room D)
- In the middle of room D, is a small pool of lava. The ground to the right of the lava is just long enough to build up speed and store a Shinespark. Once you have stored it, jump in the lava and shrink down to Morph Ball form. You need to hold the jump button just long enough to rise the height of one block off the ground, and then hold left to fly through the rock as a Morph Ball to collect the Missile Tank hidden inside.
- Missile Tank B (room F)
- When you first reach the bottom of room F, explore the lower right corner in the lava. If you bomb this region, you'll reveal a hidden passage into the rock which contains a Missile Tank.
Investigating the hideout
Once you reach room I, you may be inclined to run straight ahead to the room labeled S on the map above. But if you explore S, you'll find bits of rock floating in the lava that prevent you from exploring any further. Your only option is to check out the top of room I. Room I has a big rock formation in the middle that forces you to go around in either direction to reach the top. Once there, you then have to choose between going left to room J, or right to room N. There's no real reason to choose one direction over the other. For the purposes of this walkthrough, we will choose to go left, only because it's a little easier to climb up J and K, and easier to drop down M and N.
Head left to room J, and run all the way through it to the left. Then jump up to the top of room K until you are able to access room L at the top. In the middle of room L, you will encounter a single Alpha Metroid. Hardly a threat to Samus at this point, you should be able to dispatch the small Metroid will ease. Take it out, and you should trigger another earthquake.
Now you should investigate the state of room I by heading right out of room L, dropping down to the bottom of room M, and the jumping over the lava in room N. When you return to room I, you will discover that the lava is not receded, but rather it has actually risen. And as a consequence, the rock formation in the middle of the room has dropped, preventing any escape from the room. At the same time, your sensors will detect another Metroid life form in the area.
Return to room L, presumably through room J and K again. This time when you reach the middle of room L, a chunk of the ceiling will have fallen to the floor, providing access to the region above. Jump up into room O, and continue right into room P. Make your way up the slope through room P. As you get closer to the right, you'll begin to hear the sound of gunfire and the cries of some kind of creature. Step into room Q.
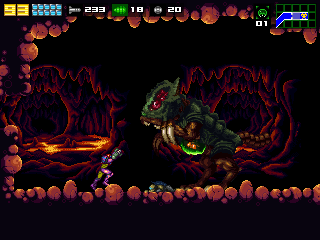
When you arrive in the room, the camera will shift to a group of soldiers fighting against a Zeta Metroid. However, right when you arrive, the Zeta Metroid will actually begin an evolution into it's final deadly form, the Omega Metroid. This new evolutionary form quickly wipes out what remains of the soldiers and turns to focus its attention on you.

Fighting against an Omega Metroid is not terribly different from fighting a Zeta Metroid. It remains bipedal and its weak point is still its stomach. You must watch out for it's stronger attacks, from the powerful claws it swings, to the saliva that it ignites into fire. Rather than charging you, it makes powerful and fast leaps in your direction which may take you by surprise. When it lands, even if it doesn't touch Samus, it will still damage her if she's standing on the ground because of the shock. Because of the amount of damage it can quickly inflict on you, you'll want to eliminate this threat as quickly as possible. Using seven Super Missiles against it is highly recommended, since you need five times as many regular missiles to defeat it. The best time to strike it is when it stands still and rears back to spray the area with fiery saliva. An optimal time to strike it is also after it jumps, as a section of its back will open and allow for a double damage shot. This can cut time down, and super missiles used as well, reducing from seven to four.
After defeating the Omega Metroid head to the right through a tunnel to examine room R. In here, you will learn that the team which was just eliminated by the Omega Metroid was the Search & Rescue team sent to save the lives of the Research team which was trapped above but never found. And now there are no survivors of the S&R team either. Another earthquake will trigger. Return to investigate room I and you will find that a small pathway out has appeared on the left side of the large rock. Furthermore, the lava has been fully cleared away from room S, allowing you to proceed.
Item gathering
- Super Missiles (room R)
- After defeating the Omega Metroid, be sure to investigate the room to the right. In room R, you'll find the last remaining supply of the Search & Rescue team: a Super Missile expansion.