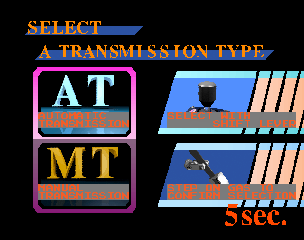
Once you have inserted your coin into the cabinet of Namco's 1994 racing arcade game Ace Driver, it shall proceed to the transmission selection screen shown above, where you'll have five seconds to select either Automatic or Manual Transmission, by pushing the gear shifter up and down (the former eliminates the need for it) then stepping on the gas pedal to confirm your choice; once you have done this, it shall proceed to the class selection screen, where you will have five seconds to select either Beginner or Expert Class by pushing the gear shifter up and down, then stepping on the gas pedal to confirm your choice (Expert Pro Class can only be played when all players select it in a multiplayer game). A close-up of your car, which is determined by the player number (1P and 2P: Team Red Lightning 25 and 26, 3P and 4P: Team Blue Castle 3 and 4, 5P and 6P: Team Yellow Cyclone 17 and 18, 7P and 8P: Team Green Island 11 and 12), will appear on the screen as its driver gets into it and the game gives up to seven other prospective players fourteen seconds to insert their coins, select their transmission and class, and join in with the race - however, if you are using MAME to play this game, this close-up will only be displayed for a second before the race automatically starts (because of the fact that the emulator does not support link plays). Also, if your version of MAME is earlier than 0.143u6 (released 20th September 2011), you should be careful when passing under that first extend line, because if your car should head off the track and crash into a wall, it shall automatically cause the emulator to abort regardless of what lap you are on.

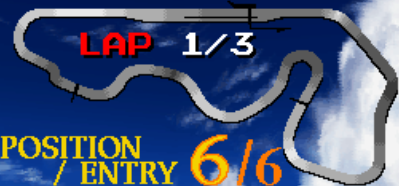
The screen will then cut to a shot of your car from the front at the starting line as the name of your chosen class ("BEGINNER", "EXPERT" or "EXPERT PRO") appears in the centre of it; the camera will then pan around to the back of the car (showing off all the advertisements for older Namco games on it) as the traffic lights, which have the name of Motos (1985) written on them, appear on the right side of the screen and change from red to green. You shall now have to step on the gas pedal to accelerate your car as the 45-second timer starts counting down and you pass under the starting line (which has the word "Polygonizer", the nickname for Namco's retired System 21 hardware, on it), pass a flashing sign with the text "TIME EXTENDED" on it, a crane and a gazebo on the left side of the track, and pass under a bridge for NOURS (Namco's PR magazine), which has three signs, the first of which has "LAP TIME" on it, while the second one has "ATTACK!!" on it and the third one has two right-pointing arrows and the text "1ST CURVE" on it - and once you have done so, you will have to turn to the right as you pass a first-aid hut, six advertisements for Solvalou (1991) and a flashing billboard with another right-pointing arrow on it on the left side of the track then pass four more advertisements for Four Trax (1989) on the track's right side. You will then have to turn to the right again, as you pass two more flashing billboards that have two right-curving upward-pointing arrows on them and six more advertisements for Ridge Racer (1993) on the left side of the track - and once you've done it, you will have to turn to the left as you pass five animated billboards for a sunglasses-wearing gorilla named "Gorigori" on the right side of the track then drive into a tunnel (which has a mechanical billboard for the aforementioned "Gorigori" with the text "Fight!" on it above it). You'll then have to turn to the right once again as you pass a sixth flashing billboard with a third right-pointing arrow on it and a regular billboard with the text "DANGER" on it on the left side of the track; once you have done so, you will pass under another bridge which has five more signs (two have the text of "EXTEND LINE" on them while the other three have inverted triangles with exclamation marks in them) on it, and receive 17-20 extra seconds of time as the text "TIME EXTENDED" appears on the screen. You'll then have to turn left again as you pass a seventh flashing billboard with a left-U-turn-pointing arrow on it, a second flashing sign with the text "TIME EXTENDED" displayed on it, an eighth flashing billboard with a second left-U-turn-pointing arrow on it, two grandstands and two more regular billboards for a chick named "Tamago", and "C-Car", on the right side of the track - and once you've done so you will have to turn to the right yet again as you pass a ninth flashing billboard with a third right-pointing arrow on it (and a fourth regular one which again has the text "DANGER" on it) on the track's left side, and pass over a third bridge. You now have to turn to the right for a fifth time as you pass two more flashing billboards with two more right-pointing arrows upon them, a lighthouse and three more advertisements (the seventeenth one features the initials of the game's four teams, while the eighteenth and nineteenth ones are for the game itself) on the left side of the track; once you have done so, you will have to turn to the left once again as you pass a hospital and a tenth flashing billboard with a left-pointing arrow on it on the right side of the track (and ten warning/caution signs for toads and elks on both sides of it). You'll then now have to turn to the left yet again as you pass an eleventh flashing billboard (which has a left-curving upward-pointing arrow upon it) on the track's right side, and turn to the right for a sixth time as you pass under a fourth bridge with five more signs (two of which again have the text "EXTEND LINE" while the other three again have inverted triangles with exclamation marks in them) on it and receive 17-20 more extra seconds of time as the text "TIME EXTENDED" again appears on the screen - and once you've done it, you will have to turn to the right for a seventh time as you pass a flagpole, which has a yellow flag with the text "TIME EXTENDED" upon it, and a twelfth flashing billboard with a third right-curving upward-pointing arrow on it on the left side of the track. You will then have to turn to the left for a fifth time as you pass under two more bridges; once you have done so you shall have to turn to the right for an eighth and final time as you pass two more flashing billboards with two more right-pointing arrows on them, a lamppost and two ambulances on the left side of the track as you pass under three more bridges (the seventh is for "Stream Field Circuit", which is presumably the name of the game's track, while the eighth one is for Driver's Eyes, 1990, and the ninth one is for "TR³ System 22", which is the hardware this game runs upon). You will now have to pass under the starting line, which has now become a third extend line, in order to complete a full lap of the track - and once you've done so you shall receive 17-20 more extra seconds of time in which to complete another lap of the track (the "LAP TIME" sign on the first bridge will also show the last lap time and positive/negative difference as you pass under it for a second time).

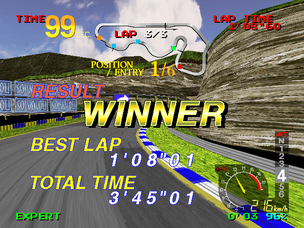
Once you have completed three, four, five, six or fifteen full laps of the track, depending on how the cabinet is set, and for the last lap, the third extend line will become a finish line, the text "RESULT", "BEST LAP" and "TOTAL TIME" will appear on the screen with your finishing position (if you finished first it will display the text "WINNER"), best lap time and total track time below them; the text "CONGRATULATIONS" will then appear at the top of the screen, as your car completes another full lap of the track by itself. Once it has passed under the finish line again, it shall drive off into the distance as the text of "GAME OVER" appears on the screen - and the game shall then go back into attract mode (there is also no "best-time" table in this game).