ActRaiser/Death Heim

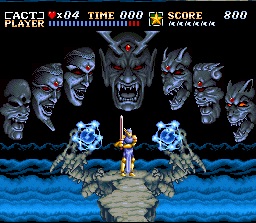
Welcome to the final act. You must defeat all the ACT II bosses again before facing Tanzra himself. All the returning bosses are quicker, and you need to fight them all within succession. There is no regeneration between boss fights. It is not recommended to use more than one magic attempt per boss during the rush, and to save the magic for the Ice Dragon.
The best magic spell to use at Death Heim is Stardust.
Minotaurus[edit]
A direct approach against the boss will usually trade a 1-for-1 health hit. However, it is vulnerable to stardust.
Wizard[edit]
The wizard behaves similarly to the original battle. The wizard begins by teleporting randomly around the room, and each time he appears he throws a trio of fireballs. When he is on any of the platforms he will follow up with a triple lightning strike, so avoid standing directly underneath him. Using only the sword, you may only get one or two hits on each teleportation.
In the werewolf form, he lumbers across the ground until he decides to jump off the walls quickly, and then lands in the center of the room and calls forth three wolf heads. The heads travel in a straight line across the room. His attacks can be hard to avoid, but the werewolf can be quickly dispatched by striking it mercilessly while it's moving slowly on the ground.
Use of Stardust is not necessary for this battle.
Pharaoh[edit]
No change in tactics is required: Jump over the arrows and the pharaoh's projectiles and get a few hits in while it rests on the ground. The stardust spell is extremely effective because the Pharaoh Head is a huge target, and there is nothing on the battlefield to give it cover from the raining stardust.
Flaming Wheel[edit]
The boss behaves in the same pattern. It will first tumble towards you, and if you remain on the same side as it, it will jump up and roll towards the center. If you are on the ground or on the opposite side, it will roll across.
Viper[edit]
The viper is dangerous, but is defeated simply by waiting under one of the spike lifts that falls, and making one or two hits as it goes up. Jump off before it reaches the top.
While it is normally vulnerable to stardust, you may want to preserve the magic for the next fight.
Ice Dragon[edit]
While the Ice Dragon isn't much more difficult, you still need to defeat it and face Tanzra afterwards. However, there is no longer a need for any magic beyond this level. It is most vulnerable to stardust while it is swooping along the ground.
Tanzra[edit]
This is the final battle within the game. You will gain the ability to shoot sword beams during this battle, even on professional mode.
The first stage will call stardust from the top-right corner. Dodge them. When Tanzra drops down, step within a few paces, and attack as much as possible. By the third drop, the first stage should be complete.
On the second form, the Tanzra will engage in a three attack pattern:
- He will release three volleys of two 90-degree projectiles. Dodge by walking left or right, although there are blind spots in this volley. One can be found by aligning the sword with the gap between the lives counter and time remaining. Another is below the "[ACT]" in the top-left corner.
- He will expose his core for a few seconds before firing a single bolt.
- He will Fly forward and drop a few free-moving projectiles, which can be destroyed without problem.
After he is destroyed, the final cutscene will commence. You will also enable Professional mode, which can be reached from an invisible option on the starting screen. This mode is a single run through the action portion of the game that skips the simulation sections, and does not allow continues.
