Adventures of Lolo 2/Castle
From StrategyWiki, the video game walkthrough and strategy guide wiki
Password: QTDV[edit]
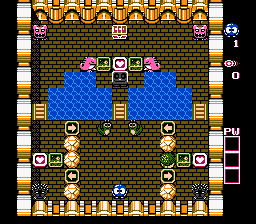
- Original room: 3rd Eggerland: Revival of the Labyrinth, room 36
This room is easier to complete than it may first appear.
- Start by luring the roaming Rocky down, and away from the center. Then walk up and collect the top Heart Frame. Push the Emerald Frames on either side all the way up to the wall. Then push either frame away from the center, trapping the Don Medusas against the wall. Come back to the Gols, shoot each one once, and push either one away from the center until they touch the walls.
- Walk down the bridges on either side until you can push the two lower Emerald Frames down one space so that they are next to the arrow tiles. Then walk into the center region, and walk across the lower arrow tiles in order to push the Emerald Frames above the two Medusas. As you do, collect each nearby Heart Frame.
- After all the Heart Frames are collected, make sure that you take the center bridge on your way to the key so that you do not get hit by either Gol's fireball.
Password: QDDQ[edit]
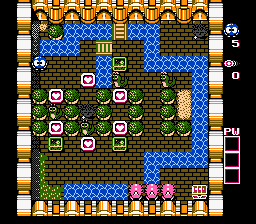
- Original room: 3rd Eggerland: Revival of the Labyrinth, room 54
- As soon as you arrive, collect the closest Heart Frame below you (above the left Snakey) and get two egg shots.
- Cross over the bridge and stand to the right of the top Snakey. Shoot it once, and push the egg into the water. Then move the Emerald Frame above down one space so that the Snakey reappears above the Medusa.
- Once the Snakey reappears, push the Emerald Frame down until it blocks the Medusa's view right. Then collect the Heart Frame above the repositioned Snakey.
- Come around to the Emerald Frame in the lower left, and push it to the right. Collect the Heart Frame above it, and the one below the bottom Snakey.
- Push the lower left Emerald Frame to the right, collect the Heart Frame below the left Snakey, and then shoot that Snakey twice. Push the Emerald Frame to the left Snakey's former position. It will reappear below the Medusa in the upper right corner.
- When you are ready, run to the right, and up the path that leads to the top. As soon as you are even with the Snakey on the right, shoot him once and push the egg to the right. There will be a fireball right behind you that will hit you if you hesitate for too long. Push the egg into the water and ride on top of it to reach the key.
Password: QKDH[edit]
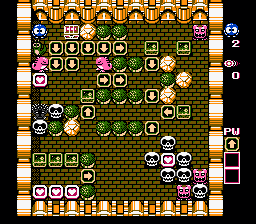
- Original room: 3rd Eggerland: Revival of the Labyrinth, room 119
- Walk down through the down arrows, and start walking through the pair of right arrow tiles below the Gol. Watch both of the Don Medusas above and below you, as you run to safety between the Emerald Frame on top, and the Skull below. Then walk down through the down arrow tile below, and back to the left.
- Come down to the trio of Emerald Frames above the trio of Heart Frames in the lower left corner. Push the two outer frames down, and slide the middle frame to the right. Head inside, and collect only the middle and left Heart Frame, but you cannot collect the right Heart Frame yet. Push the left Emerald Frame all the way up below the Skull.
- When the lower Don Medusa starts moving right, push the Emerald Frame to the left of the right arrow tile through the tile two spaces, and then stand above it for protection. When it is safe, run to the right so that you are standing above a Skull. Shoot the Skull once, and push the egg down so that you block the bottom Don Medusa in to the right. Watch out for the Don Medusa up above, and when it is safe, push the egg in to the right to pin the lower Don Medusa in.
- Walk up to the highest Skull, stand to its left, and shoot the Skull so that you can push it to the right, blocking the Don Medusa in below. When it is safe to step out along the right wall, push the egg down to pin that Don Medusa in as well. Collect the Heart Frame among the Skulls.
- Return to the Emerald Frame that you pushed through the arrow tile, and push it up to the Skulls, pushing it down half of a space so that it blocks both Skulls. Keep your eye on the Don Medusa above, return to the left, and push the remaining Emerald Frame down and through the arrow tile, over to the right, up one space, and into the open corner created by the Skulls. Return to the left and collect the last Heart Frame along the bottom wall to activate the arrow power-up.
- Walk up along the right wall, ducking behind the boulders for protection when the top Don Medusa is approaching the upper right corner. When you are below the top Emerald Frame, push it up one space to pin the Don Medusa into the corner. Then walk to the left, and push the Emerald Frame above the down arrow tile to the right to block the Don Medusa's view below. Finally, walk down to the Emerald Frame below, push it down two spaces, and push it right half of a space to block in all of the Skulls.
- Walk to the left, and up through the up arrow tile, to push the Emerald Frame all the way up to the boulder next to the treasure chest. Then zig-zag back out, following the arrow tiles until you can return to the upper right corner. Use the arrow tile on the single right arrow-tile at the end of the row of down arrow tiles where you just pushed the Emerald Frame. Then walk through and push the Emerald Frame all the way to the left against the Snakey.
- Walk up through the chest to stand above the Emerald Frame, and push it down to the Skull. Then stand to its right, and push the frame to the left half of a space. Now you can safely collect the last Heart Frame. Because of all the Skulls that are trying to move (but cannot), the game may actually appear to slow down. But you should have a threat-free approach to the key above by following the arrow tiles back out to the lower portion of the room, walking back up to the top, and walking across the top row of down arrow tiles.
Password: VPDP[edit]
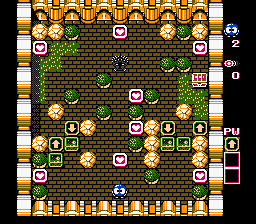
- Original room: 3rd Eggerland: Revival of the Labyrinth, room 121
Looking at this room, you may think that you need to move all four Emerald Frames around all four directions of the Medusa. But the truth is, the farthest Emerald Frame on the right cannot be moved in a way that helps you, and you do not actually need to block the Medusa's view to the right to complete the room.
- Start by collecting the two lowest Heart Frames against either wall. Then stand below the leftmost Emerald Frame and push it up two spaces. While standing on top of the up arrow tile, push the Emerald Frame on your right three spaces to the right. Come back and collect the lower middle Heart Frame, and push the Emerald Frame up two spaces. Collect the flashing Heart Frame to your right to activate the Arrow Tile power-up.
- Head down and to the right, and stand below the left of the two Emerald Frames between the boulders. Push the left frame up one space, and then press
 to activate the Arrow Tile power-up on the down arrow tile that the frame is sitting on. Now you can continue to push it up to the trees above, and then stand to its right and push it left below the Medusa. Collect the Heart Frame below you.
 - Walk between the two Emerald Frames, approach the left wall, walk down and push the left Emerald Frame one space to the right. Then walk back around the boulder, and push the Emerald Frame down three spaces. Walk beneath the lower of the two Emerald Frames below the Medusa, and push it up one space. Then walk around to its right side, and push it left two spaces. Walk horizontally across the two arrow tiles on the left to get beneath the frame and push it up two spaces, and finally right one space.
- Return to the lowest Emerald Frame, push it right three spaces, and up all the way. Similar to how you pushed the last frame up, do so with this frame, only push it up so that it is one row higher than the Medusa, and push it to the right two spaces to block the Medusa's view up. Now you can collect the remaining Heart Frames. In order to collect the key, simply walk around the left side of the Medusa.
Password: VHTK[edit]
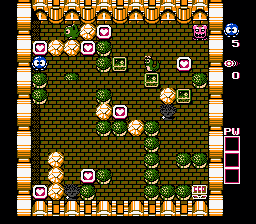
- Original room: 5th: Adventures of Lolo (Japan), floor 9, room 4
- First of all, take the Heart in the bottom-left corner for two Magic Shots.
- The real trick here is to use Leeper twice! First, take the heart and release it, then move down, and shoot it in a place where the egg can be pushed to rhe right (e.g. if you locate Lolo near the lower rocks, half-tile visible to Medusa, Leeper will pass to the left, Lolo can then move up and shoot Leeper on its way up). Pass above the egg and position Lolo half-visible to the right of Medusa. When Leeper arrives, shoot it and push the egg down, so to block Medusa's line of sight to the right. Wait for the egg to break and put Leeper to sleep.
- Collect the two Hearts in the left half of the room for two more Magic Shots. Pay attention to Don Medusa and move right under Snakey, thus pushing the Emerald right just one tile.
- Shoot Snakey once and push it up, collect the Heart to the left, run back and shoot the egg away before it cracks open, and get below the Emerald to the left. Push the left Emerald left and trap Don Medusa in the leftmost tile of his trajectory. Before Snakey reappears, push the middle Emerald on its location, and Snakey will reappear below the nearby Medusa (enemy hole).
- Push the middle Emerald between Medusa and the last Heart, and grab the latter.
- Push the rightmost Emerald down next to Medusa, collect the gem, and leave from the staircase.
Password: VQTD[edit]
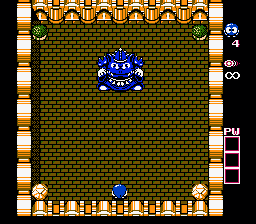
- Original room: 5th: Adventures of Lolo (Japan), castle, room 6
King Egger becomes an extremely easy boss, if you notice that he always keeps one tile away from the side walls. Just stand next to a wall and shoot sideways about 20 times, but move back when King Egger approaches.