The printable version is no longer supported and may have rendering errors. Please update your browser bookmarks and please use the default browser print function instead.
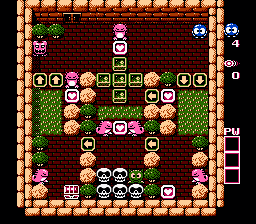
Stand on the grass below the entrance and wait for the Leeper to hop off to the left. Wait for the Leeper to come back around and fall asleep in front of the Gol. Collect the nearby Heart Franme.
Walk through the nearby left arrow tile, and collect the Heart Frame directly between the two Gols. Walk up and to the left, and push the left Emerald Frame up two spaces so it is even with the Heart Frame. Now push the Emerald Frame that is sitting to your right over one space to the right.
Collect the Heart Frame above you, and push the Emerald Frame on your left all the way to the left, pinning the Don Medusa against the left wall. Now return to the right and push the highest Emerald Frame all the way to the left, blocking the Don Medusa's view below.
Walk back to the grass in the center so that you can come up below the right Emerald Frame and push it up one space. Then push the middle Emerald Frame one space to the left. Push the lower one down all the way down until it touches the Skulls. Then push it one space right and one space down into the gap where the Leeper started.
Walk back up to the two Emerald Frames, push another one all the way down to the Skulls. Then push it left half of one space so it sits between both of the top Skulls.
Push the remaining Emerald Frame three spaces down. Then walk up and around the right side of the room, through the left arrow tile, and push the Emerald Frame all the way to the left. Once it reaches the trees, stand below it and push it up two spaces. Then stand above it, and push it down until it sits to the right of the lower left Gol. Walk up toward the up arrow tiles above and collect the nearby Heart Frame along the way.
Now walk back to the top of the room, down through the right side, and collect the Final Heart Frame. All of the Skulls should be blocked, and you can safely collect the key without fear of getting burned by any Gol fireballs.
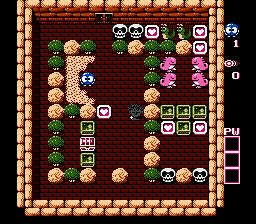
Walk up and counter-clockwise around the outside edge of the room until you reach the treasure chest. Push the Emerald Frame below the chest to the right, blocking the Medusa's view down. Then push the other frame to the right two spaces and up one space so that you can safely collect the nearby Heart Frame. You will get two egg shots.
Walk up to either Skull and shoot it twice to remove it from the screen. Collect the two Heart Frames above the Skulls, and you will get four more egg shots. Push the two outside Emerald Frames up, and push the upper middle frame to the right.
Walk up to the upper right Gol and shoot it twice to remove it from the screen. Collect the two Heart Frames above, and then shoot both Snakeys twice to remove them from the screen and give you access to the last Heart Frame.
This last step must be executed very carefully. You need to shoot the Skull to the left as soon as you collect the last Heart Frame so that it does not kill you. Once you turn it into an egg, the other Skull will go off to the left, and you can push the egg to the left until you can get access to the path down to the key below.
But there is an easier way to do this.
Same as (1) above.
Go to the southern two skulls. Shoot the one on the left once. Push it up. Shoot it again to blow it away. Before it re-spawns, go up to get the left-side heart and push the box up, and same on the right side. Push the top-middle box to the left, and the bottom-most box all the way down through the hole and against the south wall.
Use two egg-shots to blow away the top-right Gol. Get those two hearts. Go back south. Blow away the bottom-right Skull. Push the box to the left, then go up and around counter-clockwise to push that box to the right, back to where it was before. This will seal the Skulls in.
Go north and blow away the two Skulls, collect the last heart, and get to the treasure chest before those Skulls re-spawn.
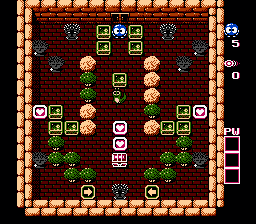
Collect the Heart Frame directly beneath the Snakey for two egg shots. Shoot the Snakey twice, and push the Emerald Frame above down one space. The Snakey will reappear between the lowest Medusa and the chest. Now collect the Heart Frame above the chest.
Go to the left, and push the closest Emerald Frame up four and a half spaces. Then push the lower left frame to the left one space. Push the remaining frame up one to two space (it does not matter) and then left one half of a space. Then collect the Heart Frame below.
Repeat the same sequence of steps on the right side to get the final Heart Frame.
Before you race to collect the key, you will need to move two of the top Emerald Frames down to either side of the key. Push the two highest Emerald Frames out next to the highest Medusas. Then push the Emerald Frames below them down to the level of the key. Once both frames are in place, you can safely collect the key.
You will have to play close attention to the two Don Medusas on the bottom of the room as you attempt to clear this round. Start out by carefully collecting the two Heart Frames above the right Don Medusa, using the boulder for protection.
When the right Don Medusa is headed to the right, push the nearby Emerald Frame up one space, then wait behind the boulder for the Don Medusa to head right again, and push the Emerald Frame all the way to the left. Carefully come back to the right and take the lower path to get beneath the Emerald Frame, now watching out for the left Don Medusa, and push it up next to the Medusa above.
Head over to the bridge, and cross it to the grass above. Be aware of the Rockys' positions as you move through the grass so that that do not force you to walk out into the open where a Don Medusa will see you. Collect the Heart Frame in the upper right corner.
Stand against the top wall on the vertical strip of grass so that the Alma rolls over to you and starts moving up and down above the Medusa. When it is on its way down, head to the left (wait for the Don Medusa to head to the right).
Collecting the next two Heart Frames requires good speed and observation. Since the Heart Frames across the water are present, they protect you from the Don Medusa below, but the Alma will come quickly so you cannot wait too long to collect them. It is best to do it in two shots, collecting one, and then running back to the strip of grass. Then run out and grab the other Heart Frame before the Alma returns.
Make sure the Alma is running up and down above the Medusa before you attempt to run back to the right. Then pass by the two Rockys and cross the bridge.
Carefully position yourself between the two boulders below the Medusa, and when the left Don Medusa is heading to right, collect the Heart Frames on the left one at a time (that is, collect one, return to safety, then get the other, and come back).
Run to the right and up to reach the key before you get burned by the Gol's fireball.
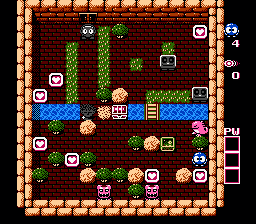
Collect the Heart Frame closest to the chest for two egg shots. Then walk up, and to the left, towards the Don Medusa. Walk up between the boulder and the tree to the top wall. Stand above the top Snakey, shoot it once, and push the egg down one space. Collect the Heart Frame to the left.
Come back to the Don Medusa, and walk toward the left wall through the space between the boulder and the tree. Stand to the left of the lower Snakey, shoot it once, and push the egg to the right one space. Collect the Heart Frame above to activate the Hammer power.
Stand between the boulders surrounding the Don Medusa, and face up. When you are ready, use the Hammer power on the boulder above you and immediately run to the right to avoid getting killed by the Don Medusa as it escapes.
When the Don Medusa is on its way back to the left, head down to the Emerald Frame near the bottom wall. Push it left and up into the place where the boulder used to be, but keep the Don Medusa on the right side of the frame.
Now you can safely collect the last two Heart Frames by heading to the left. After you do, return the same way you came, head down to the bottom wall, and when its safe to do so, collect the key.