Ai Senshi Nicol/Stage 6: Machine City
Maps[edit]
Walkthrough[edit]
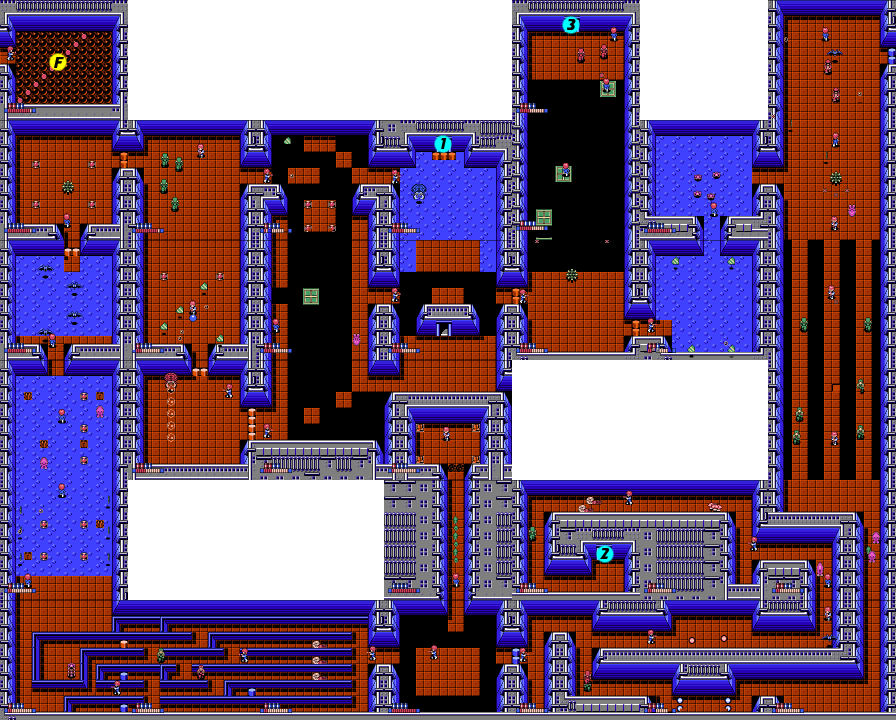
The sixth level is not the biggest, but possibly the most complicated. The entire right side of the stage can be ignored, but only if you have already found all of the previous Fire Rate Up and Range Increase enhancements, and/or don't feel the need to collect any more (there is one more opportunity to collect them in the final stage.) Whether you choose to get them or not will effect which order you might want to collect the crystal diamonds. If you do get them, you should make a counter-clockwise sweep around the stage. If not, a clockwise sweep would be faster. There are three tough bosses in this stage, the Guzuneira. One of these was the creature which kidnapped your girlfriend in the opening cinematic. You will have to fight two of them, but the third can be avoided entirely.
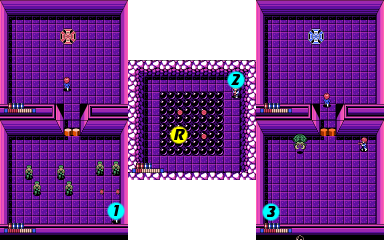
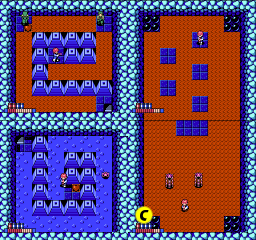
In contrast to the previous stage which had no underground screens, there are three separate underground sections that you can arrive at if you fall into a gap or a hole. The longest one composed of two screens vertically contains a Cannon Shot enhancement just above the staircase in the lower left corner, but you should be fully upgraded by this time.
Getting the crystals and the power-ups[edit]
If you would like to collect the power-ups and then get the crystals, follow this walkthrough. If you would prefer to skip the power-ups, jump down to the section below. You begin in the center of the bottom of the stage. From the start, you will have three directions to choose from. Definitely take the top path first. Shoot past all the little enemies and reach the room above. You will arrive in a dead end. Take care of the Devil Bat. Then shoot out all four corners of the dead end. Every corner will contain Power Shoes, and you will instantly be moving at max speed, which you will need for this stage. Return to the starting point.
Take the right path. Deal with the two cybots if you want to, but take the top right path. Dodge the red flash bombs and continue across. Follow the path around the bend in the next room, ignoring the Devil Bat. Continue up and around to the next room. Here, you will face a cybot and a group of Kinoko mushrooms. Continue to the room on the left, watch out for the Purunaitos that appear out of nowhere, and attack the cybot that guards the steps. Take the steps to the room below. Here you will find four red flash bombs trapped in black blocks. Beneath each bomb is a different item tile, and beneath the lower right one, you will find the Fire Rate Up enhancement.
After you collect it, you must return to the room to the right of the starting point with the two Cybots, and switch to take the lower right path. Now you must pass through the corridor with the four blue flash bombs, and on to the room with the Devil Bat. There are more Purunaitos that appear to attack you. Continue around to the far right corridor and head up. Eventually, you will reach three narrow bridges that lead north, guarded by Cybots. Take whichever one you want, but be careful not to get knocked into the gaps and fall into an underground section. When you reach the top continue moving all the way north until you see a path to the right. Take it, and you will end up in another room full of red flash bombs and black blocks. Although there aren't items hidden beneath every bomb, there are items hidden below many of them. The fourth one from the top hides the Range Increase power up.
Once you collect it, return to the left, and head back down to the opening on the left, around where the Hotchkiss cannon sits. Path through the opening, and you will be on an icy surface with four Sand Battle cannons moving about. It's best to ignore them and continue to the room below. Here, four Metal Plates fly back and forth. Destroy them if you like, and pass through the opening in the bottom left. You will be at the bottom of a vertical corridor, with a Hotchkiss in the room that you must defeat if you want to leave, or safely travel on the moving platforms. Destroy it, and hop on the first platform. Let it take you up to the second platform which you can leap straight up to land on. (If you fall, the game will deposit you on this second platform once you return from the underground.) Then leap up to the third platform on the right side, and over to the other side. Two cybots will be awaiting your arrival. When you've removed them, head down the stairs.
- When you arrive, you will go to battle with the weakest of the stage bosses. The Guzuneira is a fast moving boss, and it's tempting to hang out near the top in order to attack it horizontally, but you must make sure that you have plenty of health if you wish to adopt that strategy. It will likely crash into you frequently and do a lot of damage. Focus your attack when it is flying back and forth and stay out of its line of fire when it shoots streams of large bubbles at you. Defeat it, collect the flashing apple, and then head on to the room above to destroy the dome and collect the crystal diamond.
- From there, return to the stairs, take the platforms back down to the Hotchkiss cannon (which will have returned) and destroy it, and take the left path. Jump across to the center platform and head north. You will find the blue Guzuneira boss. Defeat him to gain access to the stairs in the back. Take the stairs, and you will arrive in a room with six Cybots. Defeat them and access the room in the back. Destroy the dome and collect the second crystal diamond.
- Climb back up the stairs and return to the room below. Jump to the middle platform, and then over to the left platform. Follow the path that it leads to down and all the way around to the door that was below the center platform. Go through this door, and you will find the third Crystal Diamond Guard dome unprotected. Destroy it, collect the crystal, and jump in the transport to be taken to the final stage.
Getting the crystals without the power-ups[edit]
If you don't need to collect the power-ups as you gather the crystals, follow this walkthrough. You begin in the center of the bottom of the stage. From the start, you will have three directions to choose from. Definitely take the top path first. Shoot past all the little enemies and reach the room above. You will arrive in a dead end. Take care of the Devil Bat. Then shoot out all four corners of the dead end. Every corner will contain Power Shoes, and you will instantly be moving at max speed, which you will need for this stage. Return to the starting point.
Take the left path. Purunaitos will appear in each of the rows to ambush you. Take any of the upper middle rows to the screen on the left. Deal with the two Cybots, and take the second or fourth row from the bottom to the left. Ignore the Sand Battle cannon on the other side of the wall, and walk around and up to the screen above. In this icy room, you will find an abundance of three things: land mines, Astro Pants, and Astro Wear. While the land mines aren't particularly appealing, the Astro equipment is, and you should do your best to collect all of it while taking as little damage as possible. When you are done, continue to the room above. Four Devil Bats will greet you when you arrive. All four must be defeated to lower the barriers so that you can proceed going north.
You will also be locked in the next room until it is cleared. That includes the Hotchkiss cannon, and all four land mines. Once you trigger them to explode, the barrier to the room on the right will be removed. You will see a group of Cybots, which you can defeat or ignore, as you make your way over to the right. Do not travel south and go to the room beyond, or you will be forced to fight the toughest Guzuneira boss when you could just as easily avoid it all together. In the room to the right, you will find a single Metal Plate moving back and forth, and an island with four land mines. Simply ignore the island, and jump over the gaps to access the room to the right.
- You will face the blue Guzuneira boss. The Guzuneira is a fast moving boss, and it's tempting to hang out near the top in order to attack it horizontally, but you must make sure that you have plenty of health if you wish to adopt that strategy. It will likely crash into you frequently and do a lot of damage. Focus your attack when it is flying back and forth and stay out of its line of fire when it shoots streams of large bubbles at you. Defeat him to gain access to the stairs in the back. Take the stairs, and you will arrive in a room with six Cybots. Defeat them and access the room in the back. Destroy the dome and collect the second crystal diamond.
- Climb back up the stairs and proceed to the room below. Jump to the middle platform, and then over to the left platform. Follow the path that it leads to down and all the way around to the door that was below the center platform. Go through this door, and you will find the third Crystal Diamond Guard dome unprotected. Destroy it, collect the crystal, and climb back up the stairs. Retrace your footsteps to return to the platform above the door that you just returned from.
- Jump over the gap to the path on the right. You will be at the bottom of a vertical corridor, with a Hotchkiss in the room that you must defeat if you want to leave, or safely travel on the moving platforms. Destroy it, and hop on the first platform. Let it take you up to the second platform which you can leap straight up to land on. (If you fall, the game will deposit you on this second platform once you return from the underground.) Then leap up to the third platform on the right side, and over to the other side. Two cybots will be awaiting your arrival. When you've removed them, head down the stairs. When you arrive, you will go to battle with the weakest of the stage bosses. Defeat it, collect the flashing apple, and then head on to the room above to destroy the dome and collect the crystal diamond. Then jump in the transport to be taken to the final stage.


