Part 1[edit]
You've made it close to the inner sanctum of the evil god that has taken claim over the Almana stone. The mine shaft is merely a clever disguise for the evil that lies beyond. But in order to find it, you will need to make use of the mining equipment found in the area. Otherwise, it will remain hidden and beyond your reach. Search the area and investigate any dead-ends that you find.
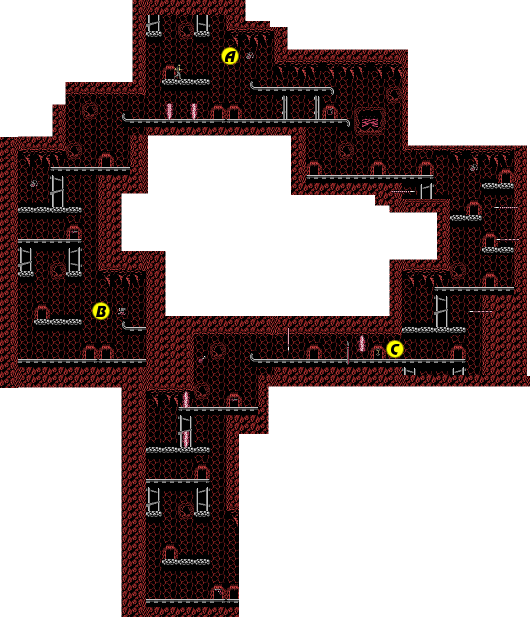
- Point A
- You begin at the very top of the mine. Right away, you may notice a pendant tantalizingly out of reach. Although it is possible to collect this, there are four other pendants in this stage, and the first one happens to be the most difficult to collect. Unless you simply want to prove your skills as a treasure hunter, ignore the pendant.
- Point B
- If you happen to explore the left side of the map first, you will notice that it comes to a dead-end. However, it's not completely useless to come down here; there happens to be a very easy 1-Up that you can grab before turning around and making your way back to the start.
- Point C
- After running quickly to avoid spears and scorpions in order to make it to this point, stop for a moment, and defeat the red enemies that occasionally come out of this entrance. They will leave Bolas behind, and Bolas happen to be a very useful weapon to use against the stage boss.
Part 2[edit]
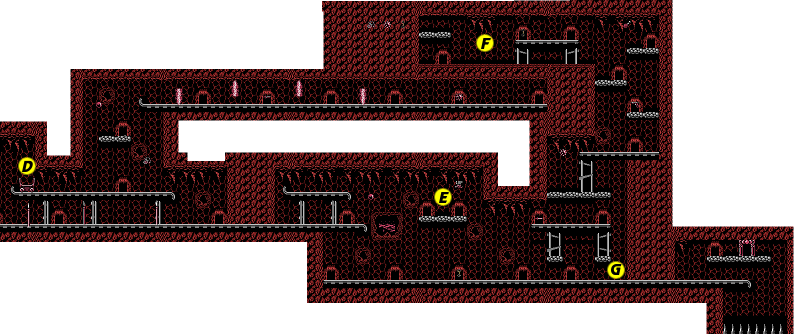
- Point D
- Just as you reach the mine cart, a spear will fly upward from the ground. Once you settle into the cart, it will begin moving forward. If you choose to ride it or follow it, you will notice that it has the ability to crash through walls and make tunnels to new areas beyond.
- Point E
- In addition to the Holy Crystal that appears near the end of the track, there is a ledge beyond to the right. It's difficult to reach, and you'll have to time a grappling hook shot over to the ledge as you fall (it's easier if you've been riding the mine cart) but if you make it, you'll find a 1-Up.
- Point F
- Provided you didn't ride the mine cart all the way to the end of the level, you can climb up to the top of this section of the map to claim a number of items. In particular, there is a section of wall in the upper left corner that you can throw Mines at in order to collect Bolas, more Mines, and a Pendant. Then to return to the mine cart, you must drop Mines on the floor until you discover the portion of the floor that you can break in order to drop down.
- Point G
- In order to proceed to the stage's boss lair, you must sit in the mine cart and ride it all the way to the very end of the track. It will bust a hole through the second wall. Beyond this wall, the track comes to an abrupt end, so you must jump out before the cart falls down to the spikes below. Inside this chamber, tons of enemies will appear to prevent you from escaping. Grapple and quickly climb up to the boss entrance.
Boss: Sand Worm[edit]

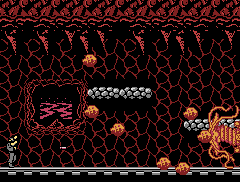
The boss of this stage is gigantic sand worm, an unearthly creature that is probably the real source of the tunnels created in the mine shaft. This huge worm has the ability to tunnel straight through rock as if it were sand. Whenever it senses that an intruder has stumbled into its den, it sticks its head in from the sides and sprays large amounts of boulders into the den, in an effort to crush whoever dares set foot in its lair.
In order to remove this creature, you'll have to confront it whenever it appears from the sides. Without the Bola, you will either have to stick with your gun and wait for it to appear lower to the ground where you can shoot at it, or you may have to grapple up to the center platform in an effort to take some shots at it while it is higher off the ground. If you do have a good supply of Bolas, you will be able to hit it from anywhere on the ground. While it's difficult to track all of the boulders that come flying out, try to keep an eye out for any rock that is clearly headed your way.
There is a trick that you can take advantage of while you fight the Sand Worm. It just so happens that if the worm appears close to the ground, and you stand right in front of the worm where the boulders originate from, you are unlikely to receive any damage by standing there. You will be able to attack the worm without fear of being attacked in the process. You must be quick and do as much damage as you can before the worm retreats and appears somewhere else.

