Stages 1 - 3
| Energy by Stage 4 | |
|---|---|
| 900 | Perfect |
| 800 | Average |
| 700 | Practice More |
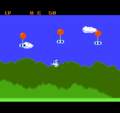
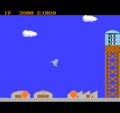
The game starts out simply enough with three energy capsules suspended by helium balloons over an open field. There is an "ordinary" amount of gravity that you will have to overcome in to order to fly through the air. Only a minimal number of shots should be needed to collect all three capsules, but this is a good stage to practice moving around in. Propelling yourself off one side of the screen will result in your return through the other side.
Stage 1
All that you have to do is launch yourself up to the capsules and collect them. However, if you ever touch or shoot a balloon before collecting the capsules, they will fall to the ground and be destroyed. If that happens, you can still fire upwards and propel yourself back to the ground in an attempt to catch them before they land, but it's best not to let that happen at all.
Stage 2

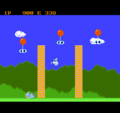
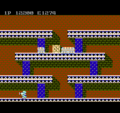
Aside from the two barrier walls that have been erected that divides the bottom of the screen into three sections, you must also contend with... a cow. Don't underestimate the cow, when it senses that a player is on the ground, it begins to charge in an effort to collide with the player and drain him or her of energy. The cow can be shot, which will stun it momentarily. The walls prevent you from moving laterally unless you're high up in the sky, so avoid shooting the balloons while you maneuver left or right.
Stage 3

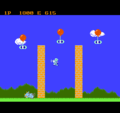
At first, this stage appears identical to the previous stage. After a few moments, the difference is made clear when evil scissors come flying across the screen. While touching them is obviously bad for you, what's even worse is when they cross the paths of the balloons, snipping the strings to which the capsules are attached. As the strings are cut, the capsules will fall to the ground and it's your last chance to collect before they land and disappear. Try to collect all three capsules as quickly as possible before the scissors even appear.
-
Stage 1
-
Stage 2
-
Stage 3


Stages 4 - 6
| Energy by Stage 7 | |
|---|---|
| 1600 | Perfect |
| 1400 | Average |
| 1200 | Practice More |
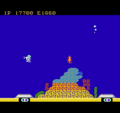
The scene shifts from a picturesque field to the site of some hangers and warehouses. In the next three stages, all three capsules that you must collect are contained behind a single barrier that must be destroyed in order for you to access to capsules. Aside from the gravity, you will also have to counter your own momentum in order to stay close to the barrier. Shoot single, well timed shots. If you start firing rapidly, you will fly too fast to control your position.
Stage 4

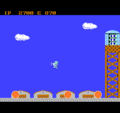
This stage starts out with nothing more than a few barrels rolling around on the ground, which generally discourages you from ever landing on the ground. That's fine since we need to stay in the air and blast the barrier away. Bring yourself close to the barrier and turn to fire one, maybe two shots at it, but not much more. If you fire too many, you will have to work harder to correct your position. A rhythmic pattern of firing right, down, left should suffice to keep you close enough to the barrier at all times to wear it away. Don't shoot any of the capsules once the barrier is destroyed!
Stage 5

Now you have a serious issue to worry about. Helicopters will appear on screen, hovering right at the level you want to remain in. They can be destroyed with a single shot, so they're not too dangerous, but it's even better to avoid getting in their way entirely. You should still focus on destroying the barrier, but play it safe and get out of a helicopter's way, especially if it's approaching you from the right.
Stage 6
This is one of the only stages where you can't cross from one side of the screen to the other, largely because of the gigantic wall on the right side of the screen. In addition to that change, the helicopters now shoot at you. And not just regular shots, these bullets seek you out to a limited extent. They can only move up or down by so much, so it's easy to duck under them, but they're very hard to escape when your at the level of the barrier. Those bullets can also be shot down, so protect yourself if you've got a good position to fire at the barrier from.
-
Stage 4
-
Stage 5
-
Stage 6


Stages 7 - 9
| Energy by Stage 10 | |
|---|---|
| 2500 | Perfect |
| 2000 | Average |
| 1500 | Practice More |
This is the warehouse zone. At first glance, this zone appears to be very simple, but two things are working against you. First is the worker droids that are programmed to pick up items that they come across and move them about the warehouse. They are not a direct threat to you, but they do move throughout the warehouse oblivious to your presence and can drain a lot of energy from you if they touch you. When they grab the capsules, it's tempting to want to shoot them so that you can reclaim the capsule, but that will only result in you losing energy when you touch the droid's remains. Additionally, the warehouse seems to have a rather high degree of gravity to overcome.
Stage 7

Use this stage to get to know how the droids move around. They warp from one level to another whenever they touch the sides of the screen, or one of the crates in the middle of a platform. And when they warp, they take whatever they happen to be carrying with them. Because it's so costly to touch a droid, even when it is shut down, it is best to wait for the droids to release the energy capsules before attempting to collect them. Feel free to shoot a droid that is empty-handed, but try not to shoot it in a position that you will need to pass through to complete the stage.
Stage 8

If the droids weren't bad enough, now you must also deal with flying bricks that float across the screen on every level. The bricks can be destroyed with five shots from your gun, and it's much better to use up 5 units of energy to destroy them then to lose 50 units of energy when you get hit by them. You are most vulnerable on the edges of the stage since it's hard to predict which side the bricks will come out from. Everything else is the same as the last stage.
Stage 9
Aside from the layout and the placement of the crates, this stage is exactly like the previous one. The altered layout restricts the number of routes you can take to get from one level to another, so proceed with caution, and only travel from one level to another when the coast is clear.
-
Stage 7
-
Stage 8
-
Stage 9


Stages 10 - 12
| Energy by Stage 13 | |
|---|---|
| 2400 | Perfect |
| 1800 | Average |
| 1200 | Practice More |
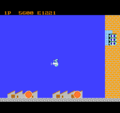
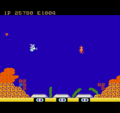
The underwater stages are, without question, the most difficult stages in the whole game. In fact, the steep ramp up in difficulty will have some players wondering if they possibly skipped certain stages. You are going to come away with less energy than what you started with. It is inevitable. While it is not recommended that you fire rapidly in any other scene, it is actually encouraged in the underwater scene because of the amount of forces you need to overcome, and the number of obstacles that are in your way.
Stage 10

To start you off, you must claim two energy capsules beneath two barriers on the ocean floor. The current in the water is flowing to the right, and you must overcome your own buoyancy, which works opposite of gravity. The seahorse that floats around, and occasionally spits rocks at you, is nothing more than a nuisance, but the seaweed that waves back and forth by the barriers is a true threat. Not only will it drain you substantially whenever you touch it, it can get in the way of your shots, and even restrict access to the capsules once you finally remove the barrier. Avoid the seaweed at all costs.
Stage 11

This stage is actually somewhat easier than the previous stage because there is no side to side current. So it's easier to situate yourself over a particular barrier and just worry about your vertical position as you wear one of the three barriers away. However, two new threats enter the picture. For one thing, to make up for the lack of current, the surface of the water is now deadly to touch. Do not let your player rise to the top of the screen or you will lose energy. Secondly, the starfish that loops through the water can be shot, but if you hit it, it breaks apart into four small pieces that are more annoying to dodge. Try not to shoot the starfish if you can help it. And as always, avoid the seaweed.
Stage 12
If you can make it past this stage, you are well on your way to beating the game, because the remaining four stages are not nearly as difficult as this one. In this stage you must contend with buoyancy, current, a sea horse, a starfish, three seaweeds, and a deadly water surface. The amount of discipline that it takes to keep your energy expenditure low is astounding. Try your hardest to stay approximately two to three inches above the barrier that you are currently working on, as that is both the safest position (above the seaweed, safely below the surface, and usually beneath the starfish) and the most effective for destroying the barrier.
-
Stage 10
-
Stage 11
-
Stage 12


Stages 13 - 15
| Energy by Stage 16 | |
|---|---|
| 3000 | Perfect |
| 2000 | Average |
| 1000 | Practice More |
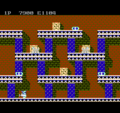
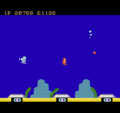
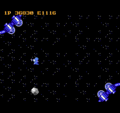
After you ordeal underwater, this outer space zone will seem easy. You may have difficulty adjusting to the physics at first because, for the first time, there are no forces acting on you. No gravity, no buoyancy, no current. You are completely weightless and will travel in your current direction until you hit something that stops you. There is not much variation between the next three stages. The enemies in these stages consist of meteors and bird like creatures that fly around each capsule set.
Stage 13

The energy capsules in outer space are arranged with two capsules in the upper left corner of the screen, and two capsules in the bottom left. They are protected by a barrier-like glass dome that must be worn away. Unlike the previous scene where it was usually more effective to work on one barrier at a time, in these scene, it's actually more effective to work at several barriers at once. When you start shooting at one set of barriers, you will naturally be pushed closer to the other set. By correcting your vertical position, you can volley back and forth between each set, taking a few shots at each of them at a time.
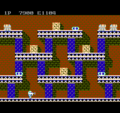
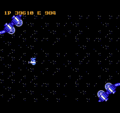
Stage 14

This stage is just like the previous one but with a second layer of bird like creatures that circle around the capsule sets. It is important to try you best to time your approach to the capsules so that you don't collide with a bird that is appearing on the screen, although it is very hard to do. Shooting meteors also has the effect of breaking them up into small pieces which gravitate towards your position and must be avoided.
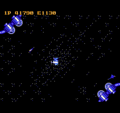
Stage 15
Stage 15 is just like the previous two, but with even great enemy frequency. Complete this stage and you only have one stage to go.
-
Stage 13
-
Stage 14
-
Stage 15


Stage 16

This is it, the very last stage. The obvious feature of this stage is the black hole that is positioned directly in the middle of the screen. Be aware that if you come too close to the black hole, that is it, game over, no matter how much energy you have stored up. And to make matters worse, the black hole will continually draw you closer to it. With one energy capsule positioned in each corner, the best approach is to pick one side at a time, and cross up and down, shooting at the top and bottom barriers until both capsules are free, then switching over to the opposite side and doing the same. Since this is the very last screen, there is no reason to be thrifty with your energy. Spend as much as you need to, without using it all up. If you have a large supply by the time you get here, you should have nothing to worry about. Once you free and collect all four capsules, you'll be rewarded with the game's ending.