Dreadnought is a large multiplayer map set amongst a large series of islands. Unlike other maps, it is completely symmetrical. Its defining feature is a single large island in the center, a large focus during Island Capture. A single large island in the center is the focus of the map and spawns powerful units.
Escort
A US Carrier under kamikaze attacks is trying to make its way to safety. The US must provide air cover until the carrier leaves the battle zone whilst the Japanese must destroy the enemy carrier with their kamikazes before she can escape.
—Map Description


This fairly straightforward mission involves a Lexington-class carrier that must be escorted to safety, or eliminated quickly. Even without air superiority, the Japanese will have to fight an uphill battle against the American pilots as well as the carrier's escorts - a quartet of Fletcher-class destroyers.
The Allies have it fairly easy here - their only spawn point is from the carrier, and they must deploy either Hellcats or SB2Cs. The Helldivers, upon the mission start, are extremely useless, so stick with the Hellcats.
Meanwhile, the Japanese sport suicidal Oscars as their primary weapon. These can be supplemented with rocket-equipped Raidens, but these are typically ignored because Oscars have their own machine guns anyway. The Japanese must outmanoeuvre the Allied CAP, past the destroyer screen, and ram the carrier. Allied defences are extremely thick and it is next to impossible to ram the carrier, but don't worry - support comes in later.
The Japanese have two bases - one to the southeast of the carrier and another to the northwest. Japanese players should try to use this to their advantage and force the CAP to split up, potentially allowing one of the kamikazes in on the carrier or its destroyer escort.


Both the Japanese and the Allies receive AI reinforcements for the mission - the Lexington-class' inclusion of dive bombers into its air wing proves effective against the Japanese, as Japanese reinforcements arrive from the northeast corner. They come in the form of a Mogami-class cruiser and an Akizuki-class destroyer. These ships are the only seabourne units players "have", so keep them covered. As soon as they show up, half of the carrier's destroyer screen moves to engage them. The Americans must keep their carrier covered, as now is the perfect time for kamikaze strikes to sink the carrier.
The American reinforcements arrive a little later, but come in the form of additional aerial units. Two squads each of Tiny Tim TBM Avengers and torpedo-laden B-25s make a run on the Japanese reinforcements. These aircraft appear in the southwest corner and give the Allies considerable firepower. The J2M Raidens prove effective against the bombers, so begin using them on the American reinforcements in an effort to help the cruiser and its destroyer.
Usually everything falls to the cruiser to sink the carrier with help from kamikazes - if it manages to survive long enough, it sinks the carrier and wins the mission for the Japanese. Therefore, the Americans must keep their reinforcements alive whilst also bombing the Japanese ships to try and push the playing field into their direction. Once one team's reinforcements are eliminated, the session usually ends.
Siege
Japanese landing forces are attacking a US island from the south. The US must sink the landing ships and protect the coastal defence lines. The Japanese have to provide air cover for the landing forces and destroy enemy fighters and land forts.
—Map Description

Here, the Japanese are attempting to land on a heavily fortified American stronghold. The Japanese have a HUGE disadvantage in this map, as the base's defences include several Fortresses, which are immune to standard machine gun fire. The Americans also have a huge firepower advantage with their superior rockets. As a result of this huge unbalance, this map is best played with less experienced players on the American side and elite aces on the Japanese side.

Both sides have access to only two planes: the Americans have access to HVAR Corsairs and Helldivers, while the Japanese have rocket-equipped Raidens and D4Y Judies.
As aforementioned, the Allies have it easy on this map. The enemy landing fleet to the south consists of only three units - Troop Transports, Daihatsus, and SB Boats - all of which are easy pickings for rockets. The troop transports, however, have a lot of HP. Your best bet against these is to either focus rocket attacks or use SB2Cs on them - the Helldivers take down the ships faster but are far more vulnerable to enemy AA. All the Americans have to do is strafe down as many units as possible - a task made even easier by how bunched together the Daihatsus are. Any expert of low-altitude flying can easily sink entire waves of Daihatsus single-handedly. SB Boats in this mission are vulnerable to machine gun fire, but are best tackled with rockets. Two volleys of rockets from two Corsairs is enough to sink one.
The troop transports and SB Boats will constantly respawn so long as the Japanese have some "strength" left. Keep the pressure on the landing fleet, but also be sure to shoot down as many enemy fighters in your airspace as possible.

The Japanese, meanwhile, must focus on the island itself. It is extremely difficult, but not impossible, for the Japanese to win on this map. The trick the Japanese must employ is to target their secondary objectives - that is, the enemy fortresses and land defences.

Most of the island is covered by fortresses and a smattering of Heavy AA and Coastal Gun positions. A flight of Raidens or Judies is enough to neutralize these positions first and make things easier for future waves. Judies can equip bombs with which to bomb the enemy fortresses and take a lot of health of them. The fortresses are the key to the Japanese victory; eliminating a fortress will take a lot out of the American "strength". To make matters somewhat easier, the Raiden's guns are powerful enough to damage these heavy fortifications. Judy guns, however, are not; this is proof that Raidens equip a different kind of gun than other similar aircraft.
The Raidens' rockets, however, leave something to be desired. Raiden rockets don't pack nearly as much heat as the American ones, but they do seem to proximity detonate against enemy aircraft. This makes Raidens the plane of choice for the Japanese; some of them can choose to fly top cover for the invasion fleet (and protect the vulnerable landing ships) while others can strafe down the enemy fortresses. The enemy headquarters itself does not pack a lot of AA firepower, but it is totally invulnerable to any kind of gunfire.
Raidens, however, cause very little damage individually to the land bases. It is imperative, therefore, to pick a Fortress and have everyone on your team strafe it, in a "death by a thousand cuts" manner. Alternatively, if your team is extremely coordinated, it is possible to have the entire team use Judies. Four flights of Judies almost guarantees a fortress down, plus or minus a few due to enemy CAP or misses.
Neutralizing all the enemy land bases will be enough to knock the Americans out of the game. If not, proceed to shoot down enemy fighters and patrol boats (which constantly respawn, like your own troop transports) until the Allies' strength runs dry.
Competitive
How effective are your kamikaze strikes? Can you make them all count? As a Japanese force you must transport the Ohka kamikaze rockets into attack range, then launch and fly them into enemy ships.
—Map Description

Competitive Dreadnought is one of the few instances in the game which players are able to use an unlock unit despite not having unlocked it in the first place. For Competitive Dreadnought, all players are on the Japanese side.

Everyone in the game spawns as a single Ohka Carrier. The mission is a test of your abilities to fly Ohkas into targets, gaining points. To the north are large fleets of Allied warships. These fleets consist of almost every Allied unit in the game sans submarines. To an Ohka, however, they are nothing but targets. Your most notable adversary will be the Atlanta-class cruiser, which can flak a lot of Ohkas out of the sky before a successful attack is landed.
Most players choose to simply fly their Ohkas into the fleet and hope for the best, as against the AI there aren't a lot of options that can be taken. Flying extremely high and or extremely low (a tactic Japanese ace Saburō Sakai suggested for kamikaze pilots) has no effect on the AI, which can target you no matter where you are.
This mission is primarily about engaging your boost at the right time. More often than not, all your rivals fly in single file, with the most bloodthirsty pilot up front. However, remember that Ohkas cannot take a lot of pounding. The first pilot in the line is also the first target lined up by the AI. The second pilot is not much better off. The farther back in the line of Ohkas you are, the safer you'll be and the higher the chances of you striking an enemy. However, being the first to hit an enemy is important as well; some of the gold objective brackets say not to destroy the target, but to hit the target.
All in all, there is very little strategy in this map, as all you have to do is kamikaze the Allied fleet as much as possible.
Duel

Island Capture - Small
Map Description: Players start at the east and west and must quickly capture the centre base to have access to battleships. There are no planes on this map, so whoever holds the middle will likely be able to hold it for quite a while. A set of supply bases ring the island, and are quickly grabbed middle to late game. The centre base is what determines the victor.
Unlock Data: The starting bases have access to destroyers and cruisers, so players will probably want to select either a destroyer unlock or a cruiser unlock for starters. If you manage to take the middle, however, you'll be able to spawn Iowa or Yamatos. A high-end battleship like this put in the middle will be almost invincible to what the opposing base can throw at it, but a battleship captain should not be overconfident and watch out for sneak torpedo attacks.
Balancing Notes: This map is identical to both sides, and is perfectly balanced.
Click on a headquarters to see what it can spawn.
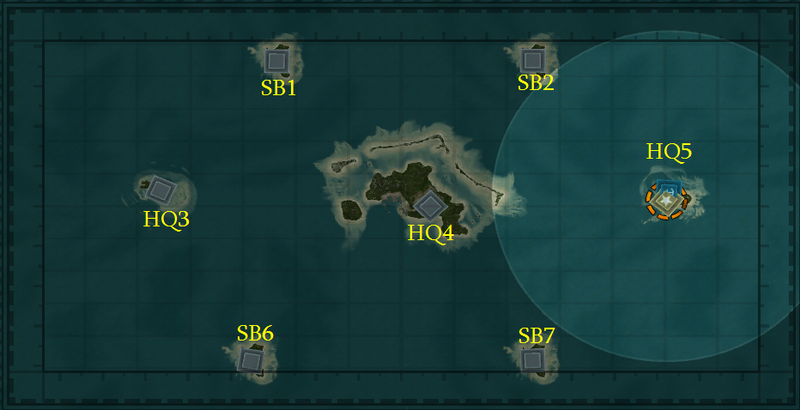
HQ 3 (Japanese)
- Elco PT
- Fletcher-class DD
- LST Mark 2
- Cleveland-class CL
- Northampton-class CA
- ASW Fletcher DD
- Allen M. Sumner DD
- Atlanta-class CL
- Alaska-class CA
- Gyoraitei PT
- Fubuki-class DD
- SB Boat
- Kuma-class CL
- Mogami-class CA
- Shimakaze-class DD
- Akizuki-class DD
- Kuma-class CL Torpedo Variant
- Tone-class CA
None
None
HQ 4
- Elco PT
- Fletcher-class DD
- LST Mark 2
- Cleveland-class CL
- Northampton-class CA
- Troop Transport AP
- South Dakota-class BB
- ASW Fletcher DD
- Allen M. Sumner DD
- Atlanta-class CL
- Alaska-class CA
- Gato-class SS
- Iowa-class BB
- Montana-class BB
- Gyoraitei PT
- Fubuki-class DD
- SB Boat
- Kuma-class CL
- Mogami-class CA
- Troop Transport AP
- Shimakaze-class DD
- Akizuki-class DD
- Kuma-class Torpedo Variant CL
- Tone-class CA
- I-400-class SS
- Kaiten Carrier SS
- Yamato-class BB
- Super Yamato-class BB
None
None
HQ 5 (Allied)
- Elco PT
- Fletcher-class DD
- LST Mark 2
- Cleveland-class CL
- Northampton-class CA
- ASW Fletcher DD
- Allen M. Sumner DD
- Atlanta-class CL
- Alaska-class CA
- Gyoraitei PT
- Fubuki-class DD
- SB Boat
- Kuma-class CL
- Mogami-class CA
- Shimakaze-class DD
- Akizuki-class DD
- Kuma-class CL Torpedo Variant
- Tone-class CA
None
None
Island Capture - Medium
Map Description: This map is remarkably similar to small, but players receive submarines right from the start. Additionally, aircraft make their appearance here; the northern and southern bases launch all kinds of aircraft. Medium Dreadnought is considered the "standard" multiplayer map that sports no real hindrances for either team. The number of supply bases has increased considerably as well.
Unlock Data: Since players start with both an airfield and a shipyard, most unlocks can be employed right from the start. Players using battleship unlocks, however, will have to make due with standard units until the centre is taken.
Balancing Notes: This map is identical for both the Allies and the Japanese.
Click on a Headquarters to see which unit it can spawn.
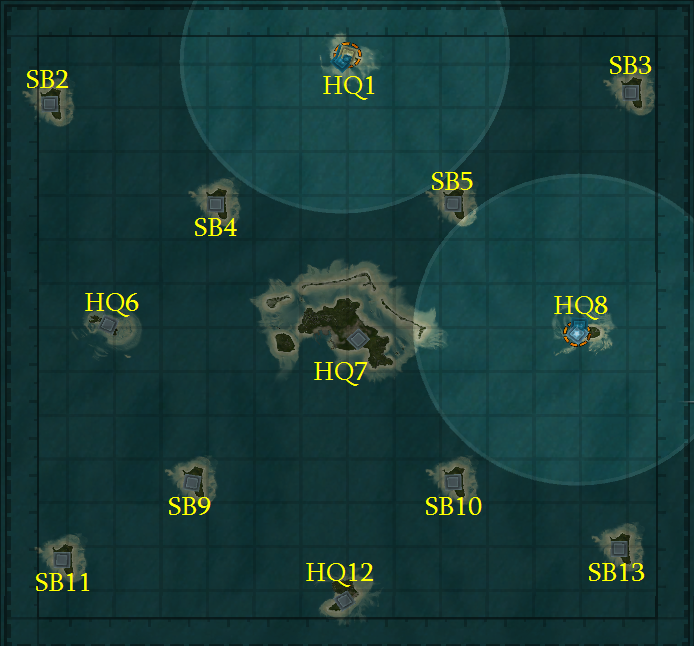
HQ 1 (Allied)
- Elco PT
- Gyoraitei PT
- F4F Wildcat
- SBD Dauntless
- TBF Avenger
- B-17 Flying Fortress
- PBY Catalina
- P-80 Shooting Star
- OS2U Kingfisher
- C-47 Skytrain
- B-25 Stratofortress
- P-51 Mustang
- TBM Avenger
- A6M Zero
- D3A Val
- B6N Jill
- G4M Betty
- H6K Mavis
- E13A Jake
- L2D Tabby
- J9Y Kikka
- G5N Liz
- J7W Shinden
- Ohka Carrier (MXY-7 Ohka)
HQ 6 (Japanese)
- Elco PT
- Gyoraitei PT
- F4F Wildcat
- SBD Dauntless
- TBF Avenger
- B-17 Flying Fortress
- PBY Catalina
- OS2U Kingfisher
- C-47 Skytrain
- P-80 Shooting Star
- B-25 Stratofortress
- P-51 Mustang
- TBM Avenger
- A6M Zero
- D3A Val
- B6N Jill
- G4M Betty
- H6K Mavis
- E13A Jake
- L2D Tabby
- J9Y Kikka
- G5N Liz
- J7W Shinden
- Ohka Carrier (MXY-7 Ohka)
HQ 7
- Elco PT
- Fletcher-class DD
- LST Mark 2
- Cleveland-class CL
- Northampton-class CA
- South Dakota-class BB
- Narwhal-class SS
- ASW Fletcher-class DD
- Allen M. Sumner-class DD
- Atlanta-class CL
- Alaska-class CA
- Gato-class SS
- Iowa-class BB
- Montana-class BB
- Gyoraitei PT
- Fubuki-class DD
- SB Boat LST
- Kuma-class CL
- Mogami-class CA
- Fusō-class BB
- Type B SS
- Shimakaze-class DD
- Akizuki-class DD
- Kuma-class Torpedo Variant CL
- Tone-class CA
- I-400-class SS
- Kaiten Carrier SS
- Yamato BB
- Super Yamato BB
- F4F Wildcat
- SBD Dauntless
- TBF Avenger
- B-17 Flying Fortress
- PBY Catalina
- P-80 Shooting Star
- OS2U Kingfisher
- C-47 Skytrain
- B-25 Stratofortress
- P-51 Mustang
- TBM Avenger
- A6M Zero
- D3A Val
- B6N Jill
- G4M Betty
- H6K Mavis
- E13A Jake
- L2D Tabby
- J9Y Kikka
- G5N Liz
- J7W Shinden
- Ohka Carrier (MXY-7 Ohka)
HQ 8 (Allied)
- Elco PT
- Fletcher-class DD
- LST Mark 2
- Cleveland-class CL
- Northampton-class CA
- Narwhal-class SS
- Rocket LSM
- ASW Fletcher-class DD
- Allen M. Sumner-class DD
- Atlanta-class CL
- Alaska-class CA
- Gato-class SS
- Gyoraitei PT
- Fubuki-class DD
- SB Boat LST
- Kuma-class CL
- Mogami-class CA
- Type B SS
- Shimakaze-class DD
- Akizuki-class DD
- Kuma-class CL Torpedo Variant
- Tone-class CA
- I-400-class SS
- Kaiten Carrier SS
None
None
HQ 12 (Japanese)
- Elco PT
- Fletcher-class DD
- LST Mark 2
- Cleveland-class CL
- Northampton-class CA
- Narwhal-class SS
- Rocket LSM
- ASW Fletcher
- Allen M. Sumner-class DD
- Atlanta-class CL
- Alaska-class CA
- Gato-class SS
- Gyoraitei PT
- Fubuki-class DD
- SB Boat LST
- Kuma-class CL
- Mogami-class CA
- Type B SS
- Shimakaze-class DD
- Akizuki-class DD
- Kuma-class CL Torpedo Variant
- Tone-class CA
- I-400-class SS
- Kaiten Carrier SS
None
None
Island Capture - Large
Map Description: This map is to Medium as Medium is to Small - the main changes include additional bases, and most notably a carrier for both sides. There is another seabourne base for both sides easily within capture range, as well as bases to the north and south that spawn ships and planes. This map has several oddities in it: firstly, HQ 9 is the only base that can spawn Kuma-class light cruisers. While rarely defining the outcome of the match, the reason for this is unknown. Secondly, supply bases number 4 and 7 are completely missing.
Unlock Data: Because the map is so large, players will be able to employ pretty much any unlock since it will be unlikely you'll be reduced to a point where you'll be unable to spawn an unlock unit. Be most careful with battleship and aircraft unlocks - the closest airfield to the centre, aside from your starting position, is the north or south airbase. This makes planes somewhat difficult to get into the fight. Battleship unlocks can only be employed from the centre base. Some may want to choose an ASW unlock like the Tone-class cruiser or the ASW Fletcher to protect their carrier from submarine attacks.
Balancing Notes: This map is identical for both the Allies and the Japanese.
Click on a Headquarters to see which units it can spawn.
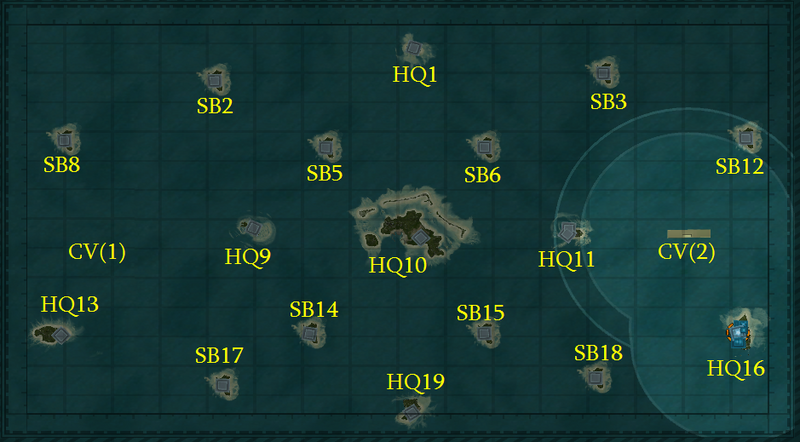
HQ 1
- Elco PT boat
- Gyoraitei PT boat
- F4F Wildcat
- SBD Dauntless
- TBF Avenger
- OS2U Kingfisher
- B-17 Flying Fortress
- C-47 Skytrain
- P-51 Mustang
- B-29 Superfortress
- P-80 Shooting Star
- TBM Avenger
- A6M Zero
- D3A Val
- B6N Jill
- E13A Jake
- G4M Betty
- L2D Tabby
- J7W Shinden
- J9Y Kikka
- G5N Liz
- Ohka Carrier (MXY-7 Ohka)
HQ 9
- Elco PT boat
- Fletcher-class DD
- LST Mark 2
- Northampton-class CA
- Rocket LSM
- Allen M. Sumner-class DD
- ASW Fletcher-class DD
- Atlanta-class CL
- Alaska-class CA
- Gyoraitei PT boat
- Fubuki-class DD
- Kuma-class CL
- Mogami-class CA
- SB Boat LST
- Shimakaze-class DD
- Akizuki-class DD
- Kuma-class CL Torpedo Variant
- Tone-class CA
None
None
HQ 10
- Elco PT boat
- Fletcher-class DD
- Northampton-class CA
- South Dakota-class BB
- LST Mark
- ASW Fletcher-class DD
- Allen M. Sumner-class DD
- Atlanta-class CL
- Alaska-class CA
- Iowa-class BB
- Montana-class BB
- Gyoraitei PT boat
- Fubuki-class DD
- Mogami-class CA
- Fusō-class BB
- SB Boat LST
- Shimakaze-class DD
- Akizuki-class DD
- Kuma-class CL Torpedo Variant
- Tone-class CA
- Yamato-class BB
- Super Yamato-class BB
- F4F Wildcat
- SBD Dauntless
- TBF Avenger
- OS2U Kingfisher
- B-17 Flying Fortress
- C-47 Skytrain
- P-51 Mustang
- B-29 Superfortress
- P-80 Shooting Star
- TBM Avenger
- A6M Zero
- D3A Val
- B6N Jill
- E13A Jake
- L2D Tabby
- J7W Shinden
- J9Y Kikka
- G5N Liz
- Ohka Carrier (MXY-7 Ohka)
HQ 11
- Elco PT boat
- Fletcher-class DD
- LST Mark 2
- Northampton-class CA
- Rocket LSM
- Allen M. Sumner-class DD
- ASW Fletcher-class DD
- Atlanta-class CL
- Gyoraitei PT boat
- Fubuki-class DD
- SB Boat LST
- Mogami-class CA
- Shimakaze-class DD
- Akizuki-class DD
- Kuma-class Torpedo Variant
- Tone-class CA
None
None
HQ 13 (Japanese)
- Elco PT boat
- Fletcher-class DD
- LST Mark 2
- Allen M. Sumner-class DD
- ASW Fletcher-class DD
- Gyoraitei PT boat
- Fubuki-class DD
- SB Boat LST
- Shimakaze-class DD
- Akizuki-class DD
- F4F Wildcat
- SBD Dauntless
- TBF Avenger
- OS2U Kingfisher
- C-47 Skytrain
- P-51 Mustang
- B-29 Superfortress
- P-80 Shooting Star
- TBM Avenger
- A6M Zero
- D3A Val
- B6N Jill
- E13A Jake
- L2D Tabby
- J7W Shinden
- J9Y Kikka
- G5N Liz
- Ohka Carrier (MXY-7 Ohka)
HQ 16 (Allied)
- Elco PT boat
- Fletcher-class DD
- LST Mark 2
- Allen M. Sumner-class DD
- ASW Fletcher-class DD
- Gyoraitei PT boat
- Fubuki-class DD
- SB Boat LST
- Shimakaze-class DD
- Akizuki-class DD
- F4F Wildcat
- SBD Dauntless
- TBF Avenger
- OS2U Kingfisher
- C-47 Skytrain
- P-51 Mustang
- B-29 Superfortress
- P-80 Shooting Star
- TBM Avenger
- A6M Zero
- D3A Val
- B6N Jill
- E13A Jake
- L2D Tabby
- J7W Shinden
- J9Y Kikka
- G5N Liz
- Ohka Carrier (MXY-7 Ohka)
HQ 19
- Elco PT boat
- Gyoraitei PT boat
- F4F Wildcat
- SBD Dauntless
- TBF Avenger
- OS2U Kingfisher
- B-17 Flying Fortress
- C-47 Skytrain
- P-51 Mustang
- B-29 Superfortress
- P-80 Shooting Star
- TBM Avenger
- A6M Zero
- D3A Val
- B6N Jill
- E13A Jake
- G4M Betty
- L2D Tabby
- J7W Shinden
- J9Y Kikka
- G5N Liz
- Ohka Carrier (MXY-7 Ohka)
CV(1) - Hiryū-class
Japanese planes
- A6M Zero
- D3A Val
- B6N Jill
- J7W Shinden
- J9Y Kikka
CV(2) - Yorktown-class
Allied planes
- F4F Wildcat
- SBD Dauntless
- TBF Avenger
- P-51 Mustang
- P-80 Shooting Star
- TBM Avenger