Leyte is a large map with an open sea with a huge chain of islands in the centre. The island chain in the middle is unnavigable by ships and must be flown over. There are usually fights for bases around the edges of the centre island.
Escort
The Akagi and Lexington are both providing support to the ongoing battle for an island. Whilst putting the enemy land installations under fire they have learned about each others presence. A clash between the two carriers is about to begin. Protect your carrier and land bases and destroy all enemy units and land targets!
—Map description


This highly entertaining battle is no doubt drawn partially from Coral Sea as it appears in Battlefield 1942. The two carriers start on the west side of the map and travel eastward, and are escorted by a single light destroyer - that is, a Clemson for the Allies and a Minekaze for the Japanese. The carriers, as they travel, pass three bases of the opposing side. These bases carry a lot of armament and can cause considerable damage as a carrier passes, making it a priority to eliminate these.
Aside from just destroying the enemy carrier, a secondary objective involves destroying two enemy bases whilst protecting at least one of your own. The bases are rather difficult to defend as the enemy spawns very close to them.
There are very few tactics on this map, as it all boils down to good flying and accurate bombing. Players have access to fighters (the Wildcat and the Zero), dive bombers (the SB2C and the D4Y), and torpedo bombers (the TBF and the B6N). Each has its own obvious niche on this map: the dive bombers' job is to eliminate not just the bases, but potentially also the destroyer and the carrier; torpedo bombers can focus on the carrier itself; fighters shoot down each other and the bombers. A solid defence and a good offence are required to win this map, and a lot of it boils down to both player skill and a good strategy.
Siege
The US are softening up Japanese land defences prior to a planned invasion. The Americans have to protect the two carriers participating in the attack, whilst the Japanese must defend their command buildings. Losing the carriers or a command building means losing the battle.
—Map description
Unfortunately, this map is horribly balanced against the Japanese, as the Allies have a lot of firepower. The Japanese strength also seems to fall for seemingly no reason at all.

The map layout is a ship and plane-based version of Siege Dreadnought, with the Japanese defending instead of attacking. The Allies have two objectives: either neutralize the base or destroy the Japanese fortresses. The bases are rather difficult targets from the sea but are relatively easy pickings from the air; the only trouble is that you don't have access to dedicated bombers. You'll instead, therefore, have to rely on Lightnings to destroy the enemy facilities. The headquarters have very little health and quite a bit of AA, so you'll want to fly around the base and destroy any AA emplacements you see. Afterwards, gun down the Japanese fortresses with your guns (remember, they're invincible to the Hellcat's guns, not the Lightning's) and combine these with bombs. Four or five squads of these is usually enough to destroy a fortress.

To help them with the specified objectives, the Allies have access to the Lightning and the Hellcat from their carriers, and Fletchers and Clemsons from the sea. The boats are relatively slow and do not have sufficient range to destroy the fortresses, so players will want to stick to planes. Protecting the Allied carriers are two Cleveland-class light cruisers. These cruisers have a respectable AA and can still cook a Fubuki or Minekaze with their artillery, so the carriers are practically defended for you. To make matters better (and worse for the Japanese) the Allies receive reinforcements in the form of two Northampton-class heavy cruisers that proceed to target the Japanese fortresses.
Allied players will want to simply focus on the bases and the Japanese players in order to win.
The Japanese, meanwhile, face an uphill battle. They have access to Minekazes and Fubukis from the southeast corner of the map. Air support comes from a Kaga-class, protected by two Akizuki-classes, from the southwest. Players can spawn from the carrier as a D4Y kamikaze, a J2M Raiden, or a Zero.
Aside from the constantly falling strength of the Japanese forces, the Allies also receive the aforementioned Northampton-class heavy cruisers; something the Japanese simply have nothing to counter with, especially when escorted by the large number of destroyers and fighter support. If possible, the Japanese will want to combine four kamikaze Judies and all target a single Cleveland. This might punch the hole in the Allied defences you're looking for, allowing you a free shot at the carriers. Expect, however, some crafty Allied players to spawn a Hellcats and shoot down your kamikazes.
Competitive
The carriers Hiryū and Sōryū are assigned to launch attack waves against a group of lightly defended enemy islands to take out any land defences. However, recent sightings of American planes indicate the possibility of an enemy carrier presence in the area. Therefore this operation should be carried out in haste!
—Map description


This map is similar to Escort, but changes around some allegiances; all the bases belong to the Allies and both carriers belong to the Japanese. The Japanese have Zeroes, D4Ys, and B6Ns to eliminate as many Allied ground forces as possible.
There are six Allied bases, and each carrier must pass through three of them. Each has considerable firepower. Judies, therefore, will be the preferred starting plane. Ultimately, however, you'll need to use all three types in order to win. Neutralize the first bases quickly to prevent them from damaging the rather fragile carriers.
The carriers will mainly be harassed by patrol boats, but players who want to win will want to target the land-based shore defences. Rather than gambling on landing the finishing bomb on the headquarters, focus instead on destroying the land defences. They are easy kills and each base has a lot of them. The fortresses can't be damaged by guns from either bomber type, but they can from the Zero. In order to ensure the survival of the carriers and to get the highest number of points, try spawning as dive bombers. Once you bomb the headquarters, fly around and destroy whatever you can with your guns while your bomb reloads.


Once the carrier passes the first base, however, the computer ups the ante by spawning additional enemy units. Hawker Hurricanes make their runs on the extremely vulnerable dive bombers whilst additional patrol boats, TBD Devastators, SBD Dauntlesses, and a pair of Clemson-class destroyers attack the carriers. Players should switch as soon as possible from dive bombers to torpedo bombers (which cause more damage than dive bombers; because the Clemsons are easy targets, you'll want to damage them as possible) and fighters (particularly to get the golden bracketed Hurricanes).
Continue to destroy the enemy forces. There are many targets to choose from, and a different set for each plane type.
Upon neutralizing all six bases (and completing the secondary objective), the final stage begins: a Yorktown-class and a Lexington-class carrier appear on the eastern border. Where they spawn on the border seems to be randomized, but they will always spawn equidistantly from the centre. One carrier launches fighter cover while the other sends waves of bombers. Defend and attack accordingly. Sinking both carriers ends the mission.
Duel

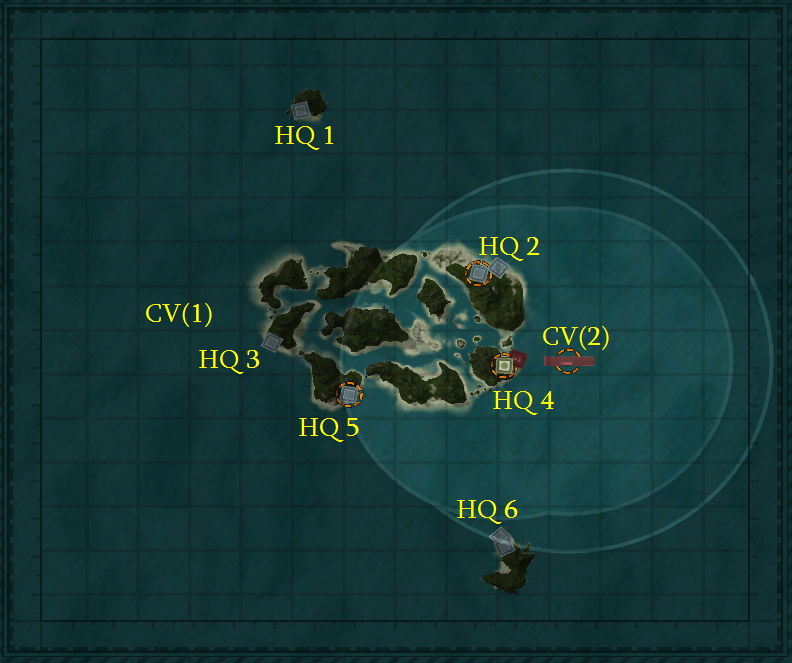
Island Capture - Small
Map Description: Small consists of a huge island chain connected by shallows, with multiple island bases on the outside. The center of the map is impassible to ships due to shallows, but can be flown over by planes from the aircraft carriers. Only the outside bases spawn light cruisers, so players can expect heavy destroyer fights on this map.
Unlock Data: The strongest unit you'll encounter on this map are heavy cruisers, spawned from the outer bases. This makes for an interesting destroyer-centric map. The strongest unlocks are the Kuma-class CL Torpedo Variant and the Atlanta on the waves, or the J9Y Kikka or the P-51 Mustang in the air.
Balancing Notes: The balancing of this map is called into question when the Mustang Unit Pack is used. The P-51 Mustang, with its huge array of rockets, can cook enemy destroyers and light cruisers on this map rather easily. The J9Y Kikka is far less overpowered, because its bomb doesn't cause as much damage. The Japanese won't have much to respond with if faced by a Mustang rush.
Click on a Headquarters to see what it can spawn.
HQ 1
- Elco PT boat
- Clemson-class DD
- De Ruyter-class CL
- ASW Fletcher-class DD
- Allen M. Sumner-class DD
- Atlanta-class CL
- Gyoraitei PT boat
- Minekaze-class DD
- Kuma-class CL
- Akizuki-class DD
- Shimakaze-class DD
- Kuma-class CL Torpedo Variant
None
None
HQ 2
- Elco PT boat
- Fletcher-class DD
- ASW Fletcher-class DD
- Allen M. Sumner-class DD
- Gyoraitei PT boat
- Fubuki-class DD
- Akizuki-class DD
- Shimakaze-class DD
None
None
HQ 3 (Allied)
- Elco PT boat
- Clemson-class DD
- ASW Fletcher-class DD
- Allen M. Sumner-class DD
- Gyoraitei PT boat
- Minekaze-class DD
- Akizuki-class DD
- Shimakaze-class DD
None
None
HQ 4 (Japanese)
- Elco PT boat
- Clemson-class DD
- ASW Fletcher-class DD
- Allen M. Sumner-class DD
- Gyoraitei PT boat
- Minekaze-class DD
- Akizuki-class DD
- Shimakaze-class DD
None
None
HQ 5
- Elco PT boat
- Fletcher-class DD
- ASW Fletcher-class DD
- Allen M. Sumner-class DD
- Gyoraitei PT boat
- Fubuki-class DD
- Akizuki-class DD
- Shimakaze-class DD
None
None
HQ 6
- Elco PT boat
- Clemson-class DD
- De Ruyter-class CL
- ASW Fletcher-class DD
- Allen M. Sumner-class DD
- Atlanta-class CL
- Gyoraitei PT boat
- Minekaze-class DD
- Kuma-class CL
- Akizuki-class DD
- Shimakaze-class DD
- Kuma-class CL Torpedo Variant
None
None
CV(1) - Hermes-class
Allied planes
- F4F Wildcat
- SB2C Helldiver
- P-51 Mustang
- P-80 Shooting Star
CV(2) - Shōhō-class
Japanese planes
- A6M Zero
- D4Y Judy
- J7W Shinden
- J9Y Kikka
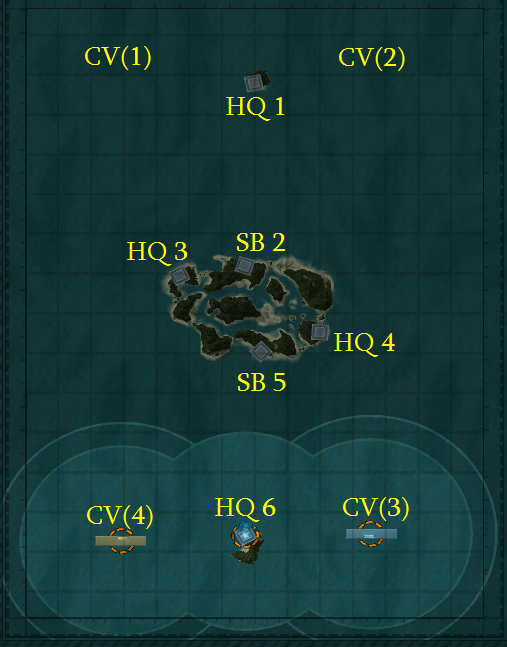
Island Capture - Medium
Map Description: Medium is larger than small but has more or less the same units. The most prevalent changes include the addition of heavy cruisers, another carrier for each side, and more bases in the middle. The Akagi-class and the Lexington-class carriers have each side's special plane - that is,the HVAR-slinging F4U Corsair and the kamikaze Zero. The other two - Yorktown and Kaga - sport standard aircraft. This may be mostly a cruiser fight, but the cruiser group that wins will be the one with the best air support.
Unlock Data: The best unlocks for this mission vary based on how you want to play - if you intend to use air superiority, P-80s, J7Ws, and P-51s can easily secure the skies. P-51s can also sink destroyers, making them almost overpowered on this map. However, heavy cruisers are very much selectable, and can be used to punch through Mustang spammers.
Balancing Data: The P-51 Mustang is almost overpowered on this map due to the large number of destroyers, but heavy cruisers are resistant enough to rockets to be able to punch through the enemy lines if they try to do so.
Click on a Headquarters to see which units it can spawn.
HQ 1 (Japanese)
- Elco PT boat
- Fletcher-class DD
- Cleveland-class CL
- LST Mark 2
- ASW Fletcher-class DD
- Allen M. Sumner-class DD
- Atlanta-class CL
- Alaska-class CA
- Gyoraitei PT boat
- Fubuki-class DD
- SB Boat LST
- Kuma-class CL
- Akizuki-class DD
- Shimakaze-class DD
- Kuma-class CL Torpedo Variant
- Tone-class CA
None
None
HQ 3
- Elco PT boat
- Fletcher-class DD
- Cleveland-class CL
- York-class CA
- LST Mark 2
- ASW Fletcher-class DD
- Allen M. Sumner-class DD
- Atlanta-class CL
- Alaska-class CA
- Gyoraitei PT boat
- Fubuki-class DD
- Kuma-class CL
- Mogami-class CA
- SB Boat LST
- Akizuki-class DD
- Shimakaze-class DD
- Kuma-class CL Torpedo Variant
- Tone-class CA
None
None
HQ 4
- Elco PT boat
- Fletcher-class DD
- Cleveland-class CL
- York-class CA
- LST Mark 2
- ASW Fletcher-class DD
- Allen M. Sumner-class DD
- Atlanta-class CL
- Alaska-class CA
- Gyoraitei PT boat
- Fubuki-class DD
- Kuma-class CL
- Mogami-class CA
- SB Boat LST
- Akizuki-class DD
- Shimakaze-class DD
- Kuma-class CL Torpedo Variant
- Tone-class CA
None
None
HQ 6 (Allied)
- Elco PT boat
- Fletcher-class DD
- Cleveland-class CL
- LST Mark 2
- ASW Fletcher-class DD
- Allen M. Sumner-class DD
- Atlanta-class CL
- Alaska-class CA
- Gyoraitei PT boat
- Fubuki-class DD
- SB Boat LST
- Kuma-class CL
- Akizuki-class DD
- Shimakaze-class DD
- Kuma-class CL Torpedo Variant
- Tone-class CA
None
None
CV(1) - Akagi-class
Japanese planes
- A6M Zero
- Kamikaze (A6M Zero)
- J7W Shinden
- J9Y Kikka
CV(2) - Kaga-class
Japanese planes
- A6M Zero
- D4Y Judy
- B6N Jill
- J7W Shinden
- J9Y Kikka
CV(3) - Lexington-class
Allied planes
- F4F Wildcat
- F4U Corsair
- P-80 Shooting Star
- P-51 Mustang
CV(4) - Yorktown-class
Allied planes
- F4F Wildcat
- SB2C Helldiver
- TBF Avenger
- P-80 Shooting Star
- P-51 Mustang
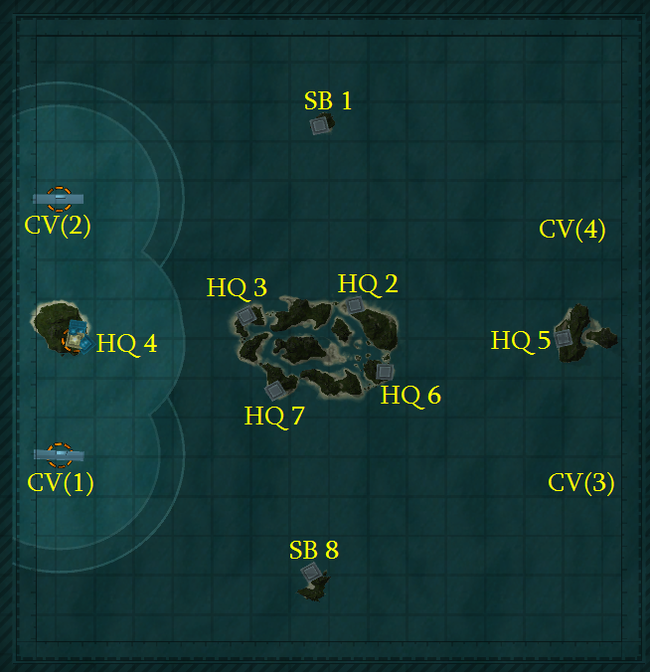
Island Capture - Large
Large contains a large amount of heavy cruisers. Battleships will be forced to spawn at the primary base, making it extremely difficult to get them into the fray. The main power on this map is the two carriers each side has, as they are the only source of airpower on this map.
This map contains a rather unreliable glitch for the Japanese side. It has been tested in Skirmish that players selecting a unit from the Mustang pack as his or her unlock, then selecting the second slot on the Japanese side, will result in HQ 3 being able to spawn Japanese units as soon as the game starts. It is currently unknown if this glitch carries through to multiplayer.
HQ 2
- Elco PT boat
- Fletcher-class DD
- LST Mark 2
- ASW Fletcher-class DD
- Allen M. Sumner-class DD
- Gyoraitei PT boat
- Fubuki-class DD
- SB Boat LST
- Akizuki-class DD
- Shimakaze-class DD
None
None
HQ 3 (Japanese?)
- Elco PT boat
- Fletcher-class DD
- Cleveland-class CL
- LST Mark 2
- ASW Fletcher-class DD
- Allen M. Sumner-class DD
- Atlanta-class CL
- Gyoraitei PT boat
- Fubuki-class DD
- Mogami-class CA
- SB Boat LST
- Akizuki-class DD
- Shimakaze-class DD
- Tone-class CA
None
None
HQ 4 (Allied)
- Elco PT boat
- Clemson-class DD
- Fletcher-class DD
- Cleveland-class CL
- LST Mark 2
- South Dakota-class BB
- ASW Fletcher-class DD
- Allen M. Sumner-class DD
- Atlanta-class CL
- Iowa-class BB
- Montana-class BB
- Gyoraitei PT boat
- Minekaze-class DD
- Fubuki-class DD
- Kuma-class CL
- Fusō-class BB
- SB Boat LST
- Akizuki-class DD
- Shimakaze-class DD
- Kuma-class CL Torpedo Variant
- Yamato-class BB
- Super Yamato-class BB
- F4F Wildcat
- TBF Avenger
- B-17 Flying Fortress
- P-51 Mustang
- P-80 Shooting Star
- TBM Avenger
- B-29 Superfortress
- A6M Zero
- B6N Jill
- G4M Betty
- J7W Shinden
- J9Y Kikka
- Ohka Carrier (MXY-7 Ohka)
HQ 5 (Japanese)
- Elco PT boat
- Clemson-class DD
- Fletcher-class DD
- Cleveland-class CL
- LST Mark 2
- South Dakota-class BB
- ASW Fletcher-class DD
- Allen M. Sumner-class DD
- Atlanta-class CL
- Iowa-class BB
- Montana-class BB
- Gyoraitei PT boat
- Minekaze-class DD
- Fubuki-class DD
- Kuma-class CL
- Fusō-class BB
- SB Boat LST
- Akizuki-class DD
- Shimakaze-class DD
- Kuma-class CL Torpedo Variant
- Yamato-class BB
- Super Yamato-class BB
- F4F Wildcat
- TBF Avenger
- B-17 Flying Fortress
- P-51 Mustang
- P-80 Shooting Star
- TBM Avenger
- B-29 Superfortress
- A6M Zero
- B6N Jill
- G4M Betty
- J7W Shinden
- J9Y KIkka
- Ohka Carrier (MXY-7 Ohka)
HQ 6
- Elco PT boat
- Fletcher-class DD
- Cleveland-class CL
- LST Mark 2
- ASW Fletcher-class DD
- Allen M. Sumner-class DD
- Atlanta-class CL
- Gyoraitei PT boat
- Fubuki-class DD
- Mogami-class CA
- SB Boat LST
- Akizuki-class DD
- Shimakaze-class DD
- Tone-class CA
None
None
HQ 7
- Elco PT boat
- Fletcher-class DD
- LST Mark 2
- ASW Fletcher-class DD
- Allen M. Sumner-class DD
- Gyoraitei PT boat
- Fubuki-class DD
- SB Boat LST
- Akizuki-class DD
- Shimakaze-class DD
None
None
CV(1) - Yorktown-class
Allied planes
- F4F Wildcat
- F4U Corsair
- TBF Avenger
- TBM Avenger
- P-80 Shooting Star
- P-51 Mustang
CV(2) - Lexington-class
Allied planes
- F4F Wildcat
- SB2C Helldiver
- TBF Avenger
- TBM Avenger
- P-80 Shooting Star
- P-51 Mustang
CV(4) - Akagi-class
Japanese planes
- A6M Zero
- D4Y Judy
- Kamikaze (A6M Zero)
- J7W Shinden
- J9Y Kikka
CV(3) - Sōryū-class
Japanese planes
- A6M Zero
- J2M Raiden
- D4Y Judy
- B6N Jill
- J7W Shinden
- J9Y Kikka