Midway consists of a large archipelago of islands. The actual Midway atoll may or may not be present on the map, depending on which mode you're playing. The main island is actually more of a nuisance than a benefit, because it tends to be a large obstacle for ships to move around.
Escort
The Imperial Navy's battleships are closing in from the northwest towards Midway. They intend to make clear the way for incoming amphibious forces. The Japanese side's goal is to protect the battleships along the way with cruisers, while the US players, also controlling cruisers, have to destroy the battleships.
—Map description

This is a rather straightforward map. Both sides have access to their cruisers (Northamptons, Yorks, Clevelands, and De Ruyters for the Allies; Mogamis, Takaos, Aganos, and Kumas for the Japanese). The Allies must sink two battleships while the Japanese must keep at least one afloat until it reaches the specified point on the map. There are two battleships Japanese must escort are a Fusō-class and a Kongō-class.

At first glance, the Japanese have a huge advantage in terms of firepower with the battleships. However, the battleships are quite slow and the new damage model lets cruisers cause considerable damage to them. Battleships are far more vulnerable to heavy cruisers than meets the eye, especially when commanded by four intelligent players. Damage can quickly pile up. Ultimately, therefore, the map favours the Allies.
The Allies spawn to the southwest of the Japanese fleet, and continue to do so throughout the mission. The goal for the US at this point is to simply sink one of the two Japanese battleships and at least damage the second. If they can do this before their spawn is unlocked, then victory is possible. The Japanese must simply sink all the US players before they can cause considerable damage to the Japanese battleships.

Naturally, the Allies should spawn as Northampton-class heavy cruisers. Light cruisers are a total waste on this map, as they will be unable to cause heavy damage to the battleships or when the enemy selects heavy cruisers of their own. The York-class is a reasonable choice, but only if you are proficient with torpedoes. The average player should go for the cannonade the Northampton-class provides.
The Allied players should rely on their knowledge of the AI and the damage model to be victorious. Firstly, destruction of the ship's magazine will really hurt a battleship. Once it's destroyed, however, it takes a while for it to regenerate. They should therefore focus firepower on the fuel section and set it alight. The AI does not set its repairs effectively, so fire damage will be crucial to sink the battleships.
The Japanese players should make use of their torpedoes and close within torpedo range to sink the Allied cruisers quickly. The Japanese ships have a slightly shorter range than their Allied counterparts, but instead are considerably more powerful. Be sure to read this guide's Tactical Library for additional information. There is very little tactics for the Japanese; simply sink the enemy quickly.
Once the Japanese battleships get close to the island, the Allied spawn suddenly changes: they lose the spawn to the southwest and instead spawn directly in the Midway atoll, close to the Japanese goal. This new spawn can catch the Japanese players off-guard and can throw a huge wrench in the Japanese plans. Therefore, the Japanese should be sure to position several of their players in front of their battleships.
Siege
The Japanese intend to capture Midway. In order to do so, the Imperial Navy must destroy the fortresses scattered around the area to allow the landings to begin. The US have to disable all enemy carriers backing up the operation.
—Map description


This is an air superiority mission where both sides must simply dogfight to win. While the Allies and the Japanese have access to level and torpedo bombers, both of them are sitting ducks for fighters. Fighters here are worth a lot of points, so the mission can be won by simply shooting down as many enemy fighters as possible. As a result, the Allies have a slight advantage here; the P-40 Warhawk is superior in turning to the J2M Raiden, making it easier to dogfight with.
The Allies have access to the B-25 Mitchell and the TBF Avenger, but neither should be used as both are sitting ducks for the J2M Raiden. As a dedicated interceptor, the Raiden can make mincemeat of the Mitchell or the Avenger, and it is impossible to outrun. Even if you manage to get within range of the Japanese strike fleet, it is heavily guarded by multiple destroyers, making it a suicide mission.
The Japanese, meanwhile, have access to G4M Betties, D4Y Judies, and J2M Raidens. The Judies and the Betties are sitting ducks and should not be used. The Raidens are all the Japanese needs in order to win. Before attempting to dogfight the enemy Warhawks, however, be sure to fly around and neutralize as much of the ground-based AA as possible. This helps even things up in the skies, and can potentially pave the way for future air-to-ground strikes against the enemy fortresses. The fortresses are vulnerable to the Raiden's cannon fire, so strafe them down and stop only to dogfight enemy fighters. You'll need to play to your speed and climb rate in order to win.
Competitive
The Lexington and her fleet are heading home through enemy waters after having dealt a devastating strike on the Japanese. Unexpectedly they find themselves facing strong opposition. You have to ensure that Lady Lex makes it out of the area in one piece!
—Map description


This map is one of the few sea-centric Competitive maps. A Lexington-class and a Yorktown-class are being escorted by a pair of cruisers (A York and a De Ruyter). The Lexington-class must survive until the end. The Yorktown-class is a secondary objective, as is at least one of the heavy cruisers. All players are on the Allied side and have the option of picking either Fletchers or Clemsons. The answer is obvious right from the start; select the Fletcher-class at all times.
The Japanese attack the carrier with a lot of units as it passes through, mostly from the east and northeast. The first few waves will consist of bombers of some sort; the waves are randomized each time. Expect B6N Jills, D4Y Judies, kamikaze Zeroes, and H6K Mavises to come in and try to sink your boats. Simply keep the flak up and shoot down as many as possible to avoid damage to the cruisers or the carriers.
The first seabourne units you'll encounter usually come from the northeast and can consist of Shimakazes, Kumas, and Gyoraiteis. You'll need to employ torpedoes against the Kumas, which are quite resistant to destroyer fire. Even Shimakazes are quite vulnerable to torpedoes, even if it's difficult to hit them. Players can also expect high-valued I-400-class submarines around the fleet as well. Unfortunately you don't have access to ASW Fletchers, so you'll have to rely on depth charges.
Aside from these waves there are no real surprises on this map.
Duel

Island Capture - Small
Map Description: Midway has an emphasis on troop transports and landings, and as such submarines play a role in eliminating these before they can deploy Daihatsus or Higgins Boats. The two carriers remain ever-vulnerable to submarine attacks, so it can pay to upgrade to an anti-submarine warfare unit like the ASW Fletcher.
Unit Unlocks: Players have a very small choice of unlocks - it's either destroyers or submarines. Players should therefore simply choose a submarine unlock if they are confident in hitting destroyers with torpedoes. For those who can't, they should pick a destroyer unlock. The Japanese can pick a fighter unlock to help secure the skies (the J9Y Kikka, with its high speed and large rocket complement, is perfect for shooting down TBMs) and the Allies can pick the TBM to launch highly damaging long-ranged attacks.
Balancing Notes: This map favours the Allies in terms of unlocks. The Allies can deploy the TBM Avenger with Tiny Tims, but the Japanese still can't deploy Ohkas. The focus on submarines makes TBMs even more versatile, with their FIDO homing torpedoes. The Japanese must put up a lot of CAP to cover their units against TBM attacks. Additionally, P-51 Mustangs from the Mustang Unit Pack can cause critical damage to aircraft and destroyers alike, while an ASW Fletcher can make the carrier virtually invincible to submarine attacks.
Click on a Headquarters to see which units it can spawn
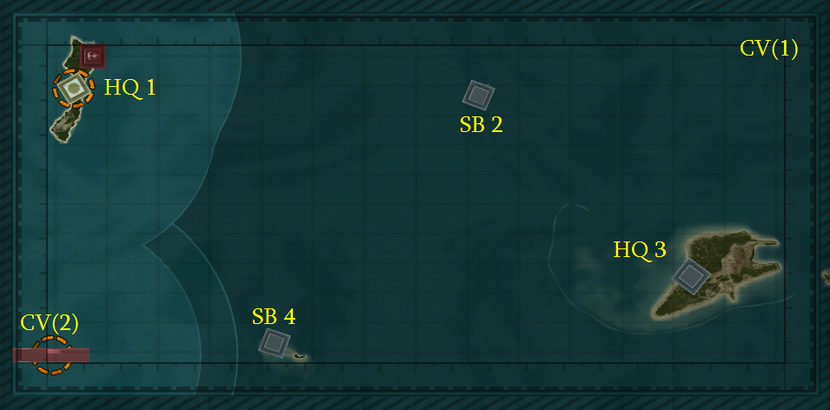
HQ 1 (Japanese)
- Elco PT boat
- Fletcher-class DD
- Troop Transport AP
- Narwhal-class SS
- ASW Fletcher-class DD
- Allen M. Sumner-class DD
- Gato-class SS
- Gyoraitei PT boat
- Fubuki-class DD
- Troop Transport AP
- Type B SS
- Akizuki-class DD
- Shimakaze-class DD
- I-400-class SS
- Kaiten Carrier SS
None
None
HQ 3 (Allied)
- Elco PT boat
- Fletcher-class DD
- Troop Transport AP
- Narwhal-class SS
- ASW Fletcher-class DD
- Allen M. Sumner-class DD
- Gato-class SS
- Gyoraitei PT boat
- Fubuki-class DD
- Troop Transport AP
- Type B SS
- Akizuki-class DD
- Shimakaze-class DD
- I-400-class SS
- Kaiten Carrier SS
None
None
CV(1) - Yorktown-class
Allied planes
- F4F Wildcat
- SBD Dauntless
- TBF Avenger
- P-51 Mustang
- P-80 Shooting Star
- TBM Avenger
CV(2) - Sōryū-class
Japanese planes
- A6M Zero
- D3A Val
- B6N Jill
- J7W Shinden
- J9Y Kikka
Island Capture - Medium
Map Description: Medium sized Midway uses the rarely-used De Ruyter-class light cruiser for the Allies. There are no LSTs in this map, so players will want to rely on patrol boats to reach the supply bases behind their starting positions and try to secure an early lead. SBs 6 and 1 should be captured last since they are the easiest to obtain. SB 3 and 4 are more contested and should be captured first to try and impede your opponent's progress.
Unlock Data: TBMs and Ohka Carriers are the main firepower on this map, particularly against the destroyers and cruisers. They are also highly effective against the two map's carriers. The other method of attack are submarines, so defensive players will want ASW Fletchers. The Tone-class ASW cruiser is unavailable for the Japanese, so defensive players might want to use their own submarines (which have a large sonar) in combination with floatplanes for submarine defence.
Balancing Notes: The Allies are a little stronger on the defensive side because of their ASW Fletcher, but aside from this the two sides are identical.
Click on a Headquarters to see which units it can spawn.
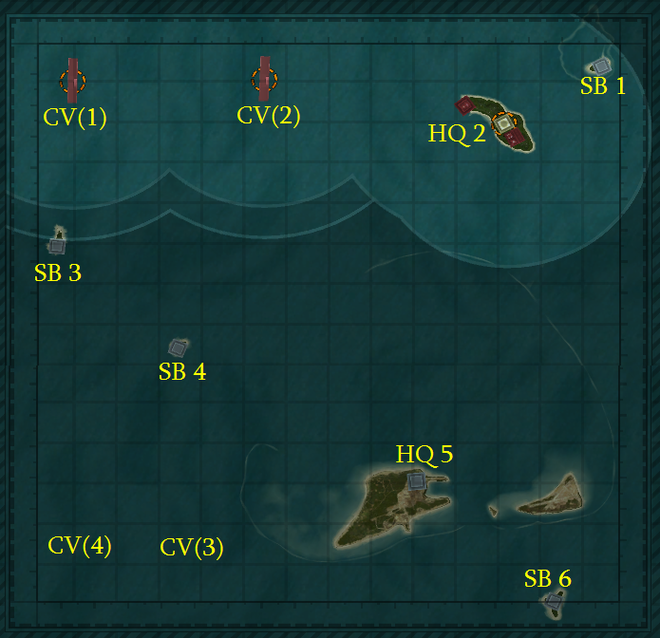
HQ 2 (Japanese)
- Elco PT boat
- Fletcher-class DD
- De Ruyter-class CL
- Troop Transport AP
- Narwhal-class SS
- ASW Fletcher-class DD
- Allen M. Sumner-class DD
- Atlanta-class CL
- Gato-class SS
- Gyoraitei PT boat
- Fubuki-class DD
- Kuma-class CL
- Type B SS
- Troop Transport AP
- Akizuki-class DD
- Shimakaze-class DD
- Kuma-class CL Torpedo Variant
- I-400-class SS
- Kaiten Carrier SS
- F4F Wildcat
- SBD Dauntless
- TBF Avenger
- OS2U Kingfisher
- C-47 Skytrain
- P-80 Shooting Star
- P-51 Mustang
- TBM Avenger
- B-29 Superfortress
- A6M Zero
- D3A Val
- B6N Jill
- F1M Pete
- L2D Tabby
- J7W Shinden
- J9Y Kikka
- Ohka Carrier (MXY-7 Ohka)
- G5N Liz
HQ 5 (Allied)
- Elco PT boat
- Fletcher-class DD
- De Ruyter-class CL
- Troop Transport AP
- Narwhal-class SS
- ASW Fletcher-class DD
- Allen M. Sumner-class DD
- Atlanta-class CL
- Gato-class SS
- Gyoraitei PT boat
- Fubuki-class DD
- Kuma-class CL
- Type B SS
- Troop Transport AP
- Akizuki-class DD
- Shimakaze-class DD
- Kuma-class CL Torpedo Variant
- I-400-class SS
- Kaiten Carrier SS
- F4F Wildcat
- SBD Dauntless
- TBF Avenger
- OS2U Kingfisher
- C-47 Skytrain
- P-80 Shooting Star
- P-51 Mustang
- TBM Avenger
- B-29 Superfortress
- A6M Zero
- D3A Val
- B6N Jill
- F1M Pete
- L2D Tabby
- J7W Shinden
- J9Y Kikka
- Ohka Carrier (MXY-7 Ohka)
- G5N Liz
CV(1) - Sōryū-class
Japanese planes
- A6M Zero
- D3A Val
- B6N Jill
- J9Y Kikka
- J7W Shinden
CV(2) - Sōryū-class
Japanese planes
- A6M Zero
- D3A Val
- B6N Jill
- J9Y Kikka
- J7W Shinden
CV(3) - Yorktown-class
Allied planes
- F4F Wildcat
- SBD Dauntless
- TBF Avenger
- P-80 Shooting Star
- P-51 Mustang
- TBM Avenger
CV(4) - Yorktown-class
Allied planes
- F4F Wildcat
- SBD Dauntless
- TBF Avenger
- P-80 Shooting Star
- P-51 Mustang
- TBM Avenger
Island Capture - Large
Map Description: Large Midway is a lot like Jaws Medium - a key island lies in the corner of the map, and both sides must race to get it. Unlike Jaws, however, the player with control of this island does not gain units that will cause the whole playing field to tilt; rather, it is a position that simply offers another spawn. This leaves the other two bases open to a counterattack. With so many units focusing on the northeastern island, expect a few submarines or bombers to sneak in and strike from the southeast.
Unlock Data: The large map size and large variety of units lets you pick any unlock and prevail. Ohkas and TBMs pack a considerable wallop against bases and cruisers alike. The large amount of carriers lures submarines around, and they should be under constant sonar coverage to protect against sneak attacks. The Allies can easily employ the FIDO easily here, using their carriers as a magnet.
Balancing Notes: The Allies have an offensive mobility advantage because their TBMs can be employed from carriers. TBMs are also highly effective against submarines, so the Japanese will want to employ a lot of destroyers and possibly patrol boats, which are torpedo-proof. Flying boats and floatplanes are effective at long range against submarines, but cannot drop enough depth charges in a short time to sink a sub, and therefore are ineffective when the submarine is close to its target.
The Allies have a bit of an advantage because their TBM Avengers can be deployed from their carriers, while the Ohka Carrier must fly all the way from their home base.
Click on a Headquarters to see what it can spawn.
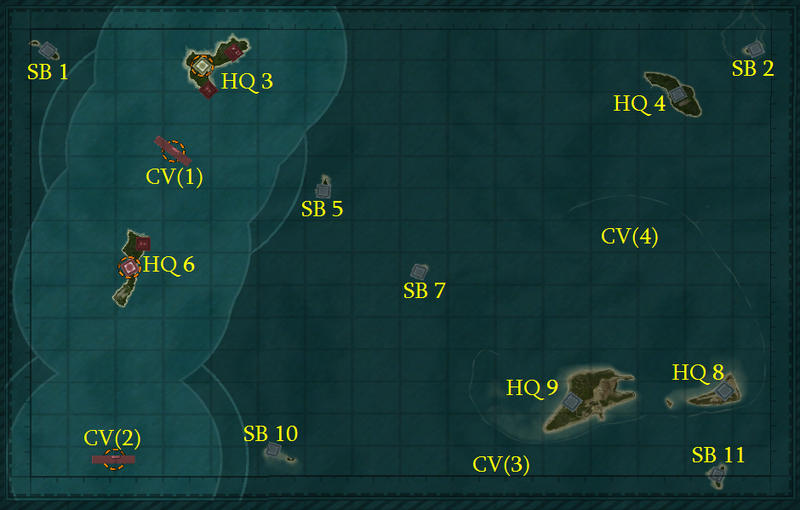
HQ 3 (Japanese)
- Elco PT boat
- Fletcher-class DD
- Cleveland-class CL
- Troop Transport AP
- ASW Fletcher-class DD
- Allen M. Sumner-class DD
- Kuma-class CL Torpedo Variant
- Gyoraitei PT boat
- Fubuki-class DD
- Agano-class CL
- Troop Transport AP
- Akizuki-class DD
- Shimakaze-class DD
- Kuma-class CL Torpedo Variant
- F4F Wildcat
- SBD Dauntless
- TBF Avenger
- PBY Catalina
- C-47 Skytrain
- P-80 Shooting Star
- P-51 Mustang
- B-29 Superfortress
- TBM Avenger
- A6M Zero
- D3A Val
- B6N Jill
- H6K Mavis
- L2D Tabby
- J9Y Kikka
- J7W Shinden
- H8K Emily
- G5N Liz
- Ohka Carrier (MXY-7 Ohka)
HQ 4
- Elco PT boat
- Fletcher-class DD
- Cleveland-class CL
- Troop Transport AP
- Narwhal-class SS
- ASW Fletcher-class DD
- Allen M. Sumner-class DD
- Atlanta-class CL
- Gato-class SS
- Gyoraitei PT boat
- Fubuki-class DD
- Agano-class CL
- Troop Transport AP
- Type B SS
- Akizuki-class DD
- Shimakaze-class DD
- Kuma-class CL Torpedo Variant
- I-400-class SS
- Kaiten Carrier SS
- F4F Wildcat
- SBD Dauntless
- TBF Avenger
- PBY Catalina
- OS2U Kingfisher
- C-47 Skytrain
- P-80 Shooting Star
- P-51 Mustang
- TBM Avenger
- B-29 Superfortress
- A6M Zero
- D3A Val
- B6N Jill
- F1M Pete
- H6K Mavis
- L2D Tabby
- J9Y Kikka
- J7W Shinden
- H8K Emily
- G5N Liz
- Ohka Carrier (MXY-7 Ohka)
HQ 6 (Japanese)
- Elco PT boat
- Fletcher-class DD
- Cleveland-class CL
- Troop Transport AP
- Narwhal-class SS
- ASW Fletcher-class DD
- Allen M. Sumner-class DD
- Atlanta-class CL
- Gato-class SS
- Gyoraitei PT boat
- Fubuki-class DD
- Agano-class CL
- Troop Transport AP
- Type B SS
- Akizuki-class DD
- Shimakaze-class DD
- Kuma-class CL Torpedo Variant
- I-400-class SS
- Kaiten Carrier SS
None
None
HQ 8 (Allied)
- Elco PT boat
- Fletcher-class DD
- Cleveland-class CL
- Troop Transport AP
- ASW Fletcher-class DD
- Allen M. Sumner-class DD
- Kuma-class CL Torpedo Variant
- Gyoraitei PT boat
- Fubuki-class DD
- Agano-class CL
- Troop Transport AP
- Akizuki-class DD
- Shimakaze-class DD
- Kuma-class CL Torpedo Variant
- F4F Wildcat
- SBD Dauntless
- TBF Avenger
- PBY Catalina
- C-47 Skytrain
- P-80 Shooting Star
- P-51 Mustang
- B-29 Superfortress
- TBM Avenger
- A6M Zero
- D3A Val
- B6N Jill
- H6K Mavis
- L2D Tabby
- J9Y Kikka
- J7W Shinden
- H8K Emily
- G5N Liz
- Ohka Carrier (MXY-7 Ohka)
HQ 9 (Allied)
- Elco PT boat
- Fletcher-class DD
- Cleveland-class CL
- Troop Transport AP
- Narwhal-class SS
- ASW Fletcher-class DD
- Allen M. Sumner-class DD
- Atlanta-class CL
- Gato-class SS
- Gyoraitei PT boat
- Fubuki-class DD
- Agano-class CL
- Troop Transport AP
- Type B SS
- Akizuki-class DD
- Shimakaze-class DD
- Kuma-class CL Torpedo Variant
- I-400-class SS
- Kaiten Carrier SS
None
None
CV(1) - Sōryū-class
Japanese planes
- A6M Zero
- D3A Val
- B6N Jill
- J7W Shinden
- J9Y Kikka
CV(2) - Sōryū-class
Japanese planes
- A6M Zero
- D3A Val
- B6N Jill
- J7W Shinden
- J9Y Kikka
CV(3) - Yorktown-class
Allied planes
- F4F Wildcat
- SBD Dauntless
- TBF Avenger
- P-80 Shooting Star
- P-51 Mustang
- TBM Avenger
CV(4) - Yorktown-class
Allied planes
- F4F Wildcat
- SBD Dauntless
- TBF Avenger
- P-80 Shooting Star
- P-51 Mustang
- TBM Avenger