Serpent is a map notable for its huge quarter circle island chain. Its Escort, Siege, and Competitive missions are rather sub-par, but island capture is quite fun because there are so many bases to capture.
Escort
US troop carrier plane must land on an Allied base, but the Japanese must intercept and destroy them. the US must escort the remaining C-47 Dakota planes until they can land whilst the Japanese have to destroy the US troop carriers before they can land at the southern enemy base.
—Map description


This map is extremely easy for the Allies, as they have far more aircraft than the Japanese will ever have. In the southwest of the large island chain are four Japanese carriers of varying classes. All four spawn only Zeroes. They must destroy the US troop carriers flying along the island chain. If they reach the southern end of the chain, the Allies win. The Allies have access to four airfields which follow the island chain the whole way.
The hard part for the Japanese is getting at the troop carriers. They are escorted not only by US players, but also by two squads of two P-40 warhawks each - more than doubling the number of Allied aircraft in the skies.
The troop transports fly about 1.7 kilometres apart. This makes getting to them extremely difficult, especially for the furthest ones. These will inevitably be the ones that will get the US the victory.
As the troop carriers fly around, US forces emerge from various places to knock out the Japanese carriers as they come by. The first carrier is doomed at the start, as a South Dakota-class battleship escorted by a Clemson will be literally invincible to anything the Japanese players can throw at them. The second carrier is sunk by two squads of three B-17s. These B-17s approach from the northeast corner of the map, and can be intercepted if struck early enough.
This can potentially save your second carrier, but you'll inevitably lose time you'll need in order to hit the C-47s. It is extremely difficult for the Japanese to win on this map as a result.
Interestingly enough, the Allied C-47s have the Tactical Map icons of heavy bombers, not the troop carriers they really are.
Siege
Japanese kamikaze will try to take an anchored US fleet by surprise. The US must protect their anchored fleet from the kamikaze attacks whilst the Japanese have to escort their kamikaze squadron to their target.
—Map description

Unfortunately, this map isn't particularly balanced either - the Allies will have an easy time eliminating the slow-moving kamikazes and the Ohka carriers, especially if they are intercepted at a sufficient range. The kamikaze waves come in two types, one after the other: six suicidal Vals, and then three Ohkas. Winning the map as Japanese is made even more difficult by the strange AIs of the kamikazes. Many times they overshoot their targets and land in the water behind them. This counts as a shot-down kamikaze when strength is concerned. Therefore this map very much favours the Allies. That said, however, it is still possible for the Japanese to win here.
In the northwest corner of the map lies a massive fleet of Allied ships. From the southeast arrive several wings of suicidal D3A Vals, and occasionally Ohka Carriers. All the kamikazes appear in singular squadrons, not the usual squadron of three. Protecting the Allied fleet are the Allied players, flying F4F Wildcats or F2A Buffalos. The Japanese players must escort the kamikazes to their targets and sink the Allied fleet. The Japanese have access to three planes - the A6M, the Ki-43, or the J1N. The J1N is quite powerful on this map, as they can sink the two carriers in a couple runs.

The Allied fleet consists of one of each:
- Renown-class BB
- South Dakota-class BB
- King George V-class BB
- De Ruyter-class CL
- Cleveland-class CL
- Atlanta-class CL
- Fletcher-class DD
- Northampton-class CA
- Yorktown-class CV
- Lexington-class CV
The strategy to the map is really quite simple - the Allies must simply shoot down every Japanese kamikaze that heads their way, and the Japanese must (try to) keep their kamikazes alive long enough for them to hit a ship. Alternatively, however, it is possible to bomb the Allied ships using Gekkos.
Competitive
Three different fronts await your protection. Can your divided forces triumph in such an encounter? As a US force, you have to save all three Allied Headquarters. You are assigned to command light units.
—Map description


This map isn't particularly popular, and with good reason: not only are PT boats the only ships available to you, but they also are the only unit that has torpedoes. The map description is also flawed - there are only two headquarters to protect, not three.
The two (not three) fronts are to the north and south. Each area consists of a PT boat-spawning base, a carrier (which spawns Dauntlesses and Wildcats), and a South Dakota-class battleship. Your opponents consist of Ki-43s spawning from a pair of enemy bases, cruisers, and battleships. Most of the cruisers you will face are of the Tone-class or Kuma-class, with the occasional Takao or Mogami. The battleships are almost always Kongō-class.
Because PT boats are notoriously inaccurate due to the wave mechanism and poor targeting, it's best to stick to planes for this mission (should you choose to play it). Dauntlesses don't cause a lot of damage to ships, so you'll need to either strike out on your own or try to coordinate with your allies to team up on ships. The map is far easier if you put helping others in front of getting the highest score.
Duel
Island Capture - Small
Map Description: Much like the previously listed maps, the winner of this map will be who owns the centre island. The center island is capable of spawning PT boats, destroyers, light cruisers, LSTs, and Troop Transports. There are no other supply bases or headquarters on this map, so simply capture the center base, then attack your opponent's base with light cruisers to win.
Unlock Data: Plane unlocks are ok on this map, as it they can escort your paratroop carriers to the middle base or if you want a quick victory, you can sneak TBM Avengers or Ohka Carriers along the left border and neutralize the opponent's airbase before they get the center base. However, choosing the Akizuki-class or Atlanta-class ship unlocks can shoot down enemy aircraft if you get the middle base, making it hard for your opponent to recapture it.
Balancing Notes: With a Headquarters and airfield on each side and a single shipyard in the middle, this map is identically played for both sides.
Click on a Headquarters to see which units it can spawn.

HQ 1 (Japanese)
None
None
- F4F Wildcat
- SBD Dauntless
- TBF Avenger
- PBY Catalina
- OS2U Kingfisher
- B-17 Flying Fortress
- C-47 Skytrain
- P-80 Shooting Star
- P-51 Mustang
- B-29 Superfortress
- TBM Avenger
- A6M Zero
- D3A Val
- B6N Jill
- E13A Jake
- H6K Mavis
- G4M Betty
- L2D Tabby
- J7W Shinden
- J9Y Kikka
- H8K Emily
- G5N Liz
- Ohka Carrier (MXY-7 Ohka)
HQ 2
- Elco PT Boat
- Fletcher-class DD
- Cleveland-class CL
- LST Mark 2
- Troop Transport AP
- ASW Fletcher-class DD
- Allen M. Sumner-class DD
- Atlanta-class CL
- Gyoraitei PT boat
- Fubuki-class DD
- Agano-class CL
- SB Boat LST
- Troop Transport AP
- Akizuki-class DD
- Shimakaze-class DD
- Kuma-class CL Torpedo Variant
None
None
HQ 3 (Allied)
None
None
- F4F Wildcat
- SBD Dauntless
- TBF Avenger
- PBY Catalina
- OS2U Kingfisher
- B-17 Flying Fortress
- C-47 Skytrain
- P-80 Shooting Star
- P-51 Mustang
- B-29 Superfortress
- TBM Avenger
- A6M Zero
- D3A Val
- B6N Jill
- E13A Jake
- H6K Mavis
- G4M Betty
- L2D Tabby
- J7W Shinden
- J9Y Kikka
- H8K Emily
- G5N Liz
- Ohka Carrier (MXY-7 Ohka)
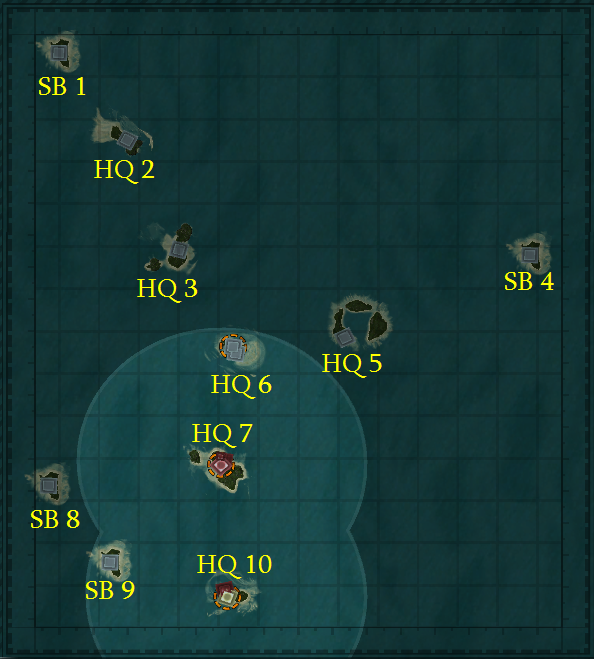
Island Capture - Medium
Map Description: This map is considerably larger than Small. The map is now a huge island chain that consists primarily of bases and a Headquarters in the centre. The centre headquarters provides light cruisers, making it the focus of the battle. That said, however, it can be tough to hold onto because of its proximity to each side's default airfields, which can make paratrooper drops on it.
Unlock Data: With so many units available, all the unlocks can prove to be extremely useful at some point or another. This map usually evolves into surface fights, though, so players will probably want to select a ship unlock versus a submarine one.
Balancing Notes: Well balanced, this map is popular amongst many players.
Click on a Headquarters to see what it can spawn.
HQ 2 (Allied)
- Elco PT boat
- Clemson-class DD
- LST Mark 2
- Narwhal-class SS
- ASW Fletcher-class DD
- Allen M. Sumner-class DD
- Gato-class SS
- Elco PT boat
- Minekaze-class DD
- SB Boat LST
- Type B SS
- Akizuki-class DD
- Shimakaze-class DD
- I-400-class SS
- Kaiten Carrier SS
None
None
HQ 3 (Allied)
None
None
- F4F Wildcat
- SBD Dauntless
- TBF Avenger
- PBY Catalina
- OS2U Kingfisher
- B-17 Flying Fortress
- C-47 Skytrain
- P-80 Shooting Star
- P-51 Mustang
- TBM Avenger
- B-29 Superfortress
- A6M Zero
- D3A Val
- B6N Jill
- E13A Jake
- G4M Betty
- H6K Mavis
- L2D Tabby
- J7W Shinden
- J9Y Kikka
- Ohka Carrier (MXY-7 Ohka)
- G5N Liz
- H8K Emily
HQ 5
- Elco PT boat
- Fletcher-class DD
- Cleveland-class CL
- Northampton-class CA
- Troop Transport AP
- LST Mark 2
- Narwhal-class SS
- ASW Fletcher-class DD
- Allen M. Sumner-class DD
- Atlanta-class CL
- Alaska-class CA
- Gato-class SS
- Gyoraitei PT boat
- Fubuki-class DD
- Agano-class CL
- Mogami-class CA
- SB Boat LST
- Troop Transport AP
- Type B SS
- Akizuki-class DD
- Shimakaze-class DD
- Kuma-class CL Torpedo Variant
- Tone-class CA
- Kaiten Carrier SS
- I-400-class SS
None
None
HQ 6
- Elco PT boat
- Fletcher-class DD
- Cleveland-class CL
- Troop Transport AP
- LST Mark 2
- Narwhal-class SS
- ASW Fletcher-class DD
- Allen M. Sumner-class DD
- Atlanta-class CL
- Gato-class SS
- Gyoraitei PT boat
- Fubuki-class DD
- Agano-class CL
- SB Boat LST
- Troop Transport AP
- Type B SS
- Akizuki-class DD
- Shimakaze-class DD
- Kuma-class CL Torpedo Variant
- I-400-class SS
- Kaiten Carrier
None
None
HQ 7 (Japanese)
None
None
- F4F Wildcat
- SBD Dauntless
- TBF Avenger
- PBY Catalina
- OS2U Kingfisher
- B-17 Flying Fortress
- C-47 Skytrain
- P-80 Shooting Star
- P-51 Mustang
- TBM Avenger
- B-29 Superfortress
- A6M Zero
- D3A Val
- B6N Jill
- E13A Jake
- G4M Betty
- H6K Mavis
- L2D Tabby
- J7W Shinden
- J9Y Kikka
- Ohka Carrier (MXY-7 Ohka)
- G5N Liz
- H8K Emily
HQ 10 (Japanese)
- Elco PT boat
- Clemson-class DD
- LST Mark 2
- Narwhal-class SS
- ASW Fletcher-class DD
- Allen M. Sumner-class DD
- Gato-class SS
- Elco PT boat
- Minekaze-class DD
- SB Boat LST
- Type B SS
- Akizuki-class DD
- Shimakaze-class DD
- I-400-class SS
- Kaiten Carrier SS
None
None
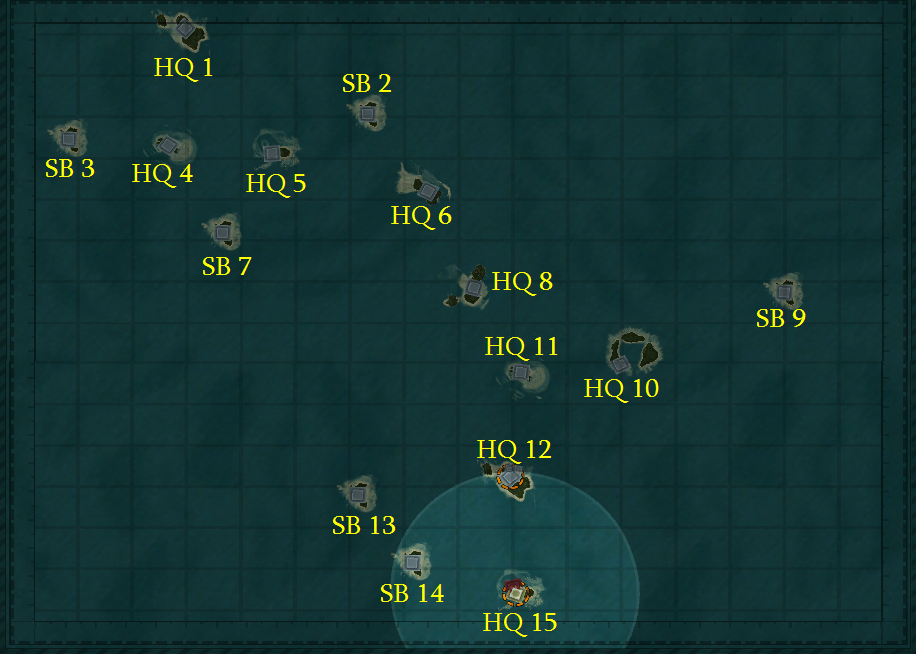
Island Capture - Large
Map Description: This map is one of the largest maps in the game and has a huge number of headquarters. There are, in fact, more headquarters than supply bases on this map. HQ 6 is unique to the Allies at the start, as it is the only headquarters on the map that spawns Clemsons (or Minekazes if owned by the Japanese) instead of Fletchers. Although the Clemsons will rarely cause considerable damage to the Japanese, it can still allow the Allies to make better use of their command points. As such the map is reasonably balanced, but the large number of headquarters can create lengthy battles.
Unlock Data: Nearly any unlock can be used to great effect on this map, perhaps save submarine unlocks. There are several forward shipyards and airbases which make the fight for the middle a question of who can neutralize their enemy's forward spawn the fastest.
Balancing Notes: This map plays evenly for both sides.
Click on a Headquarters to see which units it can spawn.
HQ 1
None
None
- F4F Wildcat
- SBD Dauntless
- TBF Avenger
- PBY Catalina
- OS2U Kingfisher
- B-17 Flying Fortress
- C-47 Skytrain
- P-51 Mustang
- P-80 Shooting Star
- TBM Avenger
- B-29 Superfortress
- A6M Zero
- D3A Val
- B6N Jill
- H6K Mavis
- E13A Jake
- G4M Betty
- L2D Tabby
- J7W Shinden
- J9Y Kikka
- H8K Emily
- G5N Liz
- Ohka Carrier (MXY-7 Ohka)
HQ 4 (Allied)
- Elco PT boat
- Fletcher-class DD
- Cleveland-class CL
- Northampton-class CA
- LST Mark 2
- Troop Transport AP
- Narwhal-class SS
- ASW Fletcher-class DD
- Allen M. Sumner-class DD
- Atlanta-class CL
- Alaska-class CA
- Gato-class SS
- Gyoraitei PT boat
- Fubuki-class DD
- Agano-class CL
- Mogami-class CA
- SB Boat LST
- Troop Transport AP
- Type B SS
- Akizuki-class DD
- Shimakaze-class DD
- Kuma-class CL Torpedo Variant
- Tone-class CA
- I-400-class SS
- Kaiten Carrier
None
None
HQ 5
- Elco PT boat
- Fletcher-class DD
- Cleveland-class CL
- LST Mark 2
- Troop Transport AP
- Narwhal-class SS
- ASW Fletcher-class DD
- Allen M. Sumner-class DD
- Atlanta-class CL
- Gato-class SS
- Gyoraitei PT boat
- Fubuki-class DD
- Agano-class CL
- SB Boat LST
- Troop Transport AP
- Type B SS
- Akizuki-class DD
- Shimakaze-class DD
- Kuma-class CL Torpedo Variant
- I-400-class SS
- Kaiten Carrier SS
None
None
HQ 6
- Elco PT boat
- Clemson-class DD
- LST Mark 2
- Narwhal-class SS
- ASW Fletcher-class DD
- Allen M. Sumner-class DD
- Gato-class SS
- Gyoraitei PT boat
- Minekaze-class DD
- SB Boat LST
- Type B SS
- Akizuki-class DD
- Shimakaze-class DD
- I-400-class SS
- Kaiten Carrier SS
None
None
HQ 8
None
None
- F4F Wildcat
- SBD Dauntless
- TBF Avenger
- PBY Catalina
- OS2U Kingfisher
- B-17 Flying Fortress
- C-47 Skytrain
- P-51 Mustang
- P-80 Shooting Star
- TBM Avenger
- B-29 Superfortress
- A6M Zero
- D3A Val
- B6N Jill
- H6K Mavis
- E13A Jake
- G4M Betty
- L2D Tabby
- J7W Shinden
- J9Y Kikka
- H8K Emily
- G5N Liz
- Ohka Carrier (MXY-7 Ohka)
HQ 10
- Elco PT boat
- Fletcher-class DD
- Cleveland-class CL
- Northampton-class CA
- LST Mark 2
- Troop Transport AP
- Narwhal-class SS
- ASW Fletcher-class DD
- Allen M. Sumner-class DD
- Atlanta-class CL
- Alaska-class CA
- Gato-class SS
- Gyoraitei PT boat
- Fubuki-class DD
- Agano-class CL
- Mogami-class CA
- SB Boat LST
- Type B SS
- Troop Transport AP
- Akizuki-class DD
- Shimakaze-class DD
- Kuma-class CL Torpedo Variant
- Tone-class CA
- I-400-class SS
- Kaiten Carrier SS
None
None
HQ 11
- Elco PT boat
- Fletcher-class DD
- Cleveland-class CL
- LST Mark 2
- Troop Transport AP
- Narwhal-class SS
- ASW Fletcher-class DD
- Allen M. Sumner-class DD
- Atlanta-class CL
- Gato-class SS
- Gyoraitei PT boat
- Fubuki-class DD
- Agano-class CL
- SB Boat LST
- Troop Transport AP
- Type B SS
- Akizuki-class DD
- Shimakaze-class DD
- Kuma-class CL Torpedo Variant
- I-400-class SS
- Kaiten Carrier
None
None
HQ 12
None
None
- F4F Wildcat
- SBD Dauntless
- TBF Avenger
- PBY Catalina
- OS2U Kingfisher
- B-17 Flying Fortress
- C-47 Skytrain
- P-51 Mustang
- P-80 Shooting Star
- TBM Avenger
- B-29 Superfortress
- A6M Zero
- D3A Val
- B6N Jill
- H6K Mavis
- E13A Jake
- G4M Betty
- L2D Tabby
- J7W Shinden
- J9Y Kikka
- H8K Emily
- G5N Liz
- Ohka Carrier (MXY-7 Ohka)
HQ 15 (Japanese)
- Elco PT boat
- Fletcher-class DD
- Cleveland-class CL
- Northampton-class CA
- LST Mark 2
- Troop Transport AP
- Narwhal-class SS
- ASW Fletcher-class DD
- Allen M. Sumner-class DD
- Atlanta-class CL
- Alaska-class CA
- Gato-class SS
- Gyoraitei PT boat
- Fubuki-class DD
- Agano-class CL
- Mogami-class CA
- SB Boat LST
- Troop Transport AP
- Type B SS
- Akizuki-class DD
- Shimakaze-class DD
- Kuma-class CL Torpedo Variant
- Tone-class CA
- I-400-class SS
- Kaiten Carrier
None
None