Battlestations: Pacific/Spine
Spine is a large asymmetric archipelago. Small and Medium, however, crop the archipelago to the point of identicalness. Despite this, this map slightly favours the Allies for their ability to spawn TBM Avengers at more points than the Japanese can spawn Ohkas.
Escort[edit]
A US carrier force is passing through an area controled by two Japanese bases and a carrier. The US must prevent Japanese attempts by achieving air superiority. The Japanese have to sink all carriers before they leave the battle zone.
—Map Description


This is a difficult map as the Japanese, because their victory depends a lot on timing their spawns.
As the map description mentions, the Allied carriers must pass through a pair of Japanese bases and a carrier. The Japanese bases spawn nothing but Gyoraiteis, which are easily handled by player-controlled wildcats spawned from the Allied carriers. The Japanese carrier spawns A6Ms, B6Ns, and suicidal Ki-43s. Of the three the Zeroes will be the most necessary to protect the Gyoraiteis and the Ohka Carriers.
The Japanese receive intermittent assistance from Ohka Carriers. Two squads of three appear at a time, always from the north part of the map.
The trick to winning as the Japanese is to time their attacks with the Ohka Carriers so that the Allies will be overwhelmed by potential targets. The eight Fletcher-class destroyers escorting the carriers will also be overwhelmed by targets and potentially let a couple through. If you're playing in Skirmish, though, you can easily win by exploiting the Allied AI's target priority list - they will always chase down planes first. Using this it's possible to have the entire Allied CAP follow you on a wild goose chase while your AI teammates go for the carriers.


The Gyoraiteis will be the real point-givers for the Japanese in this fight, but unless the are protected by Zeroes from above they will be easy pickings for the Wildcat players. With only four players, it will be difficult at best to sink the carriers. Torpedoes are also quite difficult to use, and should be employed en-masse from maximum range to ensure survivability. If you're a Gyoraitei, never be sunk with a full complement of torpedoes. Let the AI handle your AA weapons - the high waves will make aiming at the harassing Wildcats extremely difficult.
The Allies, meanwhile, must simply engage the Japanese wherever they pop up. They have access to Dauntlesses for bombing the enemy carrier but this is usually a waste of time. Instead focus on the survival of your own carriers by spawning Wildcats the entire time. Engage the Ohka Carriers and the Gyoraiteis at extreme range, before they can unleash an Ohka or torpedoes respectively.
This map is host to an interesting glitch. The Allied carrier collective health bar, seen top left, will always have the Japanese flag instead of the US one. Not only does the Japanese flag appear here where it shouldn't, but it also flies on the Yorktown-class carriers you're supposed to protect! Maybe you're defending Japanese copies of them? Aside from these glitches, however, the map plays normally, with the Japanese attacking what is technically their own carriers.
Siege[edit]
A US carrier group is backing up an amphibious force intent on invading the Japanese islands in the area. The US must destroy the enemy's land Forts and protect their landing ships. The Japanese must keep coastal defence lines in place and send the enemy fleet to the bottom.
—Map Description


This map highly favours the Japanese. As with all Siege maps, the attacking team must reduce the defending team's strength to zero. However, in this map the Japanese have a lot of static defences that, while they reduce the strength of the defenders considerably, are much too difficult to hit from the sea.
The Allied fleet consists of three AI carriers spawning F4Fs, which engage AI Zeroes in dogfights. Most notably, however, the Allies have a large LST fleet which tries (in vain) to land and capture the islands. More often than not, however, they'll get within range of the fortresses and get sunk. The mission would be far easier if you had access to bombers from the Allied carriers, but unfortunately all you have are Clemsons and Fletchers.
The Japanese have two bases, one of which is under constant Allied attack and the other is more distant and is left alone. The Japanese simply have to sink all the LSTs within the area, which should be pretty easy due to their fragile nature and the fact the Allies have to balance attacking and defending.
The islands the Allies are invading are extremely fortified with coastal guns, heavy AA, and fortresses. The fortresses are what cause a lot of damage, not just to your landing ships but also to you the player: most of the fortresses are equipped with battleship-grade cannons, which take a considerable amount off your heath when they hit. This makes approaching them nearly impossible; they have nearly twice the range as your own guns.
This map is usually avoided due to its slow pace (with ships being slow and spawning far away from the battle) and unbalanced nature.
Competitive[edit]
The Allied carrier fleet is in real trouble. Can a top-notch pilot save the day? As a US force, you have to put up ultimate resistance, flying fighters, dive and torpedo bombers to save the fleet.
—Map Description


This competitive match is a test of a player's ability to perform rocket, bomb, and torpedo strikes. Spawning from a pair of Allied carriers, players must fly F4U Corsairs, SBD Dauntlesses, and TBF Avengers to try and defend the two carriers, an Atlanta-class cruiser, and three destroyers from a huge force of Japanese ships and planes from the east.
Fortunately, neither the ships nor the planes come all at once. They usually come in waves, consisting of around three or four ships per wave. There are no submarines on this map, but there are a pair of battleships to the east, near the Japanese bases. Neither, however, really want to fight you, and it is entirely possible to win the map by simply eliminating the enemy as they come to you.
Most of the trouble for this map is choosing which plane to pick. The Corsair causes less damage but is more likely to land the killing blow on a ship via its multiple rockets. It will be difficult, however, to cause considerable damage to an enemy ship with one. That said Corsairs also double as fighters, so you'll want some to take on the enemy Ki-43s, D4Ys, and B6Ns with. Not many players choose to spawn as Dauntlesses, as they don't seem to cause as much damage as Avengers, and shipbourne components like the Magazine can be hit with Corsairs. It is best, therefore, to spawn as either an Avenger or a Corsair, depending on what your target is.
Duel[edit]

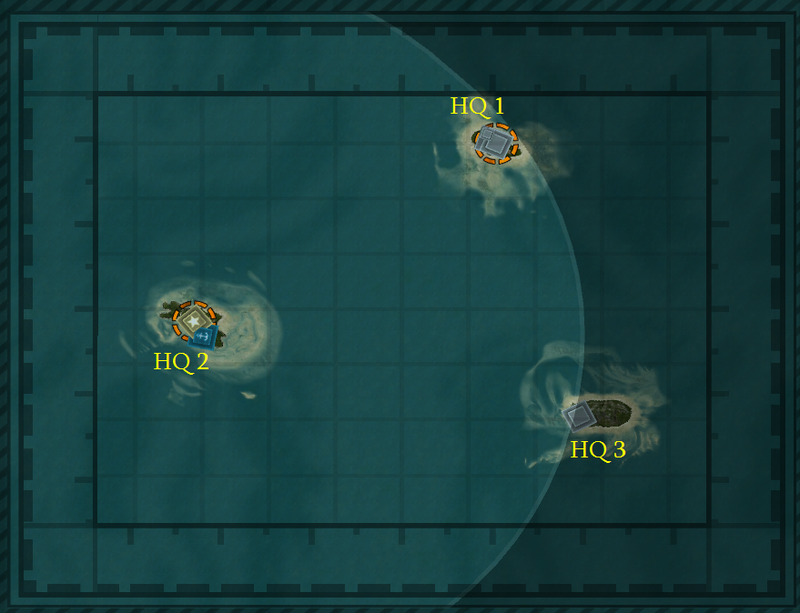
Island Capture - Small[edit]
Map Description: Small consists of only three islands - an enemy HQ, your HQ, and a neutral HQ. The neutral base - to the north - is the only source of planes on this map. Friendly HQs spawn destroyers as the only offensive ship aside from patrol boats. Since the map is so small, it is extremely easy to simply rush the enemy base with destroyers.
Unlock Data: Note that the B-29 Superfortress, Ohka Carrier, J9Y Kikka, and the G5N Liz are all listed in the Unlock selection list, but none of the Headquarters are capable of spawning them. The unlock of choice for this map will be destroyers to fight for the northern base, or planes in the event you actually get control over it. Because there's only one airfield, however, players will want to select a bomber unlock rather than a fighter one.
Balancing Notes: This map is virtually identically balanced. Although the Allies can employ the destroyer-annihilating Mustangs on this map, the map is so small that the Mustangs will be more of a hindrance than anything, since it takes them so long to reload their rockets. They also cost the same as destroyers, so Mustangs aren't really an issue. On the other hand, the Japanese have access to the H8K Emily, but twelve torpedoes against a single destroyer is overkill.
Click on a Headquarters to see what it can spawn.
HQ 1[edit]
None
None
- F4F Wildcat
- TBF Avenger
- PBY Catalina
- OS2U Kingfisher
- P-80 Shooting Star
- P-51 Mustang
- TBM Avenger
- A6M Zero
- B5N Kate
- H6K Mavis
- F1M Pete
- J7W Shinden
- H8K Emily
HQ 2 (Allied)[edit]
- Elco PT boat
- Fletcher-class DD
- LST Mark 2
- Troop Transport AP
- ASW Fletcher-class DD
- Allen M. Sumner-class DD
- Gyoraitei PT boat
- Fubuki-class DD
- SB Boat LST
- Troop Transport AP
- Akizuki-class DD
- Shimakaze-class DD
None
None
HQ 3 (Japanese)[edit]
- Elco PT boat
- Fletcher-class DD
- LST Mark 2
- Troop Transport AP
- ASW Fletcher-class DD
- Allen M. Sumner-class DD
- Gyoraitei PT boat
- Fubuki-class DD
- SB Boat LST
- Troop Transport AP
- Akizuki-class DD
- Shimakaze-class DD
None
None
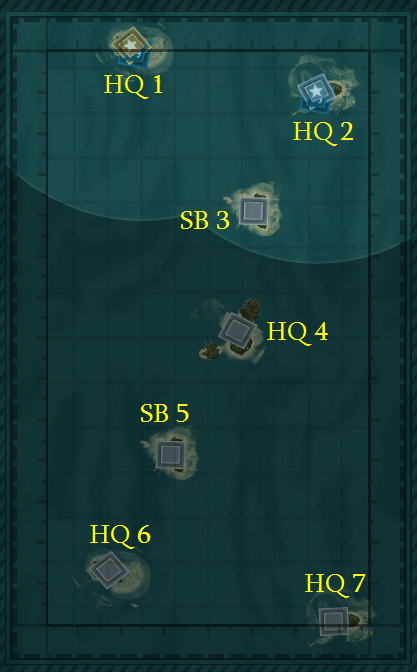
Island Capture - Medium[edit]
Map Description: Spine Medium is a sea-centric map, average in many respects. The Japanese and the Allies start in the south and north respectively, and must spawn ships to fight over the centre airfield and a pair of supply bases. The airfield is the only source of planes on the map, so whoever takes this area will be tough to knock off.
Unlock Data: The two west bases for each side produce battleships, so a battleship unlock can prove useful. A cheaper upgrade, like a destroyer, can be better for larger games since the points are split more times. Since the airfield is in the middle, however, only the confident should select an air unlock on this map.
Balancing Notes: This map is reasonably balanced, but it tends to favour the Allies because the Japanese shipyards face south - toward the map's border. This means the Japanese must turn their ships approximately 160 degrees in order to get them into the fight, while the Allied ships can simply move forward. The Allies are also capable of using the TBM Avenger and their Tiny Tims to annihilate the Japanese battleships when they enter range.
Click on a Headquarters to see what it can spawn.
HQ 1 (Allied)[edit]
- Elco PT boat
- Fletcher-class DD
- Northampton-class CA
- LST Mark 2
- Troop Transport AP
- ASW Fletcher-class DD
- Allen M. Sumner-class DD
- Alaska-class CA
- Gyoraitei
- Fubuki-class DD
- Mogami-class CA
- SB Boat LST
- Troop Transport AP
- Akizuki-class DD
- Shimakaze-class DD
- Tone-class CA
None
None
HQ 2 (Allied)[edit]
- Elco PT boat
- Fletcher-class DD
- King George V-class BB
- LST Mark 2
- Troop Transport AP
- ASW Fletcher-class DD
- Allen M. Sumner-class DD
- Iowa-class BB
- Montana-class BB
- Gyoraitei
- Fubuki-class DD
- Mogami-class CA
- SB Boat LST
- Troop Transport AP
- Akizuki-class DD
- Shimakaze-class DD
- Tone-class CA
None
None
HQ 4[edit]
None
None
- F4F Wildcat
- SBD Dauntless
- TBF Avenger
- P-51 Mustang
- P-80 Shooting Star
- TBM Avenger
- A6M Zero
- D3A Val
- B5N Kate
- J7W Shinden
- J9Y Kikka
HQ 6 (Japanese)[edit]
- Elco PT boat
- Fletcher-class DD
- King George V-class BB
- LST Mark 2
- Troop Transport AP
- ASW Fletcher-class DD
- Allen M. Sumner-class DD
- Iowa-class BB
- Montana-class BB
- Gyoraitei
- Fubuki-class DD
- Fusō-class BB
- SB Boat LST
- Troop Transport AP
- Akizuki-class DD
- Shimakaze-class DD
- Yamato-class BB
- Super Yamato-class BB
None
None
HQ 7 (Japanese)[edit]
- Elco PT boat
- Fletcher-class DD
- Northampton-class CA
- LST Mark 2
- Troop Transport AP
- ASW Fletcher-class DD
- Allen M. Sumner-class DD
- Alaska-class CA
- Gyoraitei
- Fubuki-class DD
- Mogami-class CA
- SB Boat LST
- Troop Transport AP
- Akizuki-class DD
- Shimakaze-class DD
- Tone-class CA
None
None
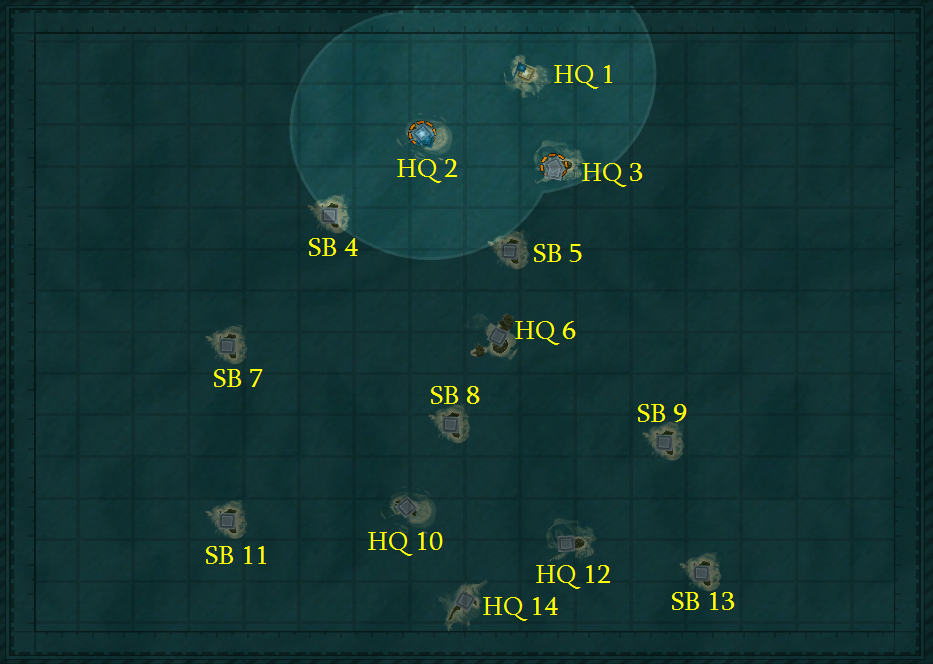
Island Capture - Large[edit]
Map Description: This map is a large archipelago with four shipyards and three airbases. Two of the airbases are player-controlled and lie at the back of the map, while the center island is the third. Each side gets a pair of shipyards spawning cruisers and battleships. Most of the fighting will be around the centre base, but its limited spawn capabilities will make holding it quite difficult.
Unlock Data: Cruisers and battleships are the way to go here, as the centre base doesn't give a lot of firepower. Fighters are also effective at stopping Skytrain and Tabby expansion.
Balancing Notes: The Allies will have an easier time holding onto the middle than the Japanese thanks to their TBM Avengers. The Japanese can't spawn Ohka Carriers from the middle, so Ohkas must be flown in from the back base. The Japanese battleships still spawn facing the wrong way, for unknown reasons, but the large map mitigates the problem somewhat.
Click on a Headquarters to see what it can spawn.
HQ 1 (Allied)[edit]
None
None
- F4F Wildcat
- SBD Dauntless
- TBF Avenger
- OS2U Kingfisher
- PBY Catalina
- B-17 Flying Fortress
- C-47 Skytrain
- P-51 Mustang
- P-80 Shooting Star
- TBM Avenger
- B-29 Superfortress
- A6M Zero
- D3A Val
- B5N Kate
- F1M Pete
- H6K Mavis
- G4M Betty
- L2D Tabby
- J7W Shinden
- J9Y Kikka
- Ohka Carrier (MXY-7 Ohka)
- G5N Liz
- H8K Emily
HQ 2 (Allied)[edit]
- Elco PT boat
- Fletcher-class DD
- Northampton-class CA
- LST Mark 2
- Troop Transport AP
- ASW Fletcher-class DD
- Allen M. Sumner-class DD
- Alaska-class CA
- Gyoraitei
- Fubuki-class DD
- Mogami-class CA
- SB Boat LST
- Troop Transport AP
- Akizuki-class DD
- Shimakaze-class DD
- Tone-class CA
None
None
HQ 3[edit]
- Elco PT boat
- Fletcher-class DD
- King George V-class BB
- LST Mark 2
- Troop Transport AP
- ASW Fletcher-class DD
- Allen M. Sumner-class DD
- Iowa-class BB
- Montana-class BB
- Gyoraitei
- Fubuki-class DD
- Fusō-class BB
- SB Boat LST
- Troop Transport AP
- Akizuki-class DD
- Shimakaze-class DD
- Yamato-class BB
- Super Yamato-class BB
None
None
HQ 4[edit]
None
None
- F4F Wildcat
- SBD Dauntless
- TBF Avenger
- P-51 Mustang
- P-80 Shooting Star
- TBM Avenger
- A6M Zero
- D3A Val
- B5N Kate
- J7W Shinden
- J9Y Kikka
HQ 10[edit]
- Elco PT boat
- Fletcher-class DD
- King George V-class BB
- LST Mark 2
- Troop Transport AP
- ASW Fletcher-class DD
- Allen M. Sumner-class DD
- Iowa-class BB
- Montana-class BB
- Gyoraitei
- Fubuki-class DD
- Fusō-class BB
- SB Boat LST
- Troop Transport AP
- Akizuki-class DD
- Shimakaze-class DD
- Yamato-class BB
- Super Yamato-class BB
None
None
HQ 12 (Japanese)[edit]
- Elco PT boat
- Fletcher-class DD
- Northampton-class CA
- LST Mark 2
- Troop Transport AP
- ASW Fletcher-class DD
- Allen M. Sumner-class DD
- Alaska-class CA
- Gyoraitei
- Fubuki-class DD
- Mogami-class CA
- SB Boat LST
- Troop Transport AP
- Akizuki-class DD
- Shimakaze-class DD
- Tone-class CA
None
None
HQ 14 (Japanese)[edit]
None
None
- F4F Wildcat
- SBD Dauntless
- TBF Avenger
- OS2U Kingfisher
- PBY Catalina
- B-17 Flying Fortress
- C-47 Skytrain
- P-51 Mustang
- P-80 Shooting Star
- TBM Avenger
- B-29 Superfortress
- A6M Zero
- D3A Val
- B5N Kate
- F1M Pete
- H6K Mavis
- G4M Betty
- L2D Tabby
- J7W Shinden
- J9Y Kikka
- Ohka Carrier (MXY-7 Ohka)
- G5N Liz
- H8K Emily