A) Inn B) Information C) Jet Shoes shop D) Pulse Bee upgrade E) Rolling Shot shop F) Wrestling contest G) "Information" H) Health increase
Area 3 is far less linear than the previous two stages. From the starting location, you have a couple of options and two different method of reaching the boss.
You begin Area 3 right in front of door A, which contains information about the path to the left. Only a short distance to the right is door B which is an inn. Obviously you don't need to visit it right when you start the level, so save it in case you return to the starting point after taking some damage.
Obtaining the Jet Shoes
If you still possess the Psycho Barrier that you purchased in Area 2, it is recommended that you do not purchase the Jet Shoes. As nice as the extra boost of speed is, the Psycho Barrier is far more useful and will keep you alive longer.
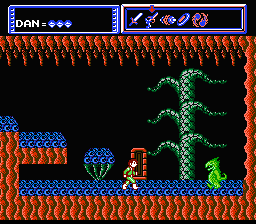
From the starting point, head all the way to the right to the gate, watching out for the enemies that hover over the floor. Take the elevator down to the level below. Cross all the way to the left. Jump over the spike pit, and you will arrive before a tree. From the platform to the right, jump up and shoot at the trunk of the tree in order to reveal the hidden entrance to passage a.
Crawl through the tunnel of the hallway you arrive in, and jump up to take passage b. When you arrive, drop to the floor. Take out the two skeletons that guard the pathway to the house on the left, while watching out for the thunder clouds above. Enter through door C and you will be given the chance to purchase the Jet Shoes for 40 units of energy. Whether you buy them or not, your only option is to head back through passages b and a, and return to the elevator.
1-up and shortcut
Hit this tree for a 1-up.
If you are not already in the elevator shaft to the right of the starting point, head there now. Ride the elevator up to the top level, and exit to the left. Proceed to the left until you find a short tree between two platforms. Throw a Smart Bomb up at the top of this tree and you will reveal a 1-up doll. Collect it when it falls to the floor.
Continue just a short distance to the left, you and will find a shop that sell a power upgrade for the Pulse Bee for 40 units of energy. Purchase it and return outside. At this point, if you continue to the left, you will eventually reach passage j which, along with passage i, serves as a very quick shortcut to the boss.
Despite the fact that following this path can take you to the boss den before the boss has a chance to become very strong, you will miss out on some important opportunities. It is recommended instead that you return to the starting point, staying at the inn behind door B if necessary, and proceed to passage c
Rolling Shot and health
From the starting point, walk to the left. Crossing the extending bridge can be particularly difficult when the continuously floating enemy appears from the left. Try to face right and make it appear from the right before attempting to cross the bridge over the spikes. When you see passage c, jump up to it.
Passage c take you to a multi-tiered hallway. Take the upper tier first to passage d. This will deposit you in an outside area. You'll need to remain in the clouds while you cross to the right in order to reach passage e on the opposite side. Watch out for the thunder clouds; take them out from a safe distance before you proceed.
Passage e brings you to the other side of the wall from the previous area. Drop to the floor, and attack the monster and skeleton that lie on your path to door E. Head inside, and you will be able to purchase the Rolling Shot for 100 units of energy. It's not so useful now, but it will come in handy in the next area after you've upgraded it.
Now return to the left, through passage e. You can drop to the floor and return to the left to reach passage d. Crawl through the upper tunnel, and drop to the floor. Crawl through the bottom tunnel and take passage f to the next area.
When you arrive, walk to the right and you will find door F. Behind this door is another friendly alien wrestling challenge in which you can win 160 units of energy. You'll have to crawl below the right platform and approach from the right to reach it. Afterwards, walk back to the left, past passage f, and you will find passage g. Don't take it yet.
Door H changes based on door G. Instead, keep going all the way to the left, and you will find door G. This door is special. Inside you will find a man who tells you he's a good guy. However, if you visit him again, his speech will change slightly. And if you visit him a third time, it will change again. After that, he starts the loop all over again. While it seems unimportant, it has an effect on the elevator behind the next gate.
The elevator marked with the 1 on the map is special. Sometimes it goes up, and sometimes it goes down. Which way it goes depends on the last thing the man in door G said.
After speaking his first line, the elevator will go up. At the end of that area is a useless door.
After speaking his second line, the elevator will go down (as shown on the map.) Door H will contain an alien who will say a nice man used to live there.
After speaking his third line (or if you never visit him at all), the elevator will go down just as it did last time, only door H will contain a friendly alien that will increase your health meter by four bars.
Obviously, the health increase is what you want to get, so be sure to speak to the man inside door G three times before visiting door H. Once you have done this, you are ready to return to passage g and finish the area. Passage g leads to a small hallway that leads to passage h.
From passage h or i
Don't miss this healing item.
Regardless of which passage you came through, you are now very close to the boss of the area. Just before you reach the final gate, you will see a tall tree. If you shoot the tree from the second platform on the right, you will reveal a syringe. Collect it before it disappears to restore four lost bars of health. Then head through the gate and down the elevator to reach the boss.
Boss
The ultimate evolutionary form of the green aliens in this area is large bouncing dragon. It will continuously jump from the left side of the room to the right side of the room and back. It always leaps directly over the center of the room, so you can stand in the middle of the room without any fear of getting jumped on. You do, however, have to watch out for the projectiles that it bombs on the floor as it's leaping over you. As long as you watch for the projectiles and move out of the way when they are directly over you, you can safely attack the boss from the middle of the room. The Spider Shot is a good choice of weapon when dealing with this boss, but the Pulse Bee isn't bad either, especially if you've upgraded it. Avoid getting killed so you won't have to take the passage out of the den and return in order to defeat the boss and clear the area.