- Required items: Communicator β (green)
Part 1
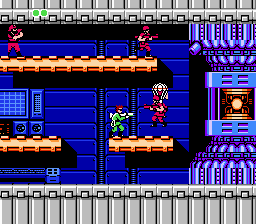
When you parachute in, you will arrive outside of an entrance on a single screen. A grenadier will be running around on the ground tossing bombs at you, and soldiers will constantly parachute in to attack you. If you really wanted to, you could hang around shooting soldiers to collect their bullets before you enter the door.
Part 2

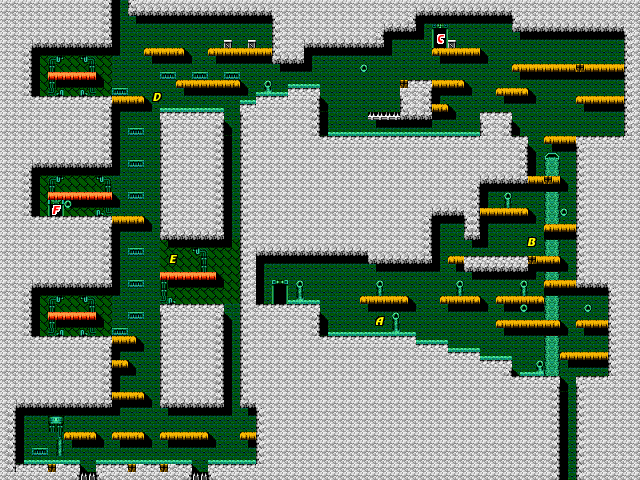
Once you set foot inside, you will arrive roughly in the center of the map above. Immediately to your right is a pipe, and some ooze will pour out of it. The ooze will not harm you, but it will grab ahold of your legs and move you along with it. Once it grabs you, you will be unable to escape from the ooze unless it slips over a ledge, or if you shoot your grappling hook and use it to steady yourself.
By the time you reach location A, get as high off of the ground as you can. If you don't escape from the ooze, it will carry you to a pit, and you will lose a life if you fall in. Even the platforms are situated near pipes, so don't rest easy just because you're off the ground. Only a few platforms are truly safe from ooze.
As you continue to climb, you should notice a set of springs at location B. You can use these to get some height as you approach the platforms above you. They are also useful for bouncing over any ooze that may be approaching. Continue your climb until you reach the next set of springs. Above this platform, you will see soldiers driving a vehicle with a chain in front. When the chain is lowered, it will deflect the shots that you fire at them. Shoot at them when the chain is up. When you destroy the vehicles, short soldiers will hop out and attack you. Your shots will pass over their heads unless you squat down to fire.
Continue making your way up to the door at location C. This is the communication room. It's hard to approach it from the right, so remove the vehicle below the door and approach it from underneath. This communication room won't work if you brought the original red alpha communicator. You need the green beta communicator from Neutral Area 16.
- Communicate: A soldier suggests that you visit Area 3 and Area 6 as long as you have the Wide Shot and the Rocket Launcher.
- Wiretapping: A commander berates a soldier for not knowing that the garbage dump is in Area 9.
In order to continue to the left once you exit the room, you must use the springs to bounce near the ceiling, and then shoot your grappling hook and swing over the spikes below. If you travel far enough, you will make it to the next section. If not, you will have to return to the right, climb back up, and attempt the swing again.
Once you make it across, watch out for the oozing pipe to your left. It's possible, but not necessary, to explore the region to the left and attempt a short cut to the exit from the stage. To do this, remove the vehicle on the platform above the floor, and walk over to location D. From here, you can fall down, and attempt to grapple onto the first platform that you pass while falling.
Otherwise, you will drop all the way down to the bottom of the stage, and have to make your way back up to the middle. There are no enemies to worry about along the bottom floor. You should however, avoid the spikes at all costs, and use the springs to boost you up to the platforms above. If you walk all the way over to the left, an item box will parachute down for you to collect.
In order to reach location E, you must climb up the series of platforms until you reach the alcove on the left. Then grapple up to the platform, and use the ceiling above to swing you over to the right. As you are moving through the air, quickly grapple up to the platform just below E, and pull yourself up. Likewise, in order to reach the platform above and to the left, you must grapple to the ceiling above and swing yourself to the left. Catch the platform as you are moving through the air.
Pull yourself up, but watch out for the ooze that pours out of the pipe to the left. It can send you back down to the bottom. Climb up to the platform above, and walk to the left to safely reach door F.
Boss

There is no real boss for this stage, per se. You must simply battle your way through a never-ending platoon of soldiers who are determined to stop you from blowing up the core. If you were fortunate enough to bring the rocket launcher along, you will discover just how powerful a weapon it is. It only takes three rockets to destroy the core and earn your completion of the stage.
Reward: You will earn ten bullets along with the Pendant. This is an automatic item which has the ability to deflect one and only one projectile from an enemy for each visit through an area. It's not much, but it's better than nothing.
Famicom Difference
- The ooze from pipe will always move to a fixed direction in FC, rather that aiming you in NES version.
