- Required items: Communicator α (red)
Part 1

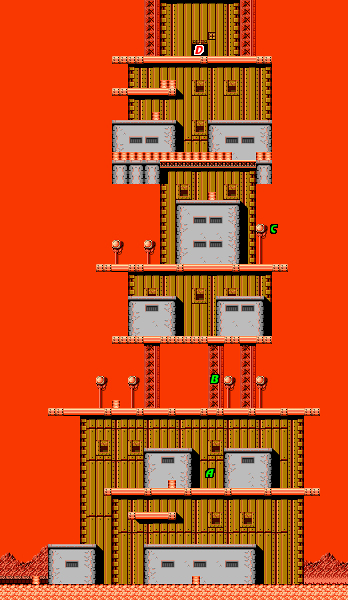
After parachuting down, you'll have to grapple swing over the barrel. A gunman will be squatting down behind the next barrel. If you chose to bring the wide gun with you, you can shoot the gunman even while he's squatting. Take his bullet, and then grapple up to the roof above you. Climb up to the left of the gunman on the platform above, and take him out. At location A, a ball will be released from a chain. Normally, you should get out of the way of these balls, but this one will bounce off the barrel and roll the other way. Getting hit by a ball will not take away any hit points, it will just knock you off your feet and put you in potential danger.
Grapple up to the roofs and on to the next platform above. When you reach B, there will be a gunman to your right. To reach the next platform up, you'll have to grapple onto the lampposts. Once you stand on the lamps, you will begin to slip off either side, so quickly shoot your grapple up and grab the platform. Pull yourself up before you fall back down.
Another ball awaits you, along with another gunman on a roof. Take out the gunner on the roof, and climb up to the next platform. To advance, you'll need to grapple onto the lamppost at C, and then quickly grapple over to the roof ledge before you fall. Allow the grapple to pull you up to the roof, but don't climb up until the gunman is done shooting.
Once you are safe, there is only a small space where you can climb up between barrels. There are a few more gunmen to deal with along with another ball. This ball has the potential to trip you up unless you get out of the way quickly enough. Then climb up to the door at location D and use the communicator. You cannot advance to the second part of this area without entering the room.
- Communicate: M-5 mentions that there may be an underground tunnel that is not displayed on the map.
- Wiretapping: It sounds like you may be overhearing Super Joe try to determine his location.
Part 2

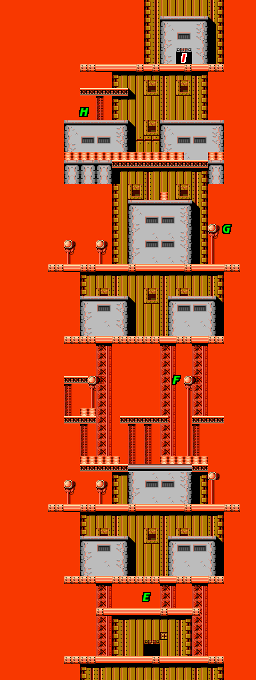
When you exit from the communication room, the area will present the middle of the tower to you. Now if you fall below this communication room, you will lose a life. As soon as you climb up to the platform above at location E, you will encounter a new enemy. Blue soldiers wear helicopter blades that enable them to hover, and fire stun beams straight down. The wide beam will help you shoot soldiers hovering above you. Additionally, you can knock these soldiers lower with your grappling hook.
As you continue to make your way up the tower, you will encounter a new threat. Turrets will be attached to some ceilings. They fire bullets in either direction. If these bullets hit your grappling hook, it will disconnect. You must fire your grapple and pull yourself up high enough to shoot them, or climb up to the roof above them.
Continue up to F. When you reach this location, you'll have to be careful when attempting to reach the platform above. Try to clear away any helicopter soldiers before you attempt to rise. To reach the next platform, pull yourself up to the top of the lamppost, and quickly fire your grappling hook up. Continue up to location G, and use the same technique as you used at location C to reach the roof.
As you climb up through the gap in the barrels, an item will parachute down. It may be an extra life, a health restoring potion, or if you're lucky, the circling barrier POW symbol which makes short work of any helicopter soldiers around you. By the time you reach H, you will encounter regular soldiers again. Clear them out of the way to reach the communication room at I.
- Communicate: A spy for the federation has determined that Super Joe is being taken to Area 8
- Wiretapping: This poorly translated dialogue is meant to indicate that the Rocket Launcher should be in this area.
Part 3

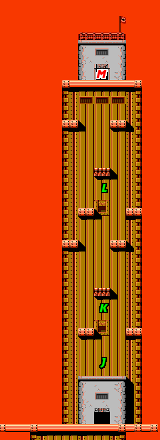
Once again, after visiting the communication room, the third and final portion of the tower will become available. Additionally, if you fall down below this level, you will lose a life. Just above the door, at location J, soldiers will begin to parachute down from the sky. Fortunately, these soldiers leave bullets behind, so collect as many as you can before you proceed to the top. If you're close to reaching the next level of fighting experience, stay below J until you reach it.
Once you grapple up to K, you will see a new type of platform above you. The platform is made out of springs which, once you set foot on them, will launch you even higher. You must grapple up to the springs, pull yourself up to them, and then be prepared to grapple up to the platforms above them when you bounce.
By the time you get close to L, you may see another item parachuting down. This item can be a hit hard to collect once you knock it out of the sky, so don't risk your life to collect its contents. Instead, focus on using another spring platform to grapple up to the platforms above it. If you time it correctly, you will be able to pull yourself up to see the final entrance M at the top of the building. Once again, before you go in, stick around and shoot soldiers for bullets if you're close to leveling up.
Boss

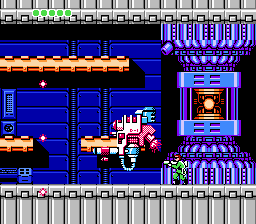
The boss of this stage looks a lot tougher than it really is. This flying robot with a cannon will engage you when you get close to the center of the room. it flies up and down along the right side of the room, and shoots a spread shot of three bullets at you periodically. The truth is, this robot has a particularly glaring blind spot: directly behind it. You can walk beneath it as it is flying up, and turn around to shoot it from behind (as shown in the picture), removing the only threat in the room. Then pull yourself up to the platform above the floor and destroy the core without fear.
Reward: You will earn ten bullets and the Rocket Launcher. The Rocket Launcher is a substantially powerful weapon, and you will likely lean on it to clear your way through several areas.
Famicom Differences
- There are more chained balls in Part 1.
- In Part 2, crouching soldiers start to appear at the platform above location F.
- Wire-tapping in the second communication room only lets you know that enemy is under attack.
