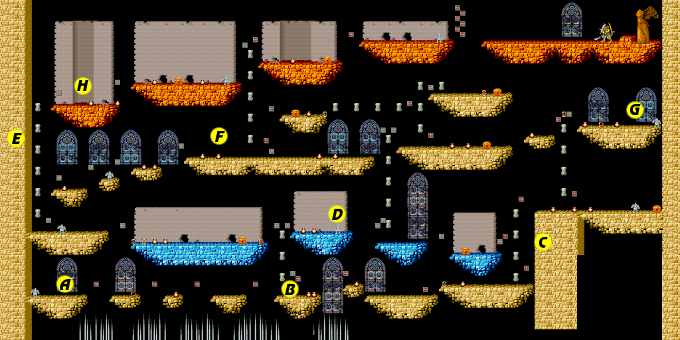
Stage 7 and 8 have multiple routes to the boss, so there is no one linear route that you must follow. You begin in the lower left corner, and your goal is in the upper right corner. You can take several paths to get there. The following notes are simply points of interest which you may or may not pass along the way, depending on which path you take. Also note that there is no dungeon in this stage.
(A): Hopefully, you will have the highest level weapon by now, but if you don't and you can afford it, by it from the shop on the left. Otherwise, stock up on the highest level armor you can afford, buy plenty of keys (between 6 and 10) and antidotes (at least 2). Then start making your way to the right. Collect the POW to knock out the Red Arremer, and watch out for Fire Demons which appear from pots. Remember to hold upward when jumping over long gaps. Two plants occupy the platform beyond the first such gap.
(B): You'll reach the first branching portion of the stage after you see Spinning Skull Coins. If you continue to the right, you'll face more dangers, but also find more treasure and opportunities. If you go up, you can then go left or right. There's a path to the end of the stage in either direction. No matter which way you choose to travel, enemies will appear in large numbers, so move carefully.
(C): This location hides one of the two secret items in this stage. This one is a Yashichi which grants an extra life, something definitely worth seeking out in this late stage of the game. Above and to the right, you'll find a few pots which hide enemies inside, a captive who gives you 100 Zenny, and a treasure chest containing a potion, situated next to a wall with a fire trap.
(D): The captive here is another one who has a shop with items for sale. As before, purchase the best defense that you can afford, and stock up on any other items as necessary. From here, you can go right a short distance and climb up to the level above, or head all the way to the left and climb up to the top level from there. If you do go right, watch out for several boulders which drop from above, as well as the appearance of a Ninja who rises from the ground and runs around quickly to strike you.
(E): As you climb up the left-most set of pillars, strike the left wall and be on the lookout for the second of two hidden items in this stage. Around location (E), you'll find a strawberry hidden in the wall. This strange item will increase the level of your armor by three. Collect it, and continue your climb to the top of the stage, or head to the right to take a different path.
(F): Be on the lookout for a Ninja which likes to surface in this area. They are fast and tricky to defeat, but you can do it if you are determined. From this location, you can head to the right and find another set of pillars which climb up to the highest levels of the stage and on to the boss's lair. Alternatively, you can continue to explore to the right, where you'll find some treasure chests, and ultimately a captive with a shop, but then you'll have to turn around and double back.
(G): Let the POW take out the Red Arremer and yellow Orc that guards this platform, and then free the captive to access the shop he keeps. Depending on how you traveled through the stage, this may be your last opportunity to armor up before you challenge the boss. From you, you must return to the left and find your way to the end of the stage.
(H): The top level of this stage is punctuated by difficult enemies, and extremely long leaps which must be performed by pushing upward on the joystick while jumping. Just about every new platform that you reach has a boulder waiting to drop when you arrive, so be prepared to jump back after you trigger one. There is a captive with a shop along the way. As you get closer to the end, be prepared for multiple purple mummies to appear from behind caves and swarm around you. A Ninja will make an appearance as well. The last captive has a potion to restore your vitality.
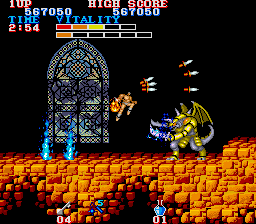
Boss: Gold Draconian

The Gold Draconian is very similar to his Silver cousin, but it has some peculiarities that make it a little easier to defeat. It's stronger, and it has a different kind of attack. It breathes a set of sparks which, when touched down on the ground, erupt in blue flames. It stands still when it does this and it relies pretty heavily on this attack. Just like with the Silver Draconian from Stage 5, you can stand rather close to the draconian and cause it to spit out this weapon repeatedly. Remain inside the safe area between the draconian and where the flames start to erupt. Jump up and strike his head at near point blank range and you shouldn't have to worry about draconian advancing on you. If the draconian does move around, adjust your location until you're back in a safe location, and then leap up to strike it's head until it's defeated.
Note: This boss, or a creature bearing a strong resemblance to it, would later appear as the boss of the 11th stage of Capcom's King of Dragons.
