
|
|
Section A

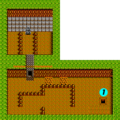
You begin the game in the lower left corner of the map. When you start, you are restricted to the lower portion of this section. Your first goal is to reach the access passage to Section B. Along the way, you'll face some monsters who are determined to stop your game before it gets going. Even more deadly than the monsters is the energy-draining grass that lines the ground below the platforms.
- Noted locations
- A: The grass below the platforms is capable of draining energy from SOPHIA, and doing a substantial amount of damage to it in very little time. If you happen to fall down into the grass below, it is imperative that you escape the grass and jump back up to a platform as quickly as possible.
- B: When you reach this location, a flying type of enemy will spin across the screen in either direction. These enemies are likely to drop Hover capsules when they are defeated. Long after you complete Area 1, and you return here to reach Template:~, this is a good place to load up on Hover power before attempting to reach Section E.
- C: To begin your ascent to Section E, you should make sure that you have a full Hover meter. Then fly up to the first ledge to collect the flashing red H capsule which will refuel your meter by four bars. Each ledge that you encounter has another red H capsule, but they also contain monsters which like to leap toward SOPHIA. As you fly up to each ledge, fly out a bit to the right so that the monsters miss you when they jump off. Otherwise, you will start to fall back down to the bottom and have to start over.
- D: You won't be able to get anywhere near these power-ups until you obtain the Wall 2 upgrade from Template:~. You can only collect them by driving along the ceiling. It's very rare to encounter gun capsules out-doors, but it's always a nice boost to your interior fire power.
Section B

This short section connects the two larger sections in this area. The creatures that walk along the walls in this section like to dart from one wall to another whenever they line up with SOPHIA. The turrets mounted to the ceiling spray the area below them with bullets at timed intervals. Clear away the wall creatures when you can, but the turrets take a lot of shots to kill, so you may wish to ignore them.
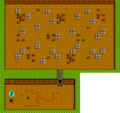
Section C

This is where the majority of your exploration throughout Area 1 is conducted. Area 1 has five interior entrances, and all five of them are located right here in this section. However, the need to explore all of them isn't that great unless you're practicing and getting a feel for controlling Jason in top-down view. The fact is you won't need to maximize the firepower of Jason's gun to defeat the boss in this area, so you can concentrate on going directly to the boss' lair if you wish.
- Noted locations
- E: Until you get the Dive Engine from Template:~, you'll notice that SOPHIA doesn't handle so well in the water. It's quite sluggish, and cant jump very high. It's best to hop out of SOPHIA and explore the water as Jason alone. Park SOPHIA on this small ledge before you go swimming. Down and to the right, you'll find a cache of Homing Missile ammunition.
- F: Once again, it's not a great idea to bring SOPHIA all the way down to the bottom of this pool. You'll be much faster, and more maneuverable as Jason. Park SOPHIA on the ledge above the water and swim down and to the right. Eventually, you'll find a ladder that leads to the entrance to the fifth interior, where you'll find the area boss.
- G: This large guardian is an imposing sight, and it fires at you when you approach it. In order to reach Template:~, you must defeat it. However, you won't be able to harm it at all until you obtain the Hyper Beam from the boss of this area. Return here after you collect it, and shoot the guardian until he is destroyed. Then pass through the gate to Section E.
-
Interior 1
-
Interior 2
-
Interior 3
-
Interior 4


Area 1 Boss: Motherbrain

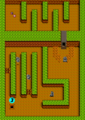
After you climb up the ladder from the lake, you'll step inside the fifth interior. Walk upward, but beware of security. Machines that line the walls cross over to the opposite walls whenever Jason steps in their line of motion. You can destroy these machines with your gun or grenades before they can pose a threat to you. Walk up until you see the passage on the right.
In this next room, you must maneuver through a small maze. A number of creatures attack you here, including small robots that track you down, more security machines, and a large creature near the end that spreads bullets in several directions. Use grenades to take out as many enemies as you can. To get through this area, you must head all the way down, to the right, then up through the channel that brings you back to the upper left corner, and then down and around until you reach the passage near the upper right corner.
In the next room, the floor contains several patches of spikes which you can walk through, but you'll take damage while doing so. It's best to avoid them entirely. As you make your way up, you'll encounter giant floating heads. These heads, when defeated, drop multi-warhead missile ammunition. It's a good idea to bombard them with grenades until they are destroyed. Then collect the ammunition and proceed upward. When you make it to the door at the top, prepare for a battle with the boss.

The boss is a gigantic brain-like organism. It surrounds itself with several small pods that orbit around the base. These pods orbit in a circle, but over time, that circle becomes more and more elliptical before stretching back out to a full circle. Naturally, touching the base or the pods causes damage to Jason. Fortunately, the boss does not shoot, it moves incredibly slowly, and it's vulnerable to attack at all times. The best strategy is to walk right up to it so that you're inside the circle of pods, and hit it with grenades as frequently as possible. Over time, it will move in your direction, forcing you to back off a little and reposition yourself in order to continue your attack. Repeat the pattern of attacking with grenades and repositioning until the boss is defeated. When you defeat the boss, you'll obtain the Hyper Beam, a weapon which increases the firepower of SOPHIA, and allows you to defeat the Guardian that stands between you and Template:~.
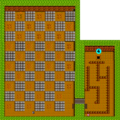
Section D

Once you destroy the Guardian with the Hyper Beam, the gate that leads to Section D will open whenever you approach it. Inside this section, you'll notice that most of the platforms are covered with mines. The mines are rather short and flush with the ground, which makes it impossible to use SOPHIA's cannon to destroy a mine directly in front of it. To clear away any mines, you'll have to hop out of SOPHIA and use Jason's exterior gun to create a safe path. You don't need to clear away every mine, as you can safely drop down to the bottom if you choose the right path. At the bottom, you will find the warp gate which leads to Template:~.
Section E

The tricky part of Section E is reaching it. The section itself is not very notable, as it resembles sections B and D. To reach this section, you must successfully hover from the bottom of Section A, right near the location where you started the game. You'll need a full or near-full Hover meter, and you'll have to successfully dodge each monster, and collect the red H capsules as you fly up to each ledge. After you do this three times, there's one final flight up to the passage that leads to E, and you will probably exhaust your supply of hover fuel just reaching it. Once you make it, head inside and drop down to visit Template:~.