|
|
Section A
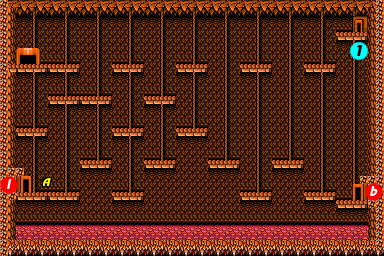
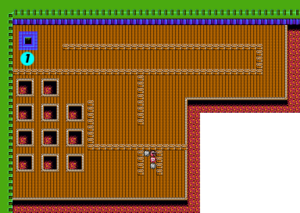
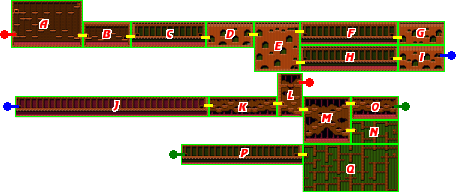
After thawing out from the icy Template:~, you enter the fiery Area 7. This area consists of some long hallways, and rooms which are full of dirt that must be cleared away in order to advance. You begin in a fairly open room populated by a few platforms. There are red wall-walkers, and red twisting enemies that fly across the screen. From the warp entrance, you can jump across the high platforms to reach the first interior entrance. This interior is a simple maze guarded by several humanoid enemies that can shoot at you. A supply of power, hover, and gun capsules await you at the end, but Interior 3 in section M is a much better place to visit. Back outside, you'll need to drop to the bottom to access passages to other sections, but don't drop all the way down to the floor, or SOPHIA will burn up in the lava. There are two passages near the bottom in either direction.
- Noted location
- A: Through the passage on the left, you can reach section L, but you won't be able to blast through the dirt on the floor unless you collect the Wall 2 upgrade from the boss of this area. Rather, this passage is intended to be a shortcut back to the area entrance after you defeat the boss. Instead, head through the passage on the right to reach section B.
Section B
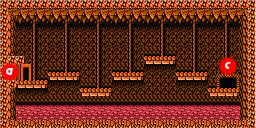
As soon as you enter this section, you're likely to get ambushed by a wall walker. Do your best to deal with it, as it's fairly unavoidable. The same enemies occupy this room as the last. When you reach the right end, you will find what looks like a simple warp. It serves the same purpose as a typical passage, and sends you on your way to section C.
Section C
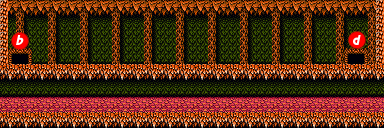
Driving across this featureless hallway is easy. Avoiding all of the damage from the ensuing enemies is the hard part. Red twisting enemies will fly across the screen at a steady clip. Meanwhile, bombers will fly across the top of the screen, and stop when they have an opportunity to drop explosives on you. Avoid these explosives at all costs, and proceed with caution when it's safe to continue.
Section D
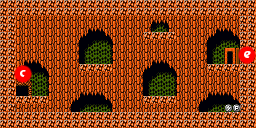
This is the first room that is nearly filled to the ceiling with dirt. You'll have to use SOPHIA's cannon to blast a path through the dirt to reach your destination to the right. There are some gaps along the way that you can use to raise or lower SOPHIA's height, depending on where the gaps lie. You may also find capsules hidden in the dirt. For example, there are some ammunition capsules just below the entrance. To reach them, you'll have to shoot your way to the first gap beyond the entrance, drop to the floor, and then turn around and shoot. There are other capsules that you can find, but it's not essential that you find them all. Note that any portion of dirt that scrolls off the screen will fill back in when you return. Make your way to the passage on the right to reach Section E.
Section E
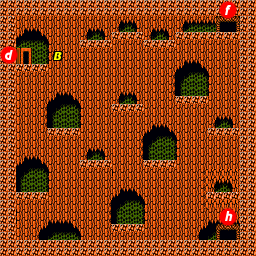
This is another section full of dirt. There are two warps out of this location, one in the upper right corner, and one in the lower right corner. Taking the path of least resistance, you are likely to reach the upper warp simply by shooting out a passage along the top. That leads to section F, which ultimately winds up in a dead-end at the entrance to the second interior. Unless you are intent on exploring every inch of this area, it's better to take the alternate route to the lower warp.
- Noted location
- B:To reach the warp to section H in the lower right corner, you'll need to start from the entrance. Without jumping, shoot a tunnel through the dirt to the right and start driving. Eventually, you will reach a gap. Fall into the gap, and turn around. Again, without jumping, shoot a tunnel to the left and drive through it, falling down into any gaps that you encounter. Keep shooting tunnels to the left and right as you fall down each gap until you reach the bottom of the room. Then pass through the warp on the right.
Section F

Section F may be longer than section C, but it's safer, as it contains no bombers. Watch out for any twisting enemies, and make your way to the right to reach section G.
Section G
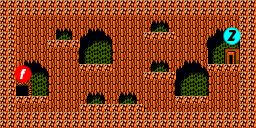

This room will resemble section D, a small room full of dirt with some gaps above platforms. Only this time, the gaps may contain enemies. If you open up a region containing enemies, be prepared to clear the enemies out before you proceed. The right end contains an entrance to the second interior. This interior has a few useful capsules, but for the effort that it takes to reach this interior, and then explore until you find them, it's generally not worth the trouble.
Section H

Throughout this long hallway, you'll only be troubled by a few jumping humanoid enemies, and one ceiling turret. Take out the humanoids as you encounter them. You can generally ignore the turret with no problem. Continue through the warp on the right to reach section I.
Section I
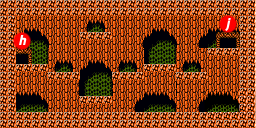
Shoot your way through the dirt to reach the warp near the top on the right side of the room. Jump up to create tunnels that help you stay closer to the ceiling than the floor in order to avoid arriving beneath the platform that the warp is on. Take the warp to section J.
Section J
Despite being the longest hallway in the entire game, this section is actually quite easy to cross. The only enemy that you will encounter are the twisting enemies that fly across the screen. Shoot them down as you cross if you are in need of extra power capsules. Pass through the warp at the far end to reach section K.
Section K

This short section contains no enemies. The only danger you must avoid is the lava at the bottom of the room. If you fall in there, there's little chance that you'll make it back out. If you happen to start falling into the lava, you can try to hover away. In general, it's better to take it slow and carefully jump from platform to platform as you make your way to the passage on the right to reach section L.
Section L
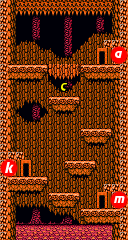
This pit also contains lava on the bottom, so take care. There are a few wall-walkers patrolling the platforms. Cross this short section to the right to reach section M.
- Noted location
- C: Be careful shooting out the dirt to the passage above. This will take you back to the entrance in section A. It's a one-way trip if you don't yet have the Wall 2 upgrade. Save travel through here until you have defeated the area boss.
Section M
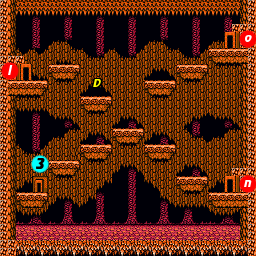

Aside from the pool of lava at the bottom, there isn't a lot of danger in this room. There are a couple of mines which Jason will likely have to hop out of SOPHIA if you wish to clear them away. And there are some ceiling mounted turrets, but nothing else that will attack.
- Noted location
- C: This room represents a cross-roads of sorts. From the entrance in the upper left corner, you have three places to visit in the other corners. The lower left corner contains the entrance to the third interior. This interior is a fantastic place to obtain gun power, as well as other weapons for SOPHIA, with considerably little danger to Jason. Just be sure to prioritize shooting the walking enemies before digging for capsules. The lower right corner leads to section N which dead-ends at the entrance to Interior 4. Given how great Interior 3 is, there's little reason to bother with N. Instead, hop back up to the upper right corner, and take the passage to section O.
Section N
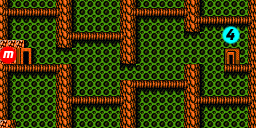

A group of fast red wall-walkers patrol the walls in this section. To the far right is the entrance to Interior 4. This interior is long and quite dangerous, contains very little reward, and is better left unexplored.
Section O
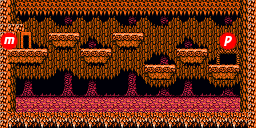
There are no enemies in this section. Just jump carefully from platform to platform to avoid falling in the lava below. Access the warp to be transported to section P.
Section P

This is the last long hallway which you must cross in order to find the boss of the area. Along the way, heavily armed humanoids will appear. Despite being armed, they are no more difficult to defeat than normal humanoids. However, the bullets they fire can block SOPHIA's cannon shots, so be careful. Jump over them and shoot them from behind if necessary. Take the warp on the right to reach section Q.
Section Q
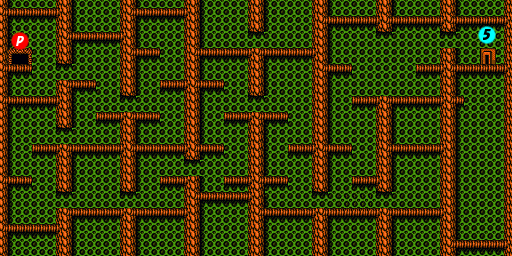
The section containing the entrance to the final interior is quite a maze. In order to find the entrance, you'll need to drop down to the lower left corner, and then make your way to the right where you must travel up and over the center. After dropping back down, you must climb back up the right side to reach the entrance. Before you begin jumping up, there is a free flashing gun capsule in the lower right corner of the maze, though you'll likely need Hover fuel in order to collect it.
Boss: Solar Fred

As with the rest of the interiors in this area, there are really only two threats to worry about: the walking shooting guards, and falling into the lava. Beyond that progress through this interior is relatively straightforward. From the entrance, you must make your way to the right and begin crossing the narrow winding path around the right side of the interior. You will encounter guards along the way, so be ready to shoot at them and take them out as quickly as possible. This is particularly easy if your gun power is at maximum. There is one dead-end which contains flashing power and gun capsules. There's also a loop that doubles back on itself. The real path is along the bottom.
After crossing the larger open segment, you'll have to begin crossing another narrow bridge. It reaches the left side of the interior, where you will walk up, and cross back to the right on another bridge. This leads back to the center, and connects with a bridge that leads up, right, and back down. After one final visit to the central platform, you'll have to start walking up one last bridge which leads to the entrance of the boss' lair.

The boss of this area is a mutated version of the frog boss that you encountered back in Template:~. He's very similar in that he hops up and down, and attacks in three different ways. However, this version of the frog is a little more clever and less predictable. It doesn't attack using the same rotating pattern of all three attacks the way that the original frog did. Instead, it varies up the attacks, sometimes using the same attack consecutively, and sometimes hopping around a bit before changing up the attack. Your strategy, however, should remain roughly the same. Stick with bombarding the frog's open mouth with grenades from the side. Assuming you stay to either side of the frog, you don't have to worry about the flaming tongue attack, or the bouncing pebbles. That will make the heat-seeking fireballs the biggest threat that you must worry about. Fortunately, if you stand just slightly above either front paw, the frog will usually spit the fireballs at an upward angle, just missing you. Try to maintain a position at this safe height as you re-position yourself to attack the frog's open mouth whenever the opportunity arises. You have the best chance of heavily damaging the frog during the long flame tongue attack. Defeating the solar-powered frog will earn you the final SOPHIA upgrade: Wall 2. With this enhancement, SOPHIA can cling to the ceiling just as easily at it can cling to the walls. Note that driving with the Wall 2 upgrade does take some getting used to, so practice on your way out of section Q. Also note that if you take damage, you will fall off the ceiling.
Now return to section L and take the shortcut back to section A. You'll have to return to Template:~, and make your way back to Template:~. From there, visit section C, and jump on top of the passage that you arrive from. Start driving to the right and use the wall upgrades to get you all the way over to the warp which leads to Template:~.
