|
|
Section A
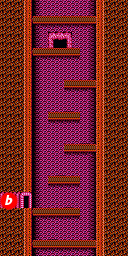
The first section of Area 8 involves a vertical descent from the warp at the top of the room, to the passage to section B at the bottom. Along the way, you'll encounter grey and red worms. Take them out safely with Homing Missiles or Thunder Break, or cling to the left wall and fire down as they drop below you. Remember to adjust your driving style to account for the Wall 2 upgrade. Then head left through the passage to continue.
Section B
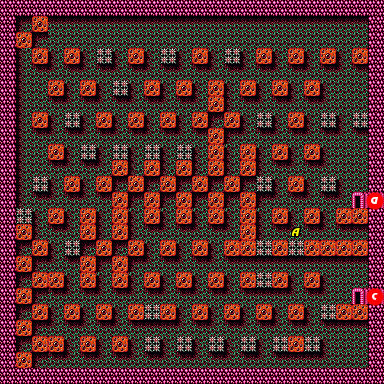
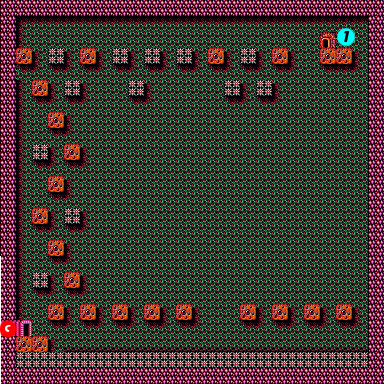
This large room is populated by three things: many square platforms, square arrangements of spikes, and the wall-clinging dome enemies that dash toward SOPHIA. What you are meant to do is to safely navigate up and down from platform to platform, avoiding spikes in an effort to make it around the room in a counter-clockwise progression and reach the passage to section C below the entrance. However, if you feel confident about your level of power, you may opt for a more convenient short-cut.
- Noted location
- A: While spikes should generally be avoided, you can save yourself a tremendous amount of time by driving up to this set of spikes and dropping through them to the platform below. You will suffer only minimal damage, and you will be just two short hops away from the entrance to section C.
Section C
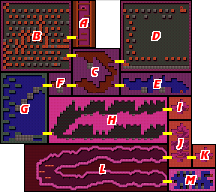
Section C contains three exits, not counting the passage you arrived through from section B. Of the three exits, only one allows you to progress through the area. This exit is in the lower left corner and leads to section F. The other two exits lead to rooms that contain entrances to interiors. However, neither interior is particularly worthwhile, and are best left ignored. When travelling through this room, be especially wary of the large pit of spikes near the entrance. If you fall down there, it's possible to escape before you die, but SOPHIA will still sustain a ton of damage.
Section D
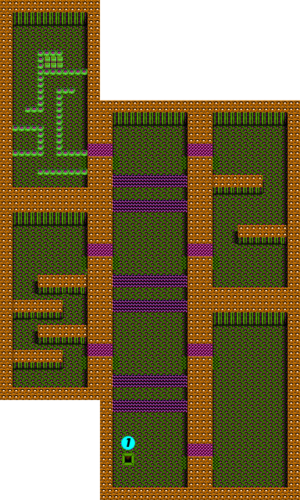
The only point of this rather empty room is to locate the entrance to the first interior in the upper left corner. It's easier to reach than it might seem. Rather than carefully jumping up from platform to platform, you can merely use the Wall upgrades to climb up the left wall, and then the ceiling, until you reach the interior. However, this interior is rather long, full of spike traps, and has a very small payoff. You can shortcut your way through the interior by daring to walk across the spikes, but you'll need to recover power quickly if you don't want to die in the process. Even when you make it back out of the interior, you'll have to find a safe way back to section C. You can drop from the platform down to the bottom, but you risk missing one of the lower platforms and plunging into the bed of spikes below. In general, this section can be safely avoided.
Section E
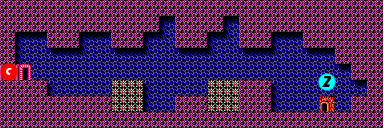

Like section D above, this is a dead-end room with an entrance to an interior that is more trouble to explore than it's worth. This room is shorter than section D, but with two giant blocks of spikes, it can be even more deadly if you don't time your jumps correctly. The safer way around the room is to use the wall upgrades and cross via the ceiling. Once you enter the interior, you'll find that after you go down from the entrance, you can head left or right. The fact is that this interior loops around in a giant circle, and going in either direction will send you to the same place. The problem is that in order to go left, you must cross a long bed of spikes which will cause Jason to lose a lot of health. Going right is safer, but much longer. Either way that you go, there isn't a lot of reward waiting for you at the end, so again, you shouldn't bother with this section.
Section F
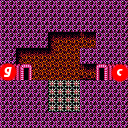
This very small room contains a very big danger. You must jump over the bed of spikes in the middle of the room. However, the ledge over the entrance is rather low. It's so low that it makes clearing the spikes without the aid of hovering impossible. You'll have to jump in the air and quickly engage your Hover engine in order to give you enough extra lift to get over the spikes so that you don't fall in and take any damage. Then carry on to section G.
Section G
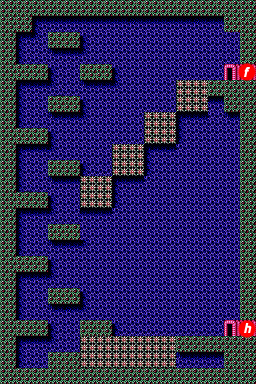
Section G is like an easier version of section B. There are a number of platforms to jump to, and a number of spikes to avoid. But this room is less dense than section B, and is a little easier to clear. If you made it to this location with a full or near-full meter of power, you may wish to take the damage and fall through the first bed of spikes in order to reach the exit quickly. However, there's not as much need to do that here, since you can use the Wall upgrades to drive up to the ceiling and cross the room from above. Then make your way down the set of platforms along the left side. Finally, when you see the bed of spikes on the floor, jump from the right-most platform over to the ledge containing the passage to section H, and kick your Hover drives on at the last minute to clear the spikes.
Section H
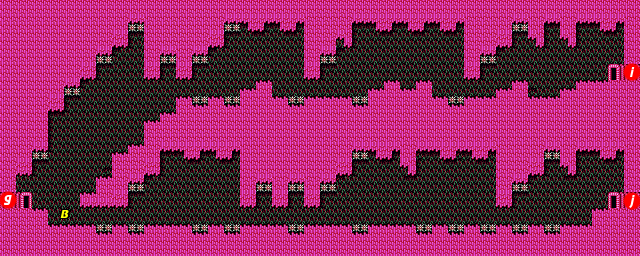
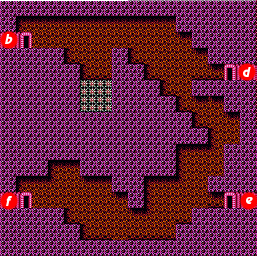
This room is by far the most dangerous room in the entire area. Spikes along the floors and ceilings make this room unsuitable for relying on the Wall upgrades. It's loaded with worm enemies and low ceilings which make it incredibly hard to jump over the small spike beds. Unless you are extremely careful and precise with your jumps, you're going to lose health here. Keep Homing Missiles at the ready in order to quickly remove the worm enemies, and hope that they drop power capsules. There are two paths to take, and you have to decide early on which way to go.
- Noted location
- B: You'll have to choose between following the upper path or the lower path through this room. The fact is, in this area, you generally want to head downward. So in order to progress, you should take the lower path. The upper path leads to a tiny room, section I, where you will find another interior. After you're finished exploring it, you'll have to turn around and take the lower path anyway. Section I and the third interior are not really worth all that effort, so stick to taking the lower path to section J.
Section I
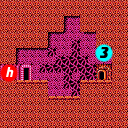
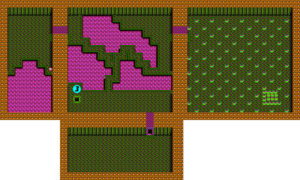
If you survive the difficult journey through the upper path of section H, you'll be rewarded with this dead-end, and the entrance to the third interior. Not as painful as the first two interiors, the third interior is still quite big, and leaves a lot to be desired in terms of reward. In general, you should skip this section.
Section J
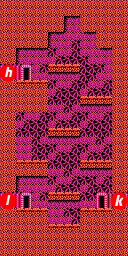
After the difficult journey through the lower path of section H, this small vertical room will be a welcome break, as well as a chance to gain some extra power. Shoot the floating enemies down with SOPHIA's cannon, and use Jason to destroy the mines. Or just use Homing Missiles to blow them all up. Either way, there's a good chance that each defeated enemy will drop a power capsule. At the bottom of the section are two passages. The one to the left goes on to section L, which will take you to the area boss, the but one on the right goes to section K, a small room that contains an entrance to an interior that is actually worth exploring. It's recommended that you head right first to section K, and raise Jason's gun power to maximum before you move on to section L.
Section K
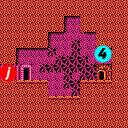
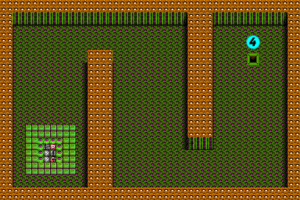
This small room is an important stop on your way to the final confrontation. It contains an entrance to a similarly small interior, relative to the others that you find in this area. This interior is ideal for Jason to explore, because you don't have to risk losing much life or gun power, in order to find a small cache of capsules at the end, including one flashing gun capsule. Two trips through here should enable you to reach maximum gun power with little effort. From the entrance, you must walk down, to the left, and back up. During this trip, flying enemies will zoom across the screen. At the top of the middle corridor are two large enemies who won't bother you if you don't bother them. If you shoot at them, they spray the screen with an arc of bullets, so ignore them. When you make the left to walk down the last corridor, three giant floating heads will approach you. Clear them away with grenades, and shoot away the blocks to access the capsules at the bottom. Then return the way you came to exit the interior. Do this as many times as necessary to max out Jason's gun power, then proceed to section L.
Section L
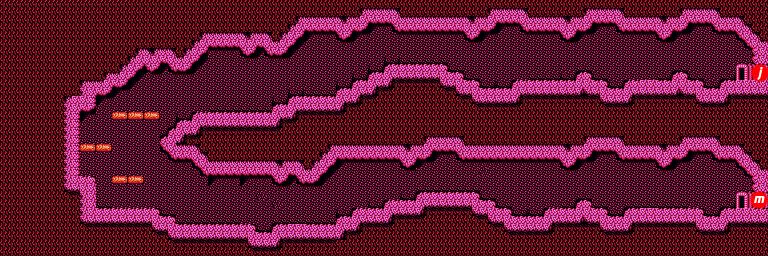
This long section contains three threats. The easiest one to deal with are the insect enemies which hover around, and are easy to remove. The bigger threat comes in the form of the red skulls that zoom across the screen, and stop to release small red eggs. The eggs land and hatch into red worms which hunt you down and try to damage you. Fortunately, there are no spikes to worry about, but the frequency of the skulls and their worms is enough to cause some concern. Again, Homing Missiles are a good remedy for this situation. They will easily clear out any insects or worms, although it will take more than one missile to destroy the skulls. Advance all the way to the left before dropping down and making your way back to the right, where you will find the passage that leads to section M, and the entrance to the final interior.
Section M
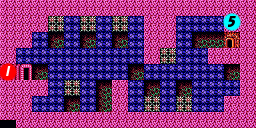
To reach the interior entrance on the far right, you will have to shoot through the dirt in order to create a safe path. Safety means avoiding the spikes that are strewn throughout the room. In general, the safest path to create is one that is exactly one block's height above the floor that you arrive on. Stick to this height all the way across the room, and you will be able to make it across the room without fear of hitting spikes. Then blast your way up to the interior entrance. When you think you're ready for the final confrontation, hop out of SOPHIA for the last time, and step inside.
Boss: Skelevenom and Goez
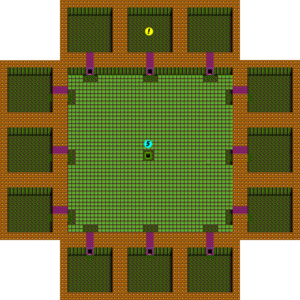
Unlike a typical boss lair, this interior is not a maze. Rather, it is composed of one giant room, with twelve adjoining chambers all around it. The giant room itself is full of blocks that you must shoot in order to create a path to the outside edge where all the chambers connect. Without maximum gun power, shooting a path through these blocks can be a chore. You can find capsules in some of these blocks, including at least one flashing gun capsule located up and to the right of the entrance. A few of the chambers are empty, but most contain some variety of interior enemy. Only one chamber contains the boss of the area, and that chamber is located directly above the entrance. Head up there when you're ready to do battle with the boss.
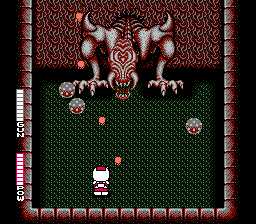
When the boss comes into view, you will be face to face with a giant enemy who has bust through the wall. This is Skelevenom (スケルベノン?), referred to as the "Plutonium Boss" in the American version of the game's manual. Unfortunately for the monster (and fortunately for you), it is unable to move from that position. It may be stuck in the wall, but it will attack you by spitting out giant boulders that bounce around the room in all directions. These boulders are the significant threat that you must avoid. The boulders do react the gun fire and grenades, which have the effect of keeping them aloft, and preventing them from falling down on Jason. There are two basic strategies to choose from: stay near the bottom of the screen and attack the Plutonium Boss with maximum gun power, or walk right up to the mouth and hit it with grenades. The first strategy is safer but slower. In order to succeed with the second strategy, you must know right where to stand in order to inflict the maximum amount of damage. Since the mouth moves around, its important to pick a place where your grenades will do damage the longest. The weak point of the boss isn't so much its mouth, but rather its chin. If you drop grenades too high (so that the explosion hits the upper set of teeth) they won't harm the boss. Instead, keep the blasts low and you'll do away with the boss rather quickly.
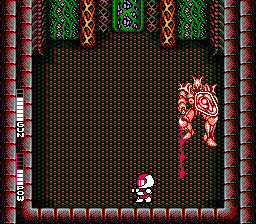
To your possible surprise, Skelevenom was not in fact the final boss of the game. Rather, it was only a prelude to the actual boss, Goez (ゴウズ?). This fight can be extremely challenging. Goez is incredibly fast, and has a vast amount of hit points, requiring a long sustained fight in order to defeat him. In addition to his amazing speed, he wields an expanding flame whip, which he can swing quite quickly as well. All in all, he is both a challenge to damage and avoid. You'll want to keep moving so that he doesn't approach you and hurt you by stepping on you. Whenever he pauses, be ready to dodge the whip that he is about to swing. Then return fire as much as you can without risking getting hit. This fight would seem to be quite difficult except for the fact that it's possible to exploit his behavior and use it against him. If you occupy the lower right corner of the screen, you will force him to advance towards you, but only far enough for you to hit him. By standing slightly to the left of the corner, his whip should go straight rather than diagonally and miss Jason altogether. If you stand in the correct place so that he can neither walk on you, or strike you with his whip, you can remain motionless and bombard him with grenades until he is defeated. You will know that you're making progress when you see his shield crack and eventually disintegrate. Once his shield is gone, it won't be long before he follows. Then you will be treated to the game's ending credits.