Braid/World 1

At Tim's house[edit]
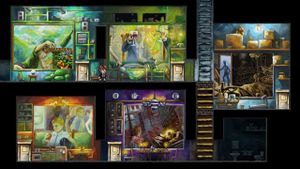
Now we're back at Tim's house, having found all puzzle pieces in the whole game. If you haven't done so already, now is a good time to assemble all the puzzle paintings. Just remember that if you want to grab the super-secret collectible mentioned in World 3, this is your last chance. You can't get it after the puzzles have been assembled.
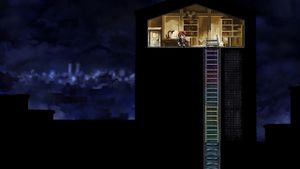
For every painting you solve, a bit of a ladder will be added to the path up to the attic of Tim's house. When all five bits are there, you can climb up and enter World 1.
 1-4[edit]
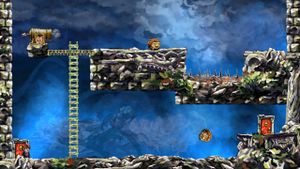
There are no more puzzle pieces to find in the game, so all you have to do in World 1 is to simply reach the exit doors. As you may notice, everything in this world is going in reverse except for Tim. The exit door is clearly visible, but it's too high up for Tim to jump. You're going to need a monstar to bounce off of. All the monstars are popping back into the cannon on the level above, though, and we need them down here. Pay attention to the path the monstars take when falling up to the spike pit. Go and position Tim in the way of that path. When a monstar falls upward again, Tim'll bounce on it and bring it back to life, on the level you want it to be. Wait for it to get close to the shelf with the exit door on it and jump the monstar to bounce up. Continue to the next (previous) level.
 1-3[edit]
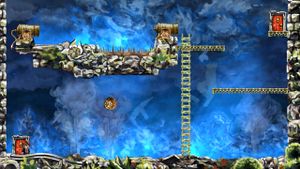
This level looks similar to the previous one. Monstars keep falling upward and reverse themselves into the cannon above. Stand over the path where the monstars are falling in reverse and bring one back to life like in the previous level. After a while of letting him walk around he'll once again fall upward, but this time he'll take a tour onto the platforms next to the ladder and enter the other cannon of the level. Notice how he flew past right next to the exit door. It should be no problem to use one of these resurrected monstars to reach the door, even though it's positioned so high up. Rewind time to get the monstar back. Run up the ladder and wait for the monstar to come by. When he starts going the last stretch to the cannon, jump on him mid-air and bounce over to the exit door.
 1-2[edit]
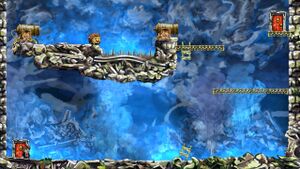
This level looks very similar to the one before it, and in fact it works pretty much the same way too. The biggest difference is that the ladder is broken this time around. What this means is that you do not only need a monstar to bounce over to the exit door, you need one to get up to the jump-off point too. So bring back two monstars by standing in their fall path. When the first one brought back starts to fly up toward the platform under the door, jump on him and ride him all the way up. Time is moving backward, so he won't die. When up there, quickly do the same thing on the same monstar again and ride him up to the cannon. The other monstar should follow soon. Jump on him exactly like in the previous level to get to the door to Braid's final world.
 1-1 Braid[edit]
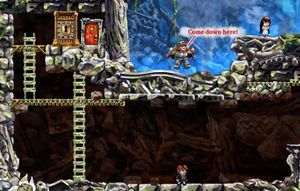
This is it. You've reached the final level of Braid. The horrible evil, monster who snatched the princess away from Tim will descend with her. Luckily she's able to break free from his grasp. The evil knight is not happy about her escape and will jump in anger, bringing the whole world ablaze by doing so. Tim and the princess must now escape the horrible fires together.
Up top of the screen the princess will run along by herself, and in the lower half of the screen you'll be controlling Tim as he makes his way through an excruciating obstacle course. The both of you will reach various levers to operate, some on Tim's level will open up paths for the princess, and some on her level will open up paths for Tim. It is therefore important to let the princess through by using all the levers on Tim's level, but otherwise you do not need to pay attention to what she does. Concentrate on keeping Tim alive.
A searing hot fire will constantly be creeping up on Tim and the princess. If Tim touches it, he dies. But he can of course be brought back by rewinding time. The fire stops for no one though, so completing the obstacle course quickly is a must. There's absolutely no time to linger. If you ever feel like a part of the course is impossible to complete, perhaps you want to rewind back a longer bit and see if you can shave a few seconds off previous parts, allowing for more time on the more difficult ones.

As soon as a part of the ceiling falls down to Tim's level, the run can begin. Jump up on the fallen block and run along. The princess will open up a path for you. Climb through the maze of ladders and jump over the claw. The next jump over the falling bridge will be a close call. If you start jumping before the bridge is down, you should be able to just make it.
Next comes a spike pit. Jump down into it just before the fire reaches you and the princess will bring up a platform to save you. Run along and you will get to a stream of fireballs. Get down between them and jump over them as quickly as you can. Climb up the next ladder and pull the lever to let the princess through. She'll stop the fireballs for you.
Next is a big trellis to climb. Jumping down the downward bits will be quicker than to climb down them and may help save a little time. Jump down and over the spike pit and begin to bounce on one of the monstars. Bounce on it all the way up to the nearby lever and flip it. If you were quick enough the princess will be able to get to the lever which opens up a cannon for the monstars to reverse into, freeing up a path for Tim.
Ride the elevator and jump up to the claws. You need to be quick to jump over the first one, then you need to wait for the second one to drop down. Go past the chandelier and climb up the next trellis to save the princess...
Or will you? The princess is sound asleep and Tim can now moonwalk around. Remember, all of World 1 is moving in reverse; so why didn't the princess? Begin rewinding time to find out. She's actually trying to escape Tim and is saved by a knight in shining armor (the evil monster). When all the way back where you began, exit through the door to go to the epilogue.
Even though it might seem oxymoronic when the truth about Tim is known, it is actually possible for Tim to catch his princess, giving the game its true ending. The easiest way to unlock it is to get the seven stars spread out across the game, with the eighth and final star being an award for catching the princess. However, it is possible to get the true ending without collecting any stars if you perform absolutely perfect timing on every obstacle in World 1-1 and utilize a few tricks to quicken the run.
- Going from the start of the level, when the stone block falls from the ceiling because of the knight's angry jumps, you have to perfectly jump onto it while it's falling and use its rebound to launch Tim up onto the next plateau.
- Next, climb the ladders as quickly as possible. When going up, jump past the first bit of the ladder instead of climbing it and don't climb longer than you have to. When going down, don't climb the ladders, but fall down instead.
- Get over the claw as smooth as possible. This might require you to die on it and rewind time to manipulate the arc of Tim's jump, so that it's as close to the claw as possible.
- Getting over the falling bridge requires absolutely perfect timing. There can be no bounce when jumping up its slope. Tim must land on it running and squeeze his way out the other side.
- Jumping down the fire pit requires even more timing than usual. Tim must hit the platform as early as possible and use the momentum of the platform to launch himself forward with a jump. He cannot hit the ceiling when jumping off; all speed gained from the jump must be conserved.
- Instead of jumping straight down off the next edge, jump up and make Tim land on the corner of the edge. If hit correctly, this will make Tim bounce forward a bit and save a few milliseconds more time.
- Don't climb down the next ladder. You need to quickly grab hold of and then release it to fall down. As soon as you're down, jump over the fireball before it reaches you. This will probably require many tries before getting it perfect.
- Climb up the ladder and flip the lever. Again, don't climb down the ladder, grab hold and release it to fall down instead. Be careful to fall either straight down or to the right. Don't fall left or bounce off the wall since it'll slow you down.
- Climb the trellis quickly and fall down the downward parts of it. When dislodging from it and jumping down next to the fire pit, be sure to land on the edge of the platform to bounce forward a bit, like you did previously.
- You should land just in time to catch a ride on a monstar. Bounce on it up to the lever and flip it. Jump down next to the two monstars walking in opposite directions at the moment they cross paths, then continue on right. You cannot bounce on any monstars after flipping the lever because it'll cost you time.
- Wait for the princess to operate the elevator and jump off it when it moves. Use its momentum to gain a little extra speed.
- Quickly move up the stairs and over the claw. Wait for the second one to go down and run to the broken chandelier. Wait for it to start moving back up and jump onto it as soon as it does. You'll take your flight up to the princess who explodes when the two of you meet. Grab hold of the trellis up there and you can now climb up to the princess' house. When you're ready, move all the way to the left of the level to find the exit door.
But here's an interesting question: Everything moves backwards, so wouldn't that mean that the princess actually un-exploded, followed by Tim going down on the chandelier?
