You will be greeted by a set of Skeleton, Bone Scimitar and Blood Skeleton. Watch your head. Step on the switch to lower the spikes on the left, in order to reveal a Hide Cuirass in a sphere behind. Take a note that most of the containers with an inventory item can only be claimed once. The Blood Skeleton may collapse after taking damage, but will soon stand up and roam again.
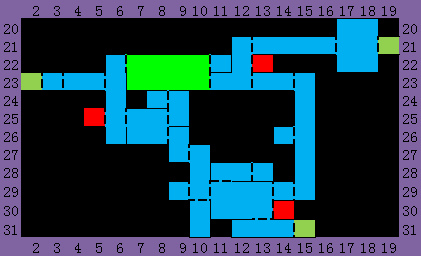
(13,30)
Another set of skeletons. The first switch you see cannot lower the spikes, but the switch on the left can. You can simply jump over the spikes, or return from above to find a Leather Shield. You can use (14,30) for a rest. In order to get Basilard at (14,29) early, you can return with an Axe, stand on the lift and kill the Blood Skeleton below so that he collapses right at the switch, or, you can first knock him at the switch, then stand below the lift and jump when he gets up. If you do, the Basilard has 1 less ATT than Short Sword, but with twice the attack speed. Take out the Axe Armor at (12,29) and proceed left, since (14,29) is blocked from the other side.
(10,29)
Change to Short Sword if you don't, then, there are two hidden rooms here. Break the left wall to find a Heart Container in (9,29), and break the floor to find a Life Vial in (10,31). Proceed upwards with the Knife found in the same shaft.
(9,27)
A Skeleton guards a container with Resist Thunder, though it has no use at the moment.
(8,26)
Beware of the drops from Spittle Bones, as they can poison you, causing -50% on ATT and DEF for a while. There are two sets of switches and spikes. In order to get to (8,25) and then (8,24) for a Cloth Cape, lower both spikes, then push the crate upon the right spikes, and make the spikes pop up, making a platform to move on. After that, leave from (7,25) while dodging two Axe Knights.
(6,25)
Another long vertical shaft, this time with two Spitter Bones. Get rid of them and move to the bottom, and climb from the left. Use (5,25) to save first, and continue up. Ignore the passage to the left at (6,23), as it is blocked. Rather, get to the top and find an Axe from the upmost candle, and jump into (7,22) for your first boss fight.
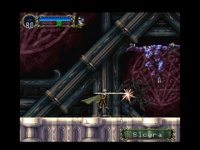
Boss: Slogra and Gaibon
Your first challenge.
Characteristics
On their own, Slogra will try to stab or shoot a fireball with his spear, and Gaibon will try to shoot fireballs diagonally downwards. Both fireballs can be blocked with shields. Occasionally, Gaibon will snatch Slogra and try to drop him from above, making a downward thrust. After taking enough damage, Slogra will drop his spear and change to attack with his sharp mouth, and Gaibon will turn red and shoot fireballs faster, just like in their Super Castlevania IV debut.
Strategy
From this battle you shall learn the basic tactics of fighting a dual boss - focus on either first. A Leather Shield is enough to block the fireballs, and the easier job is to get rid of Slogra. An Axe is effective when both are airborne, or if Gaibon is left alone.
Afterwards
(11,23)
Go past a few Bone Scimitars and Bloody Zombies. Quickly reach (13,22) for a save, and take a detour to (13,23) for some handy gears. After that, move up to (12,21) and go right.
(15,23)
The switches can call the elevator. Stand above and crouch to make it go downwards. Stop at (15,26) and find a pair of Sunglasses on the left. Move to bottom and enter (14,29), hit the switch of cannon to clear the path, and pick up a Basilard if you haven't collected it earlier.
(13,21)
Some Bloody Zombies are roaming. Dark Metamorphosis is effective.
(17,21)
Beware of the Spitter Bones. Get rid of those Axe Knights, and collect a Potion from a sphere at (17,22), then leave this area from (19,21), and move to Template:~.
Second visit
You will eventually return here after buying Jewel of Open.
(5,23)
With Jewel of Open, the blue door can be passed, but before entering Template:~, you will meet Maria again.
Collect-a-thon
It is suggested to return here after collecting Soul of Bat, and maybe Gravity Boots as well.
(11,28)
Fly into this room to find five experimental containers with different sub-weapons. Pick your choice. At the right side is Skill of Wolf in another room.
(9,22)
Remember the room where you fight Slogra and Gaibon? The upper right corner can be visited, and you will eventually find Bat Card inside.