Collecting all your men
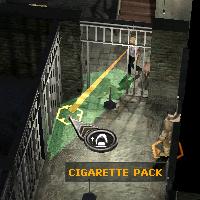
You start out with the Green Beret inside a cell. Smash up the fellow who comes inside. Look out through the door. When the engineer has his back towards you, go out and knock him out as well. Take his cigarettes and stash him in the cell. Use the cigarettes to lure and beat up the next guy. Then take out the last guy in that area (and pick up the goodies from the crate nearby). Enter the cell next door, and you will unite with the Sniper and the Sapper.
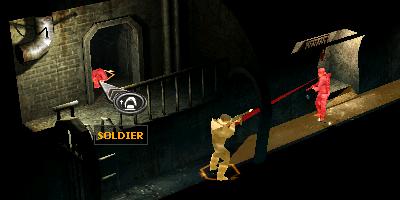
Moving on from here is quite easy. Knock out or kill the technicians on the way, and plunder all boxes you find (use 'F7' often; there are total of three apart from the one you found earlier). At some point, pick up a soldier's uniform and keep it in your inventory (it will be useful later). Soon you will see a ladder going down. Go down with the Green Beret. There will be two guys here. Take them out whichever way you wish. For example:
- When the patrolling chap turns away, kill the other guy and stash him near the bottom of the ladder. Take his machine gun. At the next opportunity, go down and turn on "Cover Mode" (before you make your move, equip the machine gun; the moment the chap turns his back, go down and press 'A' to turn on the auto-aim mode).
- Or, lie down at the bottom of the ladder and shoot the stationary chap. The other guy will come running. Shoot him too.
- Or, when the patrolling chap turns away, kill and stash the other guy (as in the previous method). Then, at the right time, run down and throw down cigarettes in front of the patroller's niche. Then take him out too (thanks to reader baboso for this tip).
Bring all your men over to the next room, where the Spy will join you.
Surfacing
We will surface now. You can explore the rest of the underground, but it's of no use. There are no goodies to take. No point in wasting time.
After the cut scenes are over, transfer the uniform you collected earlier to the Spy (if you don't have one, go back and pick up one now). Get the Spy to wear it and then "look-climb" the ladder right next to where he is standing (i.e., press "Z" to turn on "Examine" mode and then climb).
You should see a lot of guys walk by (if you took an unduly long time to surface, then the enemies would already have left, and you won't see what I am talking about). Once two motorbikes (with side-cars) have gone by, it's safe for your Spy to surface (tip: whilst you are "examining" a door, window or ladder, left-click to enter, or right-click to cancel).
Now begins a series of "distract and kill" operations. The technique is quite straightforward: Use the Spy to distract the target. Approach him from a proper angle (because you don't have the ability to order him to look/go elsewhere, yet). If the victim is the sort that patrols, wait at a suitable spot along his path and then distract him. Then, sneak up on him (from behind or the side) using the Green Beret and knife him (if you are more humane than me, you can knock him out and tie him up). Also note that there's no need to take pains to hide bodies unless I tell you so explicitly. For the most part, you can just kill and move on.
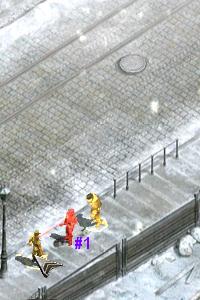
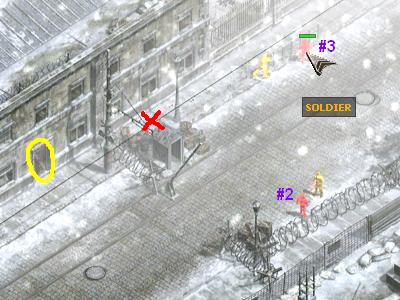
Refer to the screenshots. Distract Guy #1. Get the Green Beret to climb the ladder and come out (make sure Guy #2 is not watching nearby). Take out Guy #1. Then, distract Guy #2. While he stays distracted, kill Guy #3. Stash his body (in the place marked by the red "X"). Kill Guy #2 and stash his body as well. Come back and grab Guy #1's body and stash him away as well. Now get the Spy to go inside the nearby building (door marked with a yellow circle). NOTE: There's a goodie crate near "X", but you can ignore it. You don't really need the molotov cocktails inside it (on the other hand, it's so nearby and tempting...).
Dressing up in style
Inside the building, in the first set of rooms, you'll find two soldiers and an officer. Take out the soldiers using the same distract-kill technique. Officers can never be fooled, however. So, when he's facing a window, walk into his room with the Green Beret and knife him. Now your Spy can dress up in the officer's uniform! Importantly, you'll now be able to order ordinary soldiers to look away or walk away (within limits). This will make your Green Beret's task much easier.
Walk into the next room with your Green Beret (the Spy will not be of much use). This is the final meeting place where the traitor (General O'Donnell) will end up. Anyway, for now, there will be an officer and a soldier (both sitting on chairs). Lure the officer with a cigarette pack and knife him. Then knife the soldier. Carry their bodies into the previous room and drop them there (you don't want alarms going off when the General (or his sidekicks) see the dead bodies lying around).
Getting the explosives
Go back out of the building (through the door you entered). Now you can bring out your other two men - Sapper and Sniper - from underground.
Refer to the screenshots. Draw out Guy #4 (the one who's patrolling near the kubelwagen). You can draw him out by using a pack of cigarettes or by ordering him with your Spy. Anyway, kill him and stash his body (as before, at the place marked "X" in the previous screenshot).
Make sure your Sapper has gas grenades (which you should have picked up much earlier, underground). Now, move your Sapper to near the fence of the construction yard (see the screenshot). From here, first lob a gas grenade to take out Guy #5. The alarms won't go off, don't worry. With the second gas grenade, take out the sergeant and the other soldier (throw it when they are near each other). Now, all 3 are knocked out, but not dead. Before they wake up, finish them off (if you have molotovs, now is a good time to burn the sleepers; otherwise, old fashioned knives or knuckles will also work).
Near the dead fellas is the crate you want. Inside it are explosives (remote bombs). Once you pick them up, a timer will start to count down, at the end of which, O'Donnell will keep his tryst. So, pick up a bomb (you need only one) with your Sapper. Then, run your Sapper to the meeting place (see the second paragraph under the section "Dressing up in style" above). Place the bomb there (a good spot is approximately between the two chairs, at the foot of the table).
Marching forward
OK, the stage is now set. While the timer is counting down, you can make your way forward (the rest of this walkthrough), or you can simply wait and kill O'Donnell first, before moving ahead. I recommend that you take things slow - there's no hurry. Once O'Donnell is killed, you'll have all the time you want to make your escape.
You can actually click on "Stop Countdown" now, since there's nothing better to do. Oh, wait! There is. Once the countdown finishes (either normally, or when you dispense with it), a new soldier will come from nowhere (off the edge of the map) to where you killed Guy #1. This fellow will spot the bodies lying at "X" and raise the alarm, if you are not careful. So, you can do one of three things:
- Throw the bodies you have dumped at "X" inside the building, through one of the windows (don't throw into rooms where there could be people; throw into the window next to the door). Also, move the body of Guy #5 away (drop him next to the sergeant). This is so that the new guy won't raise the alarm. You can then proceed with the rest of the walkthrough (ignoring the new guy).
- You can wait with your Spy near the place where you killed Guy #1 and as soon as this new chap appears (it will be soon after the countdown is over), you can distract him and bring over the Green Beret and kill him. If you do this, you don't have to touch the bodies at "X". You can also leave the new chap dead on the street. No harm.
- You can throw the bodies in the sewer caps.
Anyhow, the countdown is over and you have dealt with the guy. Now, keep in mind that O'Donnell has arrived and his cavalcade is slowly making its way to the meeting place. You don't have to wait for him to be killed before moving on. But, as you forge ahead, keep an eye on the top right of the screen. When O'Donnell enters the meeting room, a small inset window will appear there showing you what's happening. When you see it, press "4" to select your Sapper (wherever you are in your journey forward), and blow up the bomb (click on the bomb icon above his backpack). O'Donnell is dead! Hurrah!
Getting to the kubelwagen
Your task is now to reach the kubelwagen further up (inside the prison compounds). It is quite easy (compared to what you have done so far). It just involves more distract-killing (aided by the fact that your Spy is now dressed as an officer). The Sniper and Sapper are quite useless and you can just leave them behind, bringing them forward only from time to time as you clear the way forward.
The next screenshot shows an easy way to reach very near the gates. There are three soldiers on the way whom you can kill easily. The yellow line shows the general path.
Distract Guy #6, order him to go away from the scene, kill him and stash his body. Then, go and distract Guy #9. While he is distracted, wait for Guy #8 to walk away. When Guy #8 is away, sneak up on Guy #7, kill him and quickly hide the evidence.
Now, order Guy #9 (whom you have been distracting) to go further away (as shown by the red arrow). Make sure he is out of reach of the guy marked 'A' (tip: to see an enemy's field of view, hold down the 'TAB' key and then click on the desired enemy). Remember that both Guy #8 and Guy #10 are keeping an eye on #9. But both these fellas will walk away, so if you time it right, you can kill #9 when neither of them is watching. Drag his body out of sight.
You're almost there! Kill #8 if you want to, although it's probably just as easy to sneak by when he is not watching. Climb up with your Spy and distract the guy marked 'B'. Then, kill Guy #10 and throw him aside. Get your Green Beret, Sapper and Sniper into the kubelwagen. Bring down your Spy, enter the kubelwagen and escape!


