Crystalis/Sahara
Death Desert[edit]

- Key points
- To/from Goa Fields.
- To/from Oasis Cave.
- To/from Sahara.
South of the Goa Fields is the Death Desert. It's easiest to reach this by Teleporting to Swan or Goa and then hiking south through the Goa Fields. It's also possible to emerge here from the Oasis Cave.
The first thing you should notice is that most of the desert is full of toxic quicksand: the desert's name is very appropriate. If you intend to be trudging your way through this, put on the Leather Boots to keep it from sapping your strength. Your next objective is a cave in a rock situated a little to the east in the heart of the quicksand. It's hard to miss as there are sand pits blocking the way, but with the Flight spell you can sail over them and reach the cave. The short connector is full of dangerous scorpions, but the Warrior Ring will allow you to keep your distance and build valuable experience (you need to be at least Level 15, but you might as well max out to 16 at this point).
Sahara[edit]

| Items to Obtain |
|---|
- Key points
- To/from Death Desert.
- Deo the Rabbit. Change into Stom to get Deo's Pendant.
- To/from Great Pyramid.
At the other end, you will find yourself in a peaceful meadow filled with rabbits. One of them, named Deo, used to know Stom. Change into Stom and talk to him. He comes to realize Stom is dead and thanks you for comforting him by giving you his pendant. This is extremely valuable because it allows you the ability to regenerate MP in quiet moments. Proceed south into Sahara town.
| Pawn Shop Available | ||||
|---|---|---|---|---|
| Inn | Tool Shop | |||
| 500 | 1000 | 4000 | 3000 | 1500 |
In this final safe haven, you learn that you're still on Draygon's trail. He headed east, towards the Great Pyramid. Meanwhile, more of the prophecy emerges from the villagers: that while Mesia has the power to call the Floating Tower, you have the means to stop the Tower. Stock up if you can (while things may be expensive, they also stock rare stuff like Magic Rings and the Fruit of Repun) then continue your pursuit through the cave to the east.
Great Pyramid[edit]

- Key points
- To/from Sahara.
- To/from Great Pyramid Interior.
- To/from Great Pyramid Rear.
Once you pass through another short connector cave, you will emerge in more quicksand-filled desert, but right there, to the east, is the Great Pyramid. You might as well fly over the quicksand the sand pits and ascend to the main entrance.
Great Pyramid Interior[edit]

| Items to Obtain |
|---|
- Key points
- To/from Great Pyramid Exterior.
- Magic Ring.
- BOSS: Emperor Draygon. Defeat to win Psycho Armor.
Once you take the armor, you will fall to #4. - You arrive here from #3 and find Azteca nearby, wounded. He gives you the Bow of Truth.
Past a short foyer, the path branches off. Take whichever path you wish.
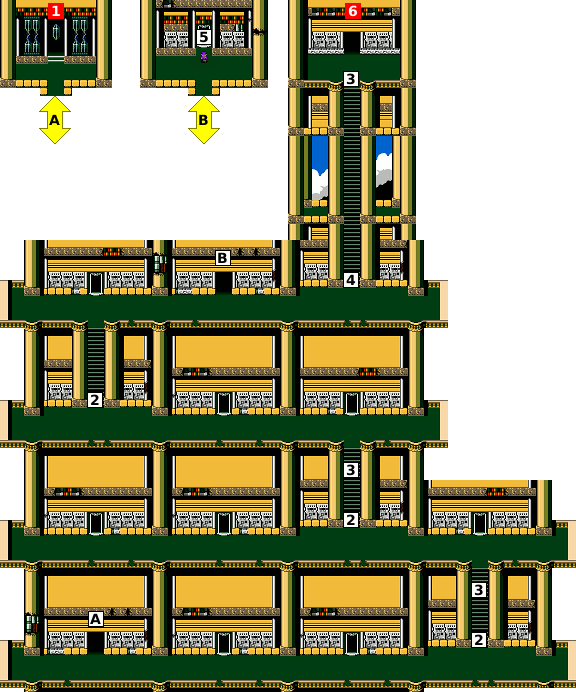
Many players can get very confused in this next section because of the monotony and the fact that many of the stairwells are linked: apart from the two that get you here, every other staircase at the ends of the corridors link up with the one at the opposite end of the maze. The stairs you need to reach are toward the center of the maze. You have options:
- If you want a Magic Ring, from where you entered, find the first intersection. If you took the left path to get in, go right for two intersections; otherwise, go left the same number. You should arrive at a doorway. Through here is a chest with the Magic Ring inside, and the doorway beyond positions you at the bottom center of the maze. Circle around the wall above you and you will find the stairway you need.
- If you want to cut to the chase, from the first intersection you encounter, go down two intersections, then right (if you came from the left branch) or left (otherwise) to locate the same set of stairs.

Once you climb up the stairs, prepare yourself. Equip the Sword of Thunder, Storm Bracelet, and Power Ring. For a spell, either choose Refresh or Barrier. Then charge up, step forward, and prepare to face Draygon, Emperor of Draygonia. He floats through the air and does two things: fly down at you at high speed and unleash a dangerous downward spread of lightning. You must fight Thunder with Thunder. Charge your Storm Bracelet, and once it's at level 3, unleash the storm. If you're quick, you can dodge the initial dive, unleash one storm, then charge up and unleash a second while he's floating back up. While costly, it only takes two such barrages to defeat Draygon. He'll leave behind a chest with the Psycho Armor (not only the strongest armor but it also allows you to regenerate HP in quiet moments). Once you take the chest, the floor collapses and you fall back to the entrance. Surprisingly, Azteca is there, though wounded. He tells you that Draygon is still alive and to locate the basement entrance to the pyramid to find him again. He then gives you the Bow of Truth to use on him.
Great Pyramid Rear[edit]

- Key points
- To/from Great Pyramid Exterior.
- Statues of Sun and Moon. Use Bow of Sun and Bow of Moon to destroy them and open the path forward.
- Opel Statue
- BOSS: Emperor Draygon. Use the Bow of Truth to reveal his true form.
- To Floating Tower.
So your next objective is to locate the pyramid's back door, which is some distance to the north of the main entrance. Fly over the sand pits and enter the passage. First, after a long corridor, you will find two lion-like statues shooting fireballs. They are the Guardian Statues of the Sun and the Moon. They are the reasons you have the Bows of Moon and Sun. Use them now. Each one will destroy one of the statues. Once both are gone, the way ahead will open.
Take the right fork once you enter (left and straight are dead ends). Be very careful around the many-armed Tomb Guardians. Not only will the only react to the Sword of Wind and take a long time to beat, but they cast Curse spells! Remember, only the Fruit of Repun can undo a Curse, so keep a couple handy. The best thing to do at this point is to dodge them (they will not respond to Paralysis). If you see a curse coming, use Barrier to protect yourself. Make your way to the doorway.
It's tempting in the next room to look down the side passages, but there's nothing in either corridor. Your best best is to put on Leather Boots and go straight up through the spike field, avoiding the Killer Moths, and go up the stairs.
If you want an Opel Statue, take the right branch and negotiate the Tomb Guardians, Killer Moths and spikes. Otherwise, head left, through another field of spikes, then back around and up to two chasms. Falling here will drop you onto the spikes downstairs, but at least with Leather Boots they won't hurt you. Thing is, you have to work your way around Killer Moths and Tomb Guardians as you cross, plus each platform will crumble once you clear them, so proceed with extreme caution.

Once you get past both chasms, go up the stairs and gear yourself up: Sword of Thunder, Storm Bracelet, Power Ring, Barrier Spell, and (most important) the Bow of Truth. This is the last chance if you feel a need of returning and stocking up items. Once again, Draygon will appear and attack. Unleash the Bow of Truth and brace yourself...
Draygon transforms into a huge beast! Draygon has three different attacks. He can conjure spiked balls that bounce around the screen, he can charge toward the bottom of the screen and cast a Curse spell, and he can unleash lasers. It is only when he is firing lasers that Draygon is vulnerable to the Storm. It will take about three such barrages to defeat the Emperor once and for all...and once you do, be prepared for a surprise.
The Emperor Draygon was in fact Azteca. He reveals that Draygon was a second personality: the result of him trying to purge his evil thoughts. Instead, the thoughts coalesced into an evil persona. The only way to defeat Draygon in essence was to destroy Azteca as well.
But although Draygon's plans have been foiled, there's still the matter of the Floating Tower. At this point, Mesia calls down to you. She explains that she is now inside the tower. The Tower is in fact operating on an automated cycle. Unless it is destroyed, it will destroy the world again...on its own. With the connection made, you must ascend to the tower and destroy it. You will proceed north and enter the portal to begin your final assault. From now on, you cannot Teleport.
Floating Tower[edit]

| Items to Obtain |
|---|
- Key points
- From Great Pyramid Rear.
- These stairs upwards appear once you destroy all the robots on a level.
- Prerecorded messages have been left for you at these points.
- These stairs upwards appear once you have Crystalis.
- Mesia. She will combine the elemental swords into Crystalis.
- To FINAL BOSS: DYNA.
The tower is manned by lots of robotic defenses. To ascend the tower, you must clear out each floor of these guardians. The easiest way to do this is to equip the Sword of Thunder and the Warrior Ring. A rapid stream of multi-directional bolts should help reduce their ranks quickly. Once each floor is cleared, a stairwell will appear to let you ascend to the next floor. As you ascend, two automated messages begin to play for you.
- You and Mesia were both scientists from the old era who helped to construct the Floating Tower. Your awakening was triggered by the Tower powering up again, as you two were meant stand in judgment of humanity.
- Azteca was in fact an android from your era, programmed to be a benevolent ruler to humankind. His failure means judgment of humanity falls to you.
Once you clear three floors of guardians, the fourth level will simply have a door. Mesia is there waiting for you. She instructs you to place the four elemental swords on the floor. She will then reveal her other power: the ability to merge the four elements into Crystal. The four swords combine into the legendary sword Crystalis. With this, you can now destroy DYNA, the tower's central computer. Ascend the stairs that appear, and prepare for your final battle.

DYNA will defend itself with its invincible Defense Pods which fire massive spreads of bullets and energy waves. DYNA itself attacks with powerful lasers. But in the presence of DYNA, Crystalis' power can be unleashed as large energy projectiles: no charging necessary. Aim for the open eye on the left side of DYNA and use Barrier to project yourself from DYNA's attack.
Once DYNA is destroyed, you can use Crystalis to shut down the Floating Tower and end its threat for good.
