Deep Dungeon III: Yuushi heno Tabi/Cave Maps
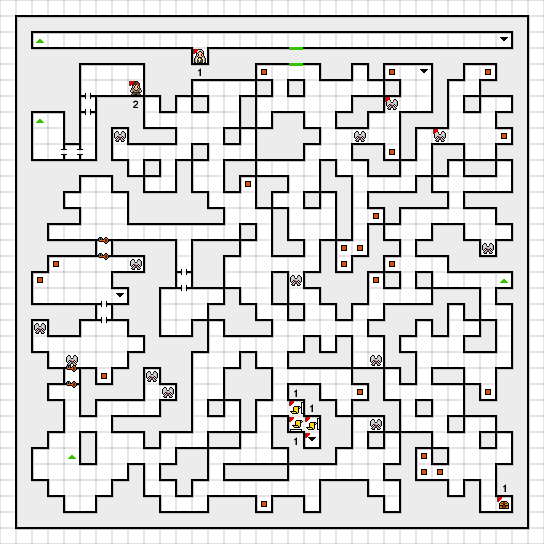
Cave level 1[edit]

This floor has both levels of Centaurs that typically come in pairs, both levels of Baboons, Giants and Vampires. The Vampires possess fairly high evasion and may cast Resist on themselves, but are vulnerable to Sunshine. The encounter marked with a red corner contains the Gorgon, which is a more powerful enemy that should not be underestimated.The ladder on the bottom right requires a Rope Ladder to descend (You can get one in the first town). Taking this ladder down leads you to the well in the third floor and ultimately, the Decayed Sword. The chest in the bottom right corner contains a Sun Shield, which is a definite upgrade from the Iron Shield. If you ascend the ladder on the right side of the map, it takes you to a part of town where you only have access to the item shop (the shop sells Surumu Spirit).
Comment: The green walls here are used as a shortcut after you've made it to Deriju.
Note 1: Danger! Stay away!!
Chest 1: Sun Shield
Person 1: The owner of the weaponsmith lives nearby...
Person 2: (Without the Decayed Sword AND Metal) What are you doing here? Get away quickly!
Person 2: (With both) Oh! Your sword! Well, I'll repair it for you. But it seems like this'll take awhile. Please come back later.
Person 2: (After finishing) It should be done! You better take the sword along.
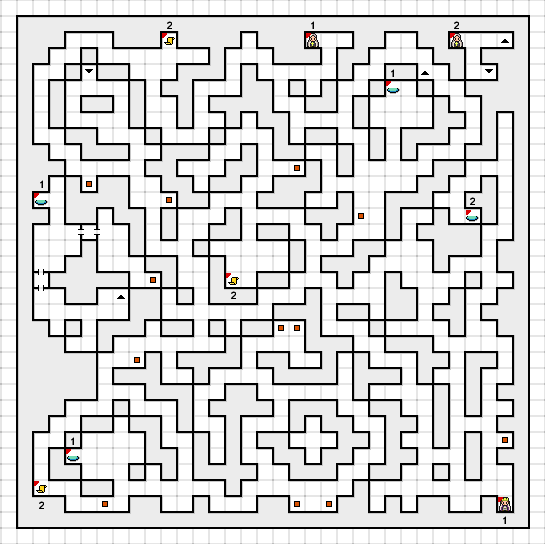
Cave level 2[edit]

The main section of this floor has the same enemies as the previous floors. There are a few recovery points here as well as some people who will join your party should you need/desire them to, but not really much else. If you entered from the ladder on the left side of the map, the only real thing of interest here is the recovery point.
Note 1: There's a message written on the wall: The caves are complex. Use the Circlet if the going gets tough.
Water 1: Partially recovers a single person's HP (Red water splashed out! Will you drink it?)
Water 2: Heals poison from a party member. (White water splashes out! Will you drink it?)
Person 1: A Priest that wants to join the party
Person 2: I am a messenger from the city, just like you. We are gathering all the freelancers to deliver letters to keep good relations between the castles.
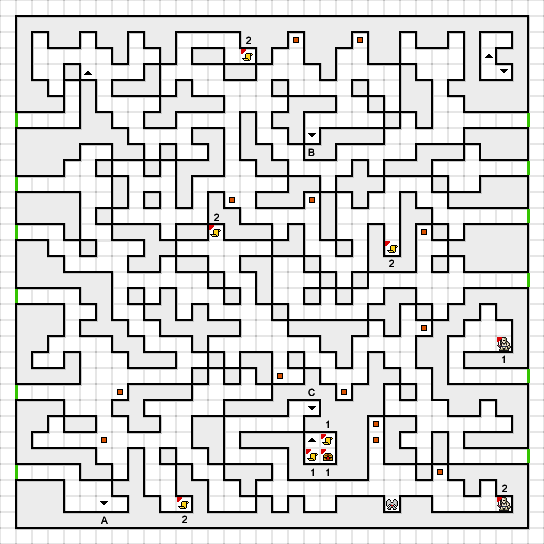
Cave level 3[edit]

This floor is too dark to see without the use of a lamp and as such, the Hand Mirror is only useful for telling your direction. We see new enemies appear here such as Dwarves, Familiars and Catmen. Catman has high evasion and can cast sleep and bomb on the party, so be sure to take it out quickly. Familiars hit fairly hard and have a good amount of HP, but if you can handle Gorgons, then there's no reason why they should give you any more trouble (they do come in slightly larger groups). Dwarves have very high defense, a decent attack and HP, so be sure to cast Acid on them to actually deal any physical damage on them. The Chimera will appear here rarely, but don't pose much more of a threat than the other enemies. The Gorgon also appears as a normal encounter here.
As far as this floor's concerned, there's not really much to do here in the main section other than receiving a few hints about the upcoming boss. The subsections are more useful, the well area houses the Decayed Sword, and the NPC in the bottom right corner sells you the Metal you need to fix it for 300g.
The well section in this area requires a lamp to see and has powerful enemies like the Gorgon as random encounters. The only thing of note in here is the Decayed Sword which requires the person pulling it to be around level 14 to successfully obtain it, in addition to some experience for the party. As it is right now, the weapon is fairly weak, but be sure not to get rid of it as it has its use later.
Comment: Walls marked in green loop over to the other side of the map. Also, some of the ladders are marked to make it easier when checking the next map.
Note 1 (Well): Inside the bottom of the well.
Note 2: There's a message written on the wall: The master of the underworld HATES sunshine!
Chest 1 (Well): Decayed Sword
Person 1: Have you got the Light Orbs? Y-(You can use it to attack the underworld master.) N-(Get it from the master of the tower.)
Person 2: You could make a great sword if you had this metal. Won't you buy it for 300g?
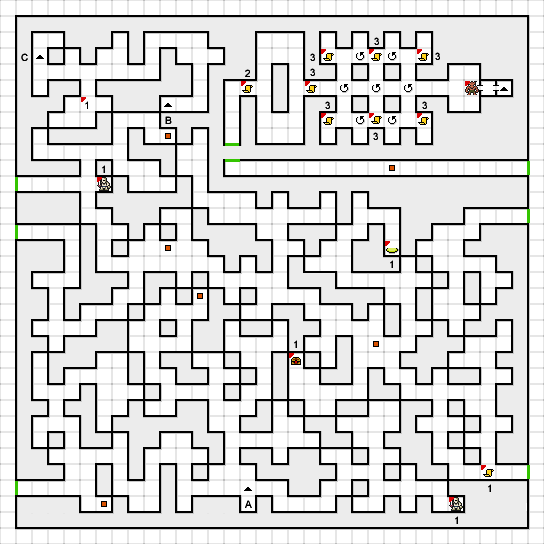
Cave level 4[edit]

As with the previous floor, the Hand Mirror only works for telling your direction and some sections of the map loop over to the other side. The enemies are more or less the same as the previous floor, you will encounter Familiar 2 here though. There's a Flame Whip found in the only chest here and it is by far the best Hunter weapon available, so be sure to grab it if you have one.
At the end of the long hallway, walk through the northern wall to be taken to Zozem's lair. In this section, be sure to use the Hand Mirror to tell where you're facing after stepping on the spinning tiles. When you fight Zozem, be sure to use the Light Orbs as soon as possible. Zozem can cast sleep on your party and may do so before you get the chance to use the item, but he shouldn't pose a major threat provided you've been doing okay thus far. Magic seems to be less effective than physical attacks so don't be afraid to swap your Magician to a supportive role. As always, keep your swordsman up and cast Sharp/Berserk and Shield/Armor on whoever needs it. Upon defeating Zozem, you will receive the Dark Orbs. Climb the ladder in the next room and make your way out.
Comment: The room labeled with a "1" seems to have a peculiar effect every time you take a step in it; every step decreases the party's current HP, but it also increases the party's current MP (up to the min/max). There's no pop-up dialog, but you can see the changes in your party window.
Note 1: There's a message written on the wall: Walk west along the south wall! Follow it down and there'll be something nice there.
Note 2: Welcome. I am the master of the underworld Zozem! Hurry over here! I've been waiting for you!
Note 3: What's the matter? I'm right here.
Water 1: Partially recover a single person's MP. (Black water splashes out. Will you try to drink it?)
Chest 1: Flame Whip
Person 1: The entrance to the master's room is at the end of a long road. Press the north wall to find it.