Battle consists of a single player campaigns and multiplayer matches against randomly selected opponents. This page describes the strategies and tips for defeating all types of scenarios, thought more specifically multiplayer matchups.
For single player campaigns, please see the sub-pages for the respective campaign:
How multiplayer battles work[edit]
First, you pay 200g to get matched with a random opponent. You get 30 seconds (usually 28 after the animation fades away) to come up with a strategy or decide to match with another opponent for an additional 200g. This cycle continues until you either wait the 30 seconds or you take action (such as by placing a unit or using a tactic).
When battle begins you get 2 minutes and 30 seconds to fight. When time runs out, or either team is completely destroyed, the battle is over.
During battle your goal is a marginal or complete victory as well as raiding enough loot to make it worthwhile. A marginal victory is acquired by getting at least 1 badge. A complete victory is when you get all five badges and your remaining troops survive. If you get a marginal victory or better, you will receive a portion of medals. A complete victory always awards the maximum possible medals for the battle. If you do not get a marginal victory you will lose medals.
Deciding the winner[edit]
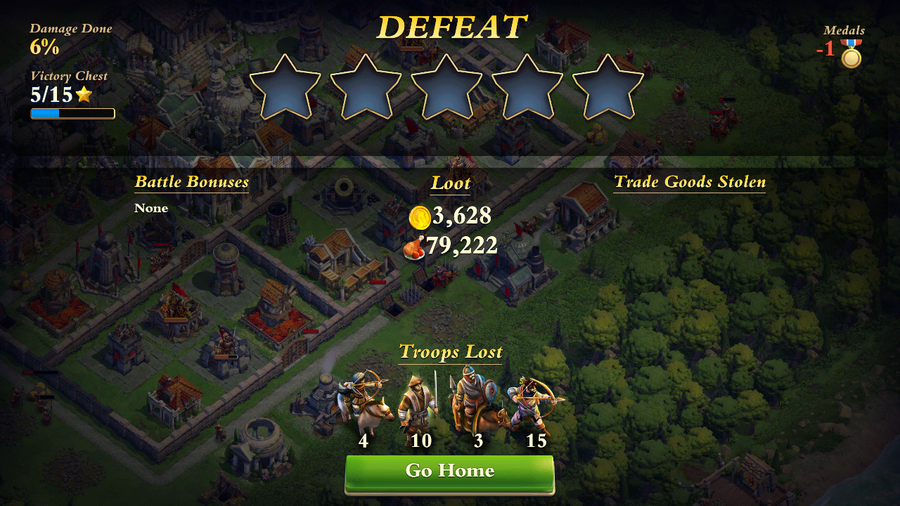
At the end of the battle a summary is given and a victor is decided. The following information is presented:
- Type of victory: defeat, marginal victory, or victory.
- Damage Done: percentage of buildings destroyed.
- Badges: shown in the below image as five empty stars centered along the top, these are the five objectives for victory you may have acquired. See below for details.
- Medals: shown at the top right
- Victory Chest: how many more badges you need before you get a bonus reward.
- Battle Bonuses: additional buffs you may have used such as Strength of the Gladiator.
- Loot: gold and food acquired.
- Trade Goods Stolen: bonus loot you may have acquired. If a diamond is available and you get all five badges, you will get the diamond, guaranteed.
- Troops Lost: a tally of your units that died in combat.

Badges[edit]
The victor is decided based on whether or not the attacker acquired a badge. There are five badges that an attacker can acquire:
- Town Center destroyed.
- Quick Victory (Town Hall destroyed within 1 minute).
- 50% Damage (half of all buildings are destroyed).
- 75% Damage (3/4 of all buildings are destroyed).
- Complete Destruction (all destructible buildings are destroyed).
Loot[edit]
When you attack certain enemy buildings your units' attacks will automatically steal gold or food for you. Certain buildings hold certain loot. When you are not in battle, you can check which buildings store loot by clicking on their info button. Below is a list of buildings that store gold. Note that although Caravans store gold, they cannot be attacked during battle as they retreat into the Town Center.
- Buildings that store food
- Farm
- Mill
- Town Center
- Buildings that store gold
- Gold piles
- Marketplace
- Town Center
- Tips for getting loot
- Deploy Raiders near outer loot-storing buildings. The raiders will focus on those buildings.
Battle Bonuses[edit]
By achieving these optional objectives you will receive a small reward:
- All Food buildings! +400f
- All Gold buildings! +400g
- All Defensive buildings! +Surviving Troops (you get to keep your troops)
Glory![edit]
The winner of the battle gains glory (in the currency of medals). The amount of glory gained is determined by comparing the two players' levels and overall strength (a calculation that is hidden to players). The more glory you have, the higher the multiplayer
Controlling your units[edit]
When you place a unit, it will behave on its own. For the most part, you cannot control it, so timing and location is important! After units have been placed, if you use the target ability, it will rally all of your troops to that point. However, that ability has a 30 second cooldown and can cause problems if used incorrectly so be careful!
- Tips for placement
- Send raiders in first or last. First if you need to do a raid or if there are outlying farms, marketplaces, or mills. Last if you need to get through a wall first. Raiders will move around the most and are likely to get taken out by towers or defending units if you do not place them carefully.
- Place units in small groups where they will be balanced and successful. An example squad consists of a cavalry unit (to absorb damage from a tower), a few heavy infantry (to cut through buildings and walls), and a few ranged infantry (to kill enemy units).
- Destroy a wall on a far corner away from turrets. When you get to the DomiNations/Classical Age, you can get Wall Miners to instantly blow open a wall, which will reduce the difficulty of victory.
- Spread your units out if near an area of effect (AOE) defensive building such as a catapult or castle.
- Tips for using Rally
- Deploy all of your troops before using it. Then rally to your most favored target, such as a Town Center or AOE turret (such as a castle or catapult).
- If you're out of options and your army is surrounded and you know you're going to die, you can try rallying your troops far away from the defending units or strike a resource-rich target such as a farm or Town Center to squeeze out a bit more loot.