Dr. Chaos/Walkthrough
In order to complete the game, you must locate all 11 zones, defeat the boss at the end of each of them, and collect the piece of laser gun that the boss is defending. Each zone entrance is hidden inside a particular room. The zones can be entered in any order, although your ability to complete them may be limited without possession of certain items from other zones. Only the first zone can be entered without possession of the Ultraspace Sensor. Of the remaining zones, many require possession of either the Jump Shoes and/or the Air Helmet. The boss of the final zone cannot be defeated without the fully assembled laser gun.
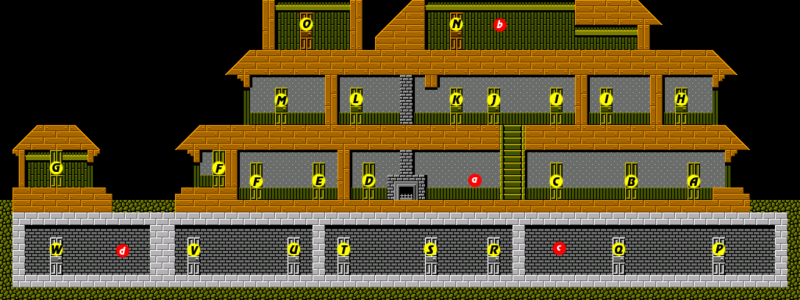
The house is divided up into four stories, with 23 rooms that can be accessed through the hallway and 4 hidden rooms which can only be accessed through other rooms. The hallways typically contain bats and mice which can be defeated with any of your available weapons. Some rooms contain walls that can be hit in order to reveal holes. Some of these holes allow you to access neighboring rooms while others contain ladders that take you up to the attic or down to the basement.
When exploring a room, you have the option to "OPEN", "GET", "GO", and "HIT". The cursor must point to the object or location where you wish to perform these actions. To move about the room, you can move the cursor to one side or the other to turn 90 degrees in either direction, or you can move the cursor off the top of the room to turn 180 degrees and perform an about face. Once you enter a zone, you will return to the side scrolling controls that are active on the house map.
This walkthrough presents one of many possible orders in which to explore the zones. The following table explains where you can find maps and descriptions of all of the rooms in the house.
| Room | Zone page |
|---|---|
| Room A | Zone 1, Zone 5 |
| Room B | Zone 1 |
| Room C | Zone 1, Zone 10 |
| Room D | Zone 3, Zone 6 |
| Room E | Zone 3 |
| Room F | Zone 8 |
| Room G | Zone 9 |
| Room H | Zone 7 |
| Room I | Zone 7 |
| Room J | Zone 2, Zone 4 |
| Room K | Zone 2 |
| Room L | Zone 11 |
| Room M | Zone 11 |
| Room N | Zone 4 |
| Room O | Zone 11 |
| Room P | Zone 10 |
| Room Q | Zone 10 |
| Room R | Zone 10 |
| Room S | Zone 10 |
| Room T | Zone 10 |
| Room U | Zone 8 |
| Room V | Zone 8 |
| Room W | Zone 8 |
| Hidden room a | Zone 1 |
| Hidden room b | Zone 4 |
| Hidden room c | Zone 10 |
| Hidden room d | Zone 8 |
