Full Moon Tower


The Full Moon Tower is quite easy to get to once you unlock the Watergate in Tuhn. However, you will most likely have to back track to get your ship, and then sail it up the eastern channel to reach the island that the tower is located on. Alternatively, you could Return to your last save point, and sail back to Tuhn, depending on how closely you saved (the closest location would be Beran.) If your last experience in the Lighthouse left you frustrated, fear not; this tower is much simpler by comparison. It's actually a nice break before the decidedly more difficult Volcanic Sea Cave dungeon coming up shortly. The monster in here, though tough, provide a good opportunity for level gaining and gold collecting.


As with the Lighthouse and the Tower of Wind, the goal you seek, the Moon Fragment, is not actually at the very top of the tower, but rather on a floor low to the ground, but in a room which can only be accessed via a staircase from a higher floor, behind a set of doors locked with the Silver Key. Some extra chests are provided in the remix version, and the two chests on the first floor which do not contain the Moon Fragment contain stat boosting seeds. The original version only has a Medical Herb. Likewise, the remix version of the second floor also contains a Mystic Nut. Gold can be found in both versions of the third floor, although you get substantially more in the remix. You'll find a DEF seed instead of a useless Bamboo Stick on the fourth floor of the remix. And just as you typically find an empty chest at the top of most towers in the original version, so too will you find an empty one on top of this tower. In the remix version, you will find a useful Wizard Ring instead.
-
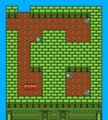
Moon Tower F4 (GBC version)
-
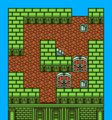
Moon Tower F5 (GBC version)
-
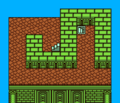
Moon Tower F6 (GBC version)
-
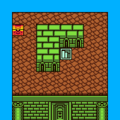
Moon Tower F7 (GBC version)


Volcanic Sea Cave

Note: The maps presented here represent the GBC version of the game. They do not correspond perfectly with the NES version, but they are similar enough, as only minor details were changed between the two versions. For comparison, please see the NES maps at the bottom of this section.
With the Moon Fragment in your possession, you'll need to figure out how to use it. Many people have spoken of the Moon Fragment's ability to raise the tides of the ocean. With this ability, you can access regions of the sea that might be otherwise blocked off by low lying reefs. One such place exists to the west and slightly south of Osterfair. If you sail out of the Osterfair lagoon, and travel south until Osterfair is out of view, and then continue west, you will come to a cave entrance which you cannot access with your boat. However, if you use the Moon Fragment in this location, it will cause the sea to swell, and the tide to rise, allowing you to sail over the shoals and right to the entrance of the cave.


The Full Moon Tower might have been a breeze, but the Volcanic Sea Cave is anything but. In addition to the incredibly difficult enemies that you will face, including Saber Lions, Mummies, and Evil Eyes, many portions of the cave floor are covered with scolding lava! And no casting of Stepguard can save you from this danger. However, those wearing the water flying cloth do not take this damage! Fortunately, the damage taken by stepping on these lava tiles is extremely small, but it can add up to quite a lot if you walk a long distance over them. For this reason, it is vital that you keep tabs on your party's health, and stop to restore any lost health. Don't necessarily wait for a member's health to reach the warning color, you do not want to be engaged in a fight with health so low that you could be defeated with one hit. Also, take your time and plan your movements so as to minimize the amount of lava covered territory that have to traverse. The maps shown here do not contain all of the small passages that the red labeled staircases pass through.


Finding your way through the Sea Cave is no small feat either. The cave contains a tremendous amount of staircases and tunnels that simply loop back to the previous floor that you were just on. As a result, some of the staircases are labeled with a lower-case red circle, to indicate that these stairs only lead to a different portion of the floor. Ultimately, you must brave a corridor filled with lava to proceed from the second basement level to the third. Once there, you must walk down and around to a portion of the floor which contains an abundance of stairwells to the floor below. Once again, it's the explorer who braves extended exposure over the lava covered floor who will find the correct staircase that he or she is looking for.


Once the staicase which leads to basement level 4 is found, you will find an alter guarded by two evil priests of Hargon who attempt to stop you from claiming the precious article known as the Eye of Malroth. Ultimately, you will not be through with the Sea Cave until you collect this artifact. When you have finally obtained it, there is one more town which you might not have visited yet, the town of Beran. Head to the island continent of Beran in the south west corner of the world.