
At this point, the game gives you full access to the rest of the world, and you are free to decide to tackle it in any order you like. Of course, there are certain paths that take the difficulty progression into account, and that is what this walkthrough strives to do: provide you with the path that should coincide best with your level advancement. With that said, your next destination is relatively close to where you've had your ship parked throughout the last chapter. From Castle Tantegal, you'll want to sail south, below the island of Charlock Castle, head east until you reach the southern channel, and then sail due south until you reach an island populated with nothing more than a lighthouse. This is your next destination.
The lighthouse can be rather unforgiving and you should not really attempt it unless the Prince of Midenhall is at least level 18. It's quite large and very maze like, with portions of the floor layout obscured from view until you walk into them. The remix version of the game positions the entrance on the opposite side of the lighthouse from the original version, and requires that you walk a bit farther to the center where the stairs are located. By comparison, in the original version, you begin at the top and follow the outermost lane all the way around. Everything else is the same.
Climbing the Lighthouse[edit]


The monsters you encounter here are largely a continuation of the ones you frequently encountered in Charlock Castle. However, their numbers will be increased. And none are more bothersome than the Gorgons. As a result, you may wish to adopt one of two strategies; fast or slow. If you are trying to earn experience points, play slowly and engage every Gorgon that you meet. Have the Princess proactively cast Defense to lower the Gorgons' protection in anticipation of them casting Increase, which they do quite frequently. However, if you want to play quickly, it would be a good idea to run away from any fight containing three or more Gorgons, and any fight with two Gorgons and many other enemies. Their tendency to cast Increase can lead to some really long fights. Note that while the Prince of Midenhall is really the only one who can appreciably damage the Gorgons consistently, using the Wizard Staff to cast Firebal actually has a better success rate than actually casting the spell of Firebal, so use it regularly if you have one. Also beware of Siber Tigers which, while strong to begin with, have a rare tendency to strike twice and instantly kill one of your characters.


The trick to climbing the lighthouse is knowing which one of the four stairs at the center of the first floor to take. The top two stairs lead to the same general area, and will only get you as high as the third floor. Of the two bottom stairs, the right one will get you as high as the fifth floor, where you will find a Chain Sickle weapon, relatively useless at this point in the game. This means your only real option is the left of the two lower staircases.
Once you take this staircase, you will quickly ascend to the third floor, where you will have a choice. You can either climb the stairs that you encounter first, or continue on to the large door, which can be unlocked with the silver key. If you unlock the door, you will very quickly ascend up a series of staircases contained in a narrow column to the very top of the lighthouse. While this might seem like a great accomplishment, all you will find here is a soldier who has been posted to stand watch over the lighthouse. You'll need to climb back down to the third floor and find that other staircase that you passed.
After climbing it, you will arrive on the fourth floor where you are presented with another choice; to venture up or down. If you head down, you will find another staircase, with a chamber off to the left that contains a chest full of gold. Climbing that staircase, you will be lead along another series of steps that travel up to the sixth floor, and back down to the fifth where you will find a Fairy Water in the original version, or a far more valuable Life Acorn in the remix. Nice, but still not what we're looking for.


Instead, venture up from the original stair case on the fourth floor. Ignore the first staircase that you can see off to the right, and climb up and around to the left. With no choices to make on the fifth floor, you will arrive in a chamber on the sixth floor behind a closed door. Unlock it with the silver key, and look for another set of stairs in a similar location to those you found on the fourth floor in the upper left corner. When you arrive on this floor, you will see a Gremlin that spots you and quickly runs into the chamber below. When you chase after him, you will instead find an old man who claims he knows what you are looking for and instructs you to follow him. Down and down you will go, back to the second floor where the old man stops in front of a treasure chest and invites you to inspect it.
As soon as you inspect the chest, it will turn out to be an ambush, and you will be attacked by a set of Gremlins. As long as you make sure that your health is high before you search the chest, this battle should not be incredibly difficult for you, and you should be able to vanquish the Gremlins with a minimal amount of effort. The reward for your efforts will be the very first crest of your collection, the Star Crest. With one crest found, you only have four more to go, and an entire world to explore.
-
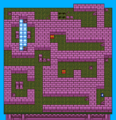
Lighthouse F5 (GBC version)
-
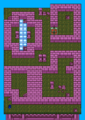
Lighthouse F6 (GBC version)
-
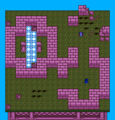
Lighthouse F7 (GBC version)
-
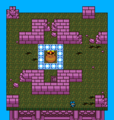
Lighthouse F8 (GBC version)


Sailing away[edit]
With the majority of the northern hemisphere explored, you'll have to venture throughout the southern hemisphere of the world by boat. The world can be roughly divided into three sections; an eastern portion, a central portion, and a western portion. And that is precisely the order that we will tackle the game in.