Dragon Warrior III/Soo
- Green text on this page indicates that it is exclusive to the GBC and SNES versions.

To the west of Eginbear and Portoga lies a new continent that is sparse in population, but high in promise. This world's version of North America contains a river bed that cuts a path right through the heart of the land. Follow the river to find a tribe of Indians who have much to teach you about this part of the world. A tower lies on the west coast which contains an item that will aid you in your search for more orbs. On the east coast, a patch of land has been cleared away to plant the seed of a new town. However, one ingredient to the town's success is missing, and only you can provide it.
| Monsters in Soo Area |
|---|
| Monsters in New Town Area |
|---|
Starting a new town[edit]


If you Return to Portoga, and set sail for the west, you will reach a new continent before too long. You will arrive at some mountains that extend south along the east coast. Travel north a while, and you may spot a patch of grass cleared out among some trees. This should arouse your suspicion. Park the boat and visit this clearing. You will find a building set up south of a pond. Inside is a man who would like to start a new town in the area. However, he needs a merchant (Dealer) to help build an economy. He's not picky either, any merchant will do.
At this time, you should Return to Aliahan, create a new Merchant (Dealer) at Luisa's place, and add him or her to your party (you'll have to bench one of the members of your team for the time being.) Return to Portoga and set sail again for the continent to the west. Return to the clearing with your newly created merchant, and allow him or her to accept a job at the new town. In return for your charity, the old man will give you a hint and tell you to search around the well in the Soo's village. Once you've parted with your merchant, return to Aliahan and reclaim your fourth party member.
This is by no means the end of the story of this new town. However, it will take time for the town to develop and for people to move there and grow its population. The town will grow each time you collect two of six orbs. You would do well to check up on it from time to time as you play through the game. The future of the town will be discussed more later on in the walkthrough.
A new frontier[edit]
Assuming you traveled back to Aliahan to fix your party, Return to Portoga, and sail west again. However, when you hit the mountains, sail south instead and follow the coast to the west until you reach the mouth of the river that extends north into the land. Ignore the first left branch and follow the second one. Then continue north while staying to the right whenever you can. As you travel back to the right below some mountains, and above a bridge, a village will come into view. Make your way to the village when the river expands into three great lakes.
The Soo (Sioux) Indians[edit]

| Tool shop | |||||||
|---|---|---|---|---|---|---|---|
| Medical Herb Herb |
Antidote Herb Antidote |
Fairy Water MohawkWig Mohawk Wig |
Wing of Wyvern Silver Silver Barrette |
Full Moon Herb MoonHerb |
Poison Moth Powder BugPowder Moth Powder |
Invisibility Herb Hide Herb Invisible Herb | |
| 8G | 10G | 20G 60G | 25G 760G | 30G | 500G 310G | 300G | |
| Equipment shop | |
|---|---|
| Cypress Stick - |
5G - |
| Club Club |
30G |
| Poison Needle Poison Poison Dagger |
10G |
| Thorn Whip Battle Battle Axe |
320G 8700G |
| Clothes Kilt Leather Kilt |
10G 800G |
| Flashy Clothes Flashy Flashy Suit |
480G |
| Fighting Suit Magic Magic Shield |
800G 2000G |
| Services | |
|---|---|
| Inn | Healing |
| 40G/person | No |
This is the village created by members of the tribe of Indians known as the Soo (Sioux) (named for the Sioux tribes of Native Americans that lived in central North America). They know a lot about the lore surrounding this part of the world and have a lot to teach you. Their item shop is impressively stocked, while their equipment shop might be considered rather primitive. However, this is the one place in the world where you can purchase the Poison Needle (Poison Dagger) (instead of stealing one from the shop in Kanave).
Among the topics that the Soo know about, you can learn about the Vase of Drought (Dry Vase/Thirty Pitcher), the Echoing Flute (Echo Flute), and the land of Greenlad. If you already possess the Final Key, then you likely know all you need to know about the vase. However, it turns out that the vase originated in this town, and was stolen away and taken east. Although it's not the greatest clue, the most information on where you might find the shoals of the sunken shrine is given to you by a talking horse, who indicates that you can find them in the ocean to the west.

Many of the children in town know a bit about the Echoing Flute (Echo Flute). This item will echo a tune back to you if you play it in a location that contains an orb, and it is apparently located in a tower. A man at the top of the village tells you about a wizard who reportedly lives on a frozen island far to the north in a place called Greenlad. Another man near the bottom asks if you noticed a town to the east. If you say no, he'll reply that some people left to start a new town there and never returned, but if you say yes, he'll be delighted to hear the news.
Last, but not least, don't forget about the hint provided to you by the man who is starting that new town. If you left a merchant with him, he thanks you by telling you to search around the well. If you stand below the well and search the ground there, you will find the Staff of Thunder (![]() Bolt
Bolt ![]() /
/ ![]() Bolt Staff). Give it to a spell caster if you'd like to save magic points, or give it to a non-spell caster if you'd like to provide yourself with one more party member who can attack an entire group of enemies.
Bolt Staff). Give it to a spell caster if you'd like to save magic points, or give it to a non-spell caster if you'd like to provide yourself with one more party member who can attack an entire group of enemies.
Search on the other side of the well to find the ![]() TinyMedal /
TinyMedal / ![]() Small Medal. Go down the well and check the dresser there for a
Small Medal. Go down the well and check the dresser there for a ![]() Token /
Token / ![]() Pachisi Ticket. In house north of the well is a
Pachisi Ticket. In house north of the well is a ![]() TinyMedal /
TinyMedal / ![]() Small Medal hidden in pot. Now enter the house south of equipment and get the
Small Medal hidden in pot. Now enter the house south of equipment and get the ![]() AGLseed /
AGLseed / ![]() Agility Seed from the pot.
Agility Seed from the pot.
In search of a tower[edit]
After hearing about the Echoing Flute (Echo Flute), and the fact that it's hidden in a tower, it would be a good idea to search for this item. There happens to be a tower located on the west coast of this continent. To reach it, you must either sail to the mouth of the river and get off your boat in order to walk to the west, or sail due east from the remote town of Muor (north of Jipang). Either way that you go, you must be on the look out for some powerful enemies. Blue Beaks are like Great Beaks that can cast Inferno, twice per round if they like. Venom Zombies/Zombies/VenomHorks can poison your party with their breath. Witch Doctors/Shamans can heal themselves when they feel they've taken too much damage, and Bighorns are large goats that can put you to sleep.
Aurhea's Fountain[edit]


Go north of Tower of Arp to a small sea. There is a Fountain called Aurhea's Fountain. You will trip and drop a item in the sea. A Spirit called Aurhea will appear and say that she will search for your lost item. She will return with a Cypress Stick and ask you if that is what got dropped. If yes, then she will ask again if that really is the item you lost. If yes, then you will receive the Cypress Stick, but lose the other item that really got dropped in water. But if you say no instead, then she will return with another item, this time with a Demon Axe. She will once again ask you if that is your lost item. If yes, then she will call you a liar and give back the item you lost, but if not then she will come back with the lost item. Answer truthful yes and you will receive the lost item plus a additional item, but if you say no she will call you a liar and give back the lost item.
If you do this again, then she will ask you if you drop your item before. Say yes for a second question and no to skip it and go to third question. The second question is if you do that on purpose. Say yes to go to third Question and no for get your item back. The third Question is about forgiving, because she can't find your item. Say no to get to 4. Question or yes to receive 50 gold and your item. As for the last Question, it don't matter if you say yes or no, because you will get your lost item either way. You can do this many times as you want to get more money.
The Tower of Arp[edit]
| Monsters in Tower of Arp |
|---|

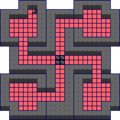
Upon arriving at the tower, you start out at the bottom of the first floor. It's important to keep your party healthy and ready for attacks from menacing enemies like Eliminators/Eliminatos or Lethal Armors/Death Nites/KillArmors. A few columns are arranged in the interior while two paths ways on the sides lead out to some grass. Continue straight up the middle, and unlock the door. Then you can choose to walk either to the left or to the right, it doesn't matter which, before you will need to unlock another door. Finally, when you reach the top, come back to the center where you will need to unlock one final door. Then step inside, and you will find four staircases arranged in one group in the center of the room.
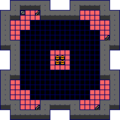
It doesn't matter which staircase you take. What matters is which direction you walk in when you reach the second floor. If you take the time to explore the rooms in every direction, you will find that only the room to the left of the stairs contains anything of interest: a staircase to the third floor. Any other direction simply leads to a dead-end. So head to the left immediately if you wish to reduce your exposure to battles.
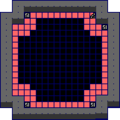
When you arrive on the third floor, you will now be stuck in the upper left corner due to the lack of any floor that crosses the tower. If you drop down a bit and try to peer across the tower, you will see a small platform in the center which contains four treasure chests. However, there doesn't appear to be any immediate means of reaching them, so climb the stairs on your right to the fourth floor.
-
Floor 2
-
Floor 3
-
Floor 4
-
Floor 5


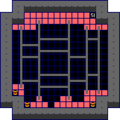
On the fourth floor, you'll find yourself positioned on a ring that circles the exterior of the gap in the middle of the tower. If you walk counter-clockwise around this ring, you will reach stairwells that climb down to every corner of the third floor. Yet, with each corner that you visit, you will find no clear means of reaching the treasures in the middle of the floor. The only option you are left with, is to climb the final staircase up to the fifth floor.


On the fifth floor, you'll find something unusual: a lattice of ropes tied across the gap in the center of the floor. The ropes extend to the section of floor on the south side of the tower. You'll even find three treasure chests on the other side. However, the middle chest only contains Clothes (![]() TinyMedal /
TinyMedal / ![]() Small Medal), and the two on the sides are Man-Eater Chests (the left chest has
Small Medal), and the two on the sides are Man-Eater Chests (the left chest has ![]() Love
Love ![]() /
/ ![]() Benevolent Ring while the right chest is a Cannibox)! These are hardly the treasures you were hoping to find.
Benevolent Ring while the right chest is a Cannibox)! These are hardly the treasures you were hoping to find.
As you might remember from the Tower of Garuna, north of Dhama, if you walk the wrong way off of the ropes, you can fall down to the floor below. That's precisely what you should aim to do now. Get as close to the center of the floor as you can and jump off the rope. You should land, quite conveniently, on the island of treasure chests in the middle of the third floor. In these chests, you will find not one, but two Acorns of Life (only one ![]() LifeAcorn /
LifeAcorn / ![]() Life Nut and the other is a
Life Nut and the other is a ![]() TinyMedal /
TinyMedal / ![]() Small Medal), 552 gold, and of course, the Echoing Flute (
Small Medal), 552 gold, and of course, the Echoing Flute (![]() EchoFlute /
EchoFlute / ![]() Echo Flute).
Echo Flute).
Now that you have the Echoing Flute (Echo Flute), it should make your search for the remaining orbs a little easier. Whenever you play the flute in a place where an orb is kept, the sound of the flute's music will echo back to you, indicating that an orb is present. However, it's a wide world out there, and you'll need to search every inch of it to find such locations.