Description
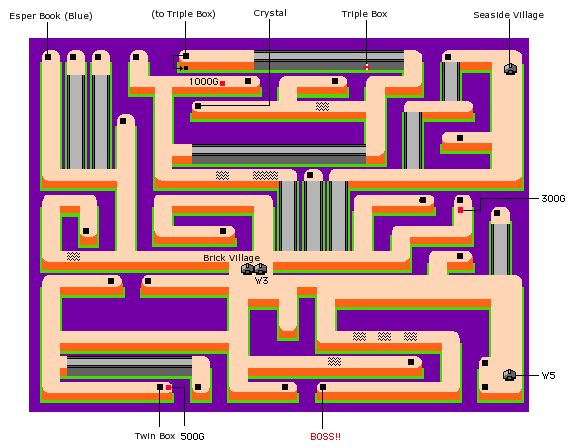
- The fourth world takes place in the labyrinthine Marsh Ruins. From both Brick Village and the Crystal Castle, you will arrive in the immediate center of the world. Unlike other worlds, all of the dungeon entrances lead to single screen sized isolated rooms, all of which require the Esper Lamp to see the interior of.
- The strength of the enemies in this world nearly requires the acquisition of the Devil suit in order to efficiently minimize the amount of damage that you will receive of enemy attacks. If you have learned Barrier magic, you may wish to utilize it at the start of every fight. Even with the Bazooka, you will find these enemies here difficult until you earn the blue ESP book.
- Despite the large number of dungeon entrances, only a small handful of them actually contain anything useful. You can see useful items before you light the room up, so if you enter, and see no useful item, your best bet is to leave immediately.
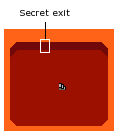
- The powerful Triple Box power up can be located in this world, but it can only be obtained by locating the secret exit from the dungeon that is found at the end of the peninsula that the Triple Box rests on. It will take you to the grass on the outlying edge of the peninsula.
Dungeon map

As stated above, there are no maze-like dungeons in this world. All dungeon entrances lead to single screen-sized rooms that are not connected to one another in any way. The only dungeon which contains a unique feature is the one found near the Triple Box which can be seen near the top of the world. This dungeon contains a secret exit which will take you to the grass which lies below the normal land that you walk across, and allow you to collect the power up.
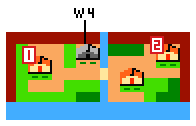
Seaside Village

Important Buildings
- The man inside will provide you with a clue about one of the treasures.
- Trade a staff with this man for the wand.
World Enemies
In addition to the NOM-1 robots, you will encounter the following:
Boss: Tutamen
The fourth Mystery Capsule is possessed by the mystical Egyptian faces known as Tutamen. When you arrive in its chamber, you will see two harmless faces in the ground. Attack either one of them and they will come to life. Those identical in appearance, they have distinct behaviors. They both flying around the room, but one relies on firing projectiles, while the other relies on crashing into you. Hopefully, you collected the blue ESP book, and have the Triple Box, which will make this fight substantially easier. Your best bet is to use Psi Beam exclusively, and focus the majority of your attack on the projectile firing face. Don't bother attacking the other face until the projectile firing face is defeated as that is the greater threat of the two to your health. Activating Barrier every now and then is also a good defense strategy. Once one face is defeated, you can focus your efforts on the remaining face.
Aftermath
- Not only was Tutamen in charge of guarding the fourth capsule, it was also charge with the guardianship of Alice. When you defeat him and collect the capsule, Alice will appear. She will bow, and you will be whisked back to Brick Village. Alice's father will thank you for rescuing her. But you're not finished yet.
- If you return to the house, the father will ask you if you obtained the treasures yet. Reply no, and he will give you Alice's Necklace. You can then take the Necklace to the old man in the upper left corner of the village who normally tells you what amount of experience points are required to reach the next level. With Alice rescued, he will now ask you if you have her necklace. If you do, reply yes, and he will reveal the entirety of the riddle.
- You still have one capsule and at least one treasure left to go (you may have the garnet, but you still need the wand), so head to the "island" at the southern edge of the village to head to the fifth and final world.


