A parting gift
Once again, you must consult with Hilda and Gordon before proceeding. Speaking with Hilda, she will mention that Leon can only have ascended the throne at Palamecia. Rumor has it that it cannot be broken into, but both Gordon and Leila have heard Paul bragging about sneaking his way in. You should visit Paul's house in town to speak with him about it.
Once your reach Paul's house, he actually doesn't have much to say about Palamecia. However, there's another man in Paul's house. It turns out to be Cid. He's badly wounded from the Cyclone attack, and he lays in bed to rest. As he does, he offers to lend you his airship... shortly before passing away himself. Speak with Paul again, and he understood that to be Cid's dying wish. Ask Paul about Palamecia, and he will confirm that the only way to get in is from the sky. Cid's parting gift will certainly come in handy.
At this time, you'll need to track down the airship. It's parked at Poft. If you look at the world map, you'll see a blinking red circle showing you the location. You'll need to rest at the Inn (you still have all the damage you received from the Cyclone, even after the celebration.) You can either walk or sail to Poft. It's still recommended that you walk, not only due to the possibility of increasing your stats through battling. Along the way, you will end up fighting many Sergeants and Sorcerers who are likely to drop decent defensive gear and several Black magic tomes respectively. Once you reach Poft, simply walk up to the Airship to claim it. Be aware that the airship can only be set down on solid ground, not trees or mountains or even desert.
Castle Palamecia

To reach Palamecia, you must fly the airship to the portion of the large desert right next to the Colliseum where you encountered the Emperor for the first time. You will see the fortress looming straight out of the mountains. In order to access it with your airship, you must set the airship down so that it lands directly behind the fortress. There is only one place where you can do this successfully, so if the airship rises back into the air, adjust your position and try again until you land.
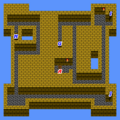
When you arrive, you actually arrive on the left side of the 7th floor, but all you can do is walk up to a chamber which has a trap floor and deposits you on the 1st floor. After you land, head down the corridor below to find a chest containing a Diamond Cuirass. Equip it if you like, then return to the top (ignore the door below) and walk across the top to the right side of the castle. Head down, and detour left to the first staircase that you find (Blue "B" on the map in this guide). Climb it to the second floor to find a short passage that dead-ends when you reach a chest containing an Hourglass. Then return to the first floor and continue down to the bottom of the floor. Walk all the way along the bottom to the left to find a chest with Garlic, and then double back to the middle where a corridor leads up to another set of stairs (Blue "C").
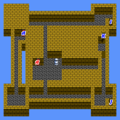
Climb the stairs to the second floor. On this floor, you may encounter a new golem known as a Stone Golem. These golems are particularly weak to poison, so be sure to cast Scourge against them. You're also much more likely to encounter packs of Gottus here, so keep your health up. From the stairs, walk to the right and then down to pick up a Knife (or an Ether in the remakes), and then walk back up to the top to find a chest containing a Buckler. Then walk counter-clockwise all the way around the outer edge of the castle to find the next set of stairs up (Blue "D").

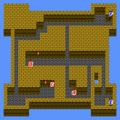
On the third floor, walk up to the top of the floor, and then head left. Follow this passage down to a chest (Red "A"). Examine it, and you'll find a Thunder Spear, but you'll also be forced into a fight with a powerful being known as an Imperial Shadow. This powerful creature has no real weaknesses, and likes to cast Death and Curse. Do not attempt to cast Drain on it, as it will have the opposite effect. You may wish to cast Shell at the start of this battle just to be on the safe side. You can also run into these creatures as regular random encounters, so beware. Once you defeat the shadow, return to the top of the floor, and walk all the way across to the right and then down to find the next set of stairs (Blue "E").
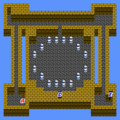
On the fourth floor, walk up and then down and around to find a chest that contain Saint's Spirit. Then walk up a bit and follow the corridor to the left to find a chest with Sleepgrass. From here, return to the center of the floor, and continue walking up the narrow corridor to the top. When you reach the top, head to the left first, and follow this path all the way to reach a door (Red "C"). Inside the door is a room with three treasure chests, each containing a different staff. One staff is the Healing Staff. It has the power to heal, but it doesn't work like a traditional Final Fantasy item. You can't attack with the staff to do damage, and use it to heal your team. You must actually attack whoever you intend to heal. So unless the enemy is undead, don't attack an enemy or you'll actually heal it. You must strike your own party members to receive the benefit of its powers. If you have a strictly Black magic user, give it to them to use when they aren't casting spells. Exit the room and back track to the top of the floor, and walk all the way to the right to find the next set of stairs (Blue "F").
From where you arrive on the fifth floor, you will find another set of stairs a short distance to the left (Blue "G"). Climb them to the next floor, and walk down through the passage. Along the way, you will spot a chest to the left. If you examine it, you'll find the powerful Sun Blade, but it is guarded by a Lamia Queen, which is just a stronger version of a Lamia. Defeat it, and then continue on your way through the passage as it doubles back to the top and to another staircase. Climb this staircase and you'll be in a different portion of the seventh floor. All you can find here is a door to a room with three chests, all of which contain Elixers. Collect them, and then make your way back down to the fifth floor.
Once you're back on the fifth floor, walk to the right and then start heading down. From this path, you will walk along a set of linear hallways that lead from the fifth to the sixth, seventh, and ultimately eighth floors of the fortress. When you reach the eighth floor, walk down to the bottom and then all the way across to the left and back up to find two chests containing Hellfire and a Wind Flute. Then walk back down and return to the middle. Walk up to the top to find Leon sitting on the throne. When you approach him, Leon will attempt to battle with Firion, but Maria will step in and demand to know why Leon is fighting. Leon will begin to explain how he believes the strong must rule the weak before the unexpected occurs... the Emperor returns.

The Emperor, now in a twisted demonic form, returns from the dead to taunt Leon and your team. He surrounds your characters with black flames. Ricard suggests you call the Wyvern in order to escape. Then he launches himself between you and the Emperor, sacrificing himself in order to give the rest of you an opportunity to escape on the back of the Wyvern. The Wyvern escorts you out of the tower. Palemecia crumbles, and in its place, a new twisted fortress rises even higher into the sky.
-
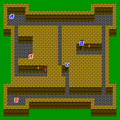
Floor 1: A) Diamond Cuirass, B) Garlic
-
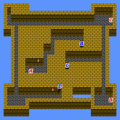
Floor 2: A) Hourglass, B) Knife, C) Buckler
-
Floor 3: A) Thunder Lance
-
Floor 4: A) Saint's Spirit, B) Sleepgrass, C) Mage's Staff, Wizard's Staff, Healing Staff
-

Floor 5
-
Floor 6: A) Sun Blade
-
Floor 7: A) Elixer ×3
-
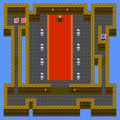
Floor 8: A) Hellfire, B) Wind Flute


