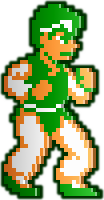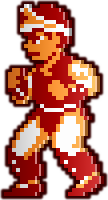

The Tournament sections of the game follow immediately after every Journey section of the game. In this section, you will be presented with a slightly larger depiction of yourself, as shown on the right. The controls for this section of the game also change dramatically as well. Refer to the chart below for a quick guide. Controls will be discussed in greater detail below. During the Tournament phases of the game, you are pit against an opponent in a one on one fight. You and your opponent both have health meters, shown in the upper left portion of the screen. The first fighter that loses all of his health will be defeated and the opponent will win. Unlike more traditional one-on-one fighting games that came later, this is not a best 2-out-of-3 fight, this is a one round, winner take all fight. If you lose, you lose one life and the fight begins again. If you run out of lives, the game is over. As you progress through the game, you may obtain scrolls which will increase your power. As you collect more scrolls, your appearance will change. The image to the right is how you will appear at your highest level of power.
Controls
Movement
During a tournament fight, Ryuhi will always face his opponent. He you jump over your opponent, or if your opponent jumps over you, Ryuhi will always turn to face the opponent at the first opportunity. You can position Ryuhi left or right, in order to get closer or farther away from your opponent. You can press down to instruct Ryuhi to squat when there is no imminent danger of being attacked. Pressing up will instruct Ryuhi to jump straight up. There are two ways to make Ryuhi jump forwards and backwards. One is to press the direction pad diagonally in the desired angle. The other is to hold left or right while pressing both ![]() and
and ![]() .
.
Defense
Defending Ryuhi from an attack is performed by pushing the direction pad (and only the direction pad) in the correct direction to block the attack. To block all high attacks, push up. To block all low attacks, push down. To block middle attacks, you can push left or right, regardless of which way you are facing; both directions will successfully block an attack. Contrary to your intuition, blocking a high attack may force you to squat, while blocking a low attack may cause you to jump up. If you press up to block a high attack, and you wind up squatting, it would be a good idea to hold up on the direction pad and remain squatting until the attack against you is fully performed. You normally squat beneath a hurricane kick, and if you let go of up too quickly, you will stand up and get hit.
Attacks
The two basic attacks are punches and kicks, and they can be directed in up to three different directions. Kicks can be aimed high or low with the aid of the direction pad, or to the mid level with or without the direction pad. Punches can only be aimed high, or to the mid level. Therefore, when you are meant to attack your opponent high or to the mid level, you may use either punches or kicks, but when you are instructed to attack low, you can only choose a low kick.
Special Attacks
There are a handful of special attacks that you can employ during your fight. They do more damage, but an enemy may see them coming and block the attack. Some may be done at any time, while others require that you have a full KO gauge at the top of the screen. The attacks which may be done at any time are all initiated by pressing both buttons together. When pressing ![]() and
and ![]() alone, you will perform a Roundhouse kick which will always knock down if it connects. If you hold down while pressing both buttons, you will perform a low Roundhouse kick which is your only alternative to a low kick when attacking low. If you press up while pressing the buttons, you will perform a Hurricane Kick which attacks high and sends you forward through the air.
alone, you will perform a Roundhouse kick which will always knock down if it connects. If you hold down while pressing both buttons, you will perform a low Roundhouse kick which is your only alternative to a low kick when attacking low. If you press up while pressing the buttons, you will perform a Hurricane Kick which attacks high and sends you forward through the air.
If your KO gauge is full, there are two attacks you can perform, one of which may only be done under certain circumstances. Against any opponent, if you hold up and press ![]() and
and ![]() when your KO gauge is full, you will perform the Hiryu no Ken, a stylish high spinning kick move. When you unmask a Tusk Soldier, you will also be able to perform a special move where you can throw a Crescent Wave at your opponent (normally only available to you in Journey mode) by pressing up and
when your KO gauge is full, you will perform the Hiryu no Ken, a stylish high spinning kick move. When you unmask a Tusk Soldier, you will also be able to perform a special move where you can throw a Crescent Wave at your opponent (normally only available to you in Journey mode) by pressing up and ![]() . When you perform this attack, you will jump back and launch a Crescent Wave at your opponent which is unblockable. This is a great attack to rely on. Without certain scrolls, you will not be able to perform these attacks multiple times, as your KO gauge will deplete when you perform them. Once you have obtained enough scrolls, you will in fact be able to perform these moves a couple of times before you must refill your gauge.
. When you perform this attack, you will jump back and launch a Crescent Wave at your opponent which is unblockable. This is a great attack to rely on. Without certain scrolls, you will not be able to perform these attacks multiple times, as your KO gauge will deplete when you perform them. Once you have obtained enough scrolls, you will in fact be able to perform these moves a couple of times before you must refill your gauge.
Combat
Combat in Flying Dragon takes place in the following manner: a red circle or target will appear somewhere on your body, or on your opponents body. If the target appears on your body, it indicates the position where your opponent is about to strike you. You must push the direction pad in the appropriate direction to respond and defend against the attack. If you delay for too long before defending, or defend the wrong location, your opponent will successfully strike and damage you. When the target appears on your opponent's body, it indicates the position where your opponent is least likely to defend your next attack. It does not guarantee that an attack will be successful, only where you have the highest chance of succeeding. You can choose any attack which will attack the region where the target is located. The sooner you strike the better chance you have of hitting successfully. If you delay, the target will move, possibly to another position on your opponent, or possibly back to your body.
Medicine

At random moments throughout the Tournament, a vial will appear on the right side of the screen and bob up and down as it travels across to the left side. If Ryuhi intercepts the vial as it travels across, he can collect it and store it for later use. These vials contain medicine which will restore Ryuhi's health in the middle of combat. You can utilize one of your stored vials by pressing ![]() at any moment during a fight. Each vial is good for only one use, and you can only store so many vials at any given moment. When the vials travel across the screen, their position is relative to the actual screen, not to the world around you. Therefore, it is important to consider it's position on the screen when attempting to jump up and collect it. Even though the camera may scroll the world to account for your new position, the vial will not move with the rest of the world. The best way to collect each vial is to hold still until the vial is nearly above your head, and then jump backwards into the air to collect it as it passes over you.
at any moment during a fight. Each vial is good for only one use, and you can only store so many vials at any given moment. When the vials travel across the screen, their position is relative to the actual screen, not to the world around you. Therefore, it is important to consider it's position on the screen when attempting to jump up and collect it. Even though the camera may scroll the world to account for your new position, the vial will not move with the rest of the world. The best way to collect each vial is to hold still until the vial is nearly above your head, and then jump backwards into the air to collect it as it passes over you.