Getsu Fuuma Den/Second sword

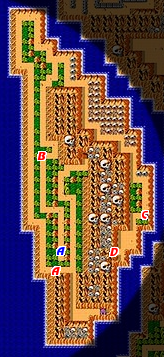
- Red letters indicate action zones. Blue letters indicate shops or help.
Main objectives[edit]
- Pass through Zone A.
- Optional: Pass through Zone B to reach Shop A, purchase Shuriken, and return through Zone B.
- Pass through Zone C to reach the dungeon entrance D.
- Enter the dungeon, and reach the entrance to the boss zone.
- Pass through the boss zone and defeat the boss to collect the second Hadouken sword
Walkthrough[edit]
Just as with the first sword, you will find the second sword on an island with a small assortment of zones to visit. There is a shop on the island that you are not required to visit, but in order to make the incredibly difficult boss fight at the end of the dungeon slightly less difficult, it is highly advised that you go there and purchase the unique attack item it has for sale. The tunnel from the gates at point J on the previous map deposits you roughly in the middle of the island. The path to the dungeon spirals outward to the coasts.
Zone A[edit]

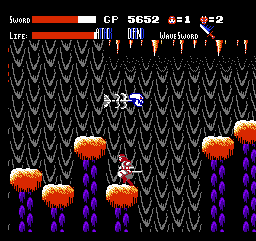
Although you may recognize some of the enemies in this zone, beware as they are much stronger than similar looking enemies that you have faced on the main island. The ax wielding demon will be the weakest enemy you face, and hopefully you have strengthened your sword enough to kill them with one hit. Do you best to avoid the monsters that hover in the air and drop tentacles to the ground. Around the middle of the stage, you will find two platforms occupied by ball and chain enemies. The ground below is poisoned, and if you fall in, the only escape is to the right. Immediately after that is a platform where you can run back and forth to encounter two ax demons which you can use to restore your health by gathering spirits. Attack them from above by jumping before you strike. Be alert, however, as you still have a bit more to go before you reach the end of the stage.
After you pass through the zone, you will continue north along the path until it bends east. At this point, the path with branch and you can head south to Zone B. It would be wise to investigate this zone in order to visit the shop to the south.
Zone B[edit]

As soon as you enter, you will need to activate your Rock Sword to cut through the stone barrier. On the other side, you will meet some familiar enemies like the knife skeleton and the ball dropping demon, only they will be much stronger. They will probably require two hits before they are defeated, so don't anticipate slicing through them. Skeleton bats and fish will soon join the battle, but they should be easily removed, and may be a good source for spirits. While there are quite a number of gaps in the floor, none of the jumps are particularly difficult. What you do need to watch out for, however, are the small platforms that have a high enough gap between them that you could accidentally fall through and die if you don't control Fuuma carefully when he lands. If you are nervous about sliding off, push down to squat and you will hold your position on the platform. You will know that the zone is ending when you reach the second barrier that you must break down.
In the shop to the south, you will find the following items: The Defense Gem for 300 gold, the Curse Clothes for 900 gold, and the one unique item that this shop sells, the Shuriken for 900 gold. Purchase the Shuriken as it will prove pivotal in the battle against the boss that guards the second sword. The Shuriken allows you to throw three throwing stars simultaneously, with the top two traveling at a slight angle. Like the other throwing weapons however, you do not gain sword strength while you use it. When you are finished, you must head back through Zone B once again, and make your way around the island to Zone C on the east coast.
Zone C[edit]

Zone C starts out quite a bit like Zone A, but you will soon encounter a new enemy. It's an armored enemy that looks similar to the ones that swing a ball and chain around. However, this enemy throws a spear instead. It is a good strategy to attack this enemy from above or behind. Carefully jump over the gaps and keep collisions with the floating monsters to a minimum. Deeper into the tunnels, you may be surprised by how many enemies appear and surround you. Take them out one at a time, and proceed with caution. Near the end of the level, you will need to activate your Rock Sword in order to cut through the barrier that blocks the exit.
Dungeon[edit]

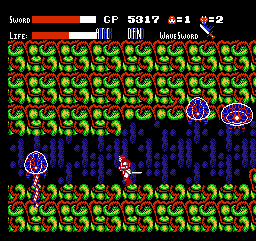
This dungeon is set up to be rather confusing. There is an outside ring that goes absolutely nowhere but in circles until you find the single entrance that leads deeper inside. Once you are in, you will have to make your way through nearly the entire dungeon in order to find the end. From the upper center of the map, you must travel to the upper right, then to the middle, then down to the lower right, over to the lower left, and finally up to the upper left where the boss zone is. With tunnels that loop back on themselves, it's easy to get lost unless you are following along with the map above, or creating your own map as you proceed. There are entirely new dungeon enemies that you will face, including a strong demon, a serpent demoness capable of casting a powerful spell, and a dragon-like monster, but the strategy to defeat them is entirely the same as in the first dungeon; jump up and slash them in the head for maximum damage, and defeat them before they really have a chance to attack you. If for some reason you find that you need to exit the dungeon, the exit is to the left of the tunnel that you start down from the outside ring.

The boss at the end of this dungeon is incredibly difficult to defeat, even with a good strategy. Therefore, it is wise to have Medicine with you when you enter the dungeon. If for some reason you do not have one in your possession, it is possible to collect one, but you'll have to enter a sub-zone of the dungeon in order to find it. Near the lower right corner of the dungeon, you can find an entrance to a sub-zone that is occupied by nothing but whip wielding skeletons. They are quite strong here and typically require two hits to defeat. You will have to travel all the way to the right, where the zone dead-ends and the Medicine can be found. Once you collect it, you have no choice but to turn around and exit where you entered and return to the dungeon. The other potion which is found in the lower left corner of the map, will only restore your current health; you are not permitted to collect it.
The boss zone of this dungeon is really no different than the boss zone of the first dungeon. The pole arm carrying guards are simply a little stronger. Remember to attack them from above, although you may wish to attack from a safe distance using your Shuriken if you are low on health. Slash your way through them as carefully as possible until you reach the end of the zone, where the ceiling is lower, and activate your Rock Sword to cut through the barriers that block your progress. Before you pass through to meet the boss, fight the last guard over and over again in order to collect spirits and restore any lost health. Then prepare for a tough fight.
Boss[edit]

The boss guarding the second Hadouken sword is a giant skeleton knight who surrounds himself with four spinning swords. If that weren't bad enough, he sends each of the swords flying towards you periodically. With the four swords spinning around him, attacking from a close distance with your own sword is all but impossible. You truly need to attack this boss from a safe distance or you will be wiped out before you can do appreciable damage to him. That is why purchasing the Shuriken is so strongly advised.
With the Shuriken, the battle still won't be easy, but it will be possible. You will want to run to the far left corner of the screen, squat down, and throw the Shuriken as frequently as possible. You will still get hurt by the swords from time to time, but remain in place and never stop throwing the stars at the boss. The boss will slowly lurch towards you, and if you find that you are actually in the range of getting hit by the closest spinning sword, you may have to get up and run to the opposite side of the screen. That is why you should bring a vial of Medicine into the fight with you. If you find that you have to run across the screen, or that you are simply too low on health to sustain another hit, use the Medicine immediately. (Alternatively, you may activate the Curse Clothes to run safely through the boss and reach the other side of the screen without taking any damage.) If you have been throwing the stars constantly, and if you used the Medicine, you should find that you have more than enough time to defeat the boss before it defeats you. Once you do, the second Hadouken sword will appear.
With two swords in your possession, you'll need to return to the main island once again. This time, you will take a different branch through the tunnels to find the third devil pass and continue on to the gate that leads to the island containing the third and final sword.