| Hostages | |
|---|---|
| Developer(s) | Infogrames Entertainment, Bit Managers, Superior Software |
| Publisher(s) | Mindscape (DOS, Apple II) Kemco (NES) Infogrames Entertainment (other) |
| Year released | |
| System(s) | Commodore Amiga, Amstrad CPC, Apple II, Atari ST, Acorn Archimedes, Commodore 64, MS-DOS, Mac OS, MSX, NES, Sinclair ZX Spectrum, BBC Micro, Acorn Electron |
| Genre(s) | Action |
|---|
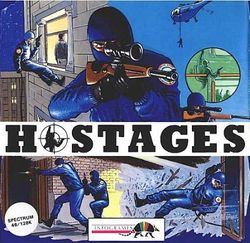
Hostages (also released as Hostage Rescue Mission, Rescue: The Embassy Mission, and Operation Jupiter) is a strategy action game developed by Infogrames Entertainment. The plot is presented in the form of a telegram: "An EMBASSY has been overrun by a group of terrorists STOP. Their demands are unacceptable STOP. It's up to you to free the EMBASSY and disarm the terrorists STOP". The NES version waters this down slightly, describing the attackers as "political fanatics".
The game has three basic stages: you first move snipers into position, then take out terrorists and position men to rappel into the building, and finally breach the Embassy to rescue hostages. This game is seen as a forerunner of more recent games such as Tom Clancy's Rainbow Six, which feature plots and gameplay of a similar nature.
This guide is written with the Amiga and MS-DOS versions in mind, with notes for changes made for the NES version; other releases may have minor differences from what is described here.
Controls
| Computers | NES | |
|---|---|---|
| move | ||
| / | view map (when hidden) | |
| N/A | pause | |
| crouch (left/right while holding to crawl) | ||
| / | roll |
| Computers | NES | |
|---|---|---|
| move crosshair | ||
| N/A | speed up crosshair | |
| fire | ||
| view map (time pauses when looking at the map) | ||
| N/A | pause |
| Computers | NES | |
|---|---|---|
| move down | ||
| stop | ||
| climb up | ||
| , | break window and enter Embassy | |
| N/A | view map (time pauses when looking at the map) |
| Computers | NES | |
|---|---|---|
| move | ||
| + | aim gun | |
| view map | ||
| N/A | pause |
| Computers | NES | |
|---|---|---|
| N/A | Switch to Delta (sniper) | |
| N/A | Switch to Echo (sniper) | |
| N/A | Switch to Mike (sniper) | |
| N/A | Switch to Hotel (SWAT) | |
| N/A | Switch to Tango (SWAT) | |
| N/A | Switch to Bravo (SWAT) |
Ranks and missions
The game has three ranks (Lieutenant, Captain, Commander) which act as difficulty levels, making the searchlights and guns harder to avoid and the terrorists inside the building more deadly. Lieutenant is the easiest, with slow searchlights and the ability to take several hits before dying. Captain is the middle ground, with a good level of difficulty, faster searchlights, and stronger enemies. Commander is significantly harder: spotlights move rapidly, many enemies aren't shown on the mini-map, and there are lots more hostages to worry about accidentally shooting.
Once you have chosen a difficulty level you then choose a mission; despite what the name indicates these are all variations set in the same building. The street level and Embassy floor plan remain identical but the number of terrorists and hostages will change. There are five missions to choose from, each with its own time limit:
| Mission | Computers | NES |
|---|---|---|
| Training | 2:24 | 20:00 |
| Target | 1:09 | 16:00 |
| Ultimatum | 0:46 | 14:00 |
| Rescue (Trigger) | 0:36 | 12:00 |
| Assault (Jupiter) | 0:29 | 10:00 |
The timer only stops when you open the map or pause the game. The timer appears in the expected hours:minutes format, but in the computer versions it counts down much faster than in real life (in the Amiga version it takes about ten seconds). In the NES version the clock counts down in real time.
Stage 1: Sniper placement
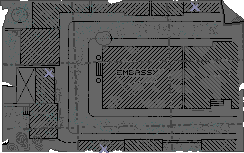
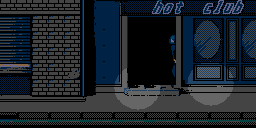
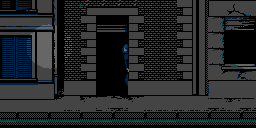
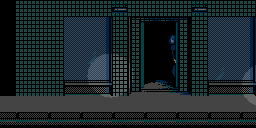
In this stage of the mission you take control of three snipers sneaking down the street to designated sniping spots with a time limit (the timer pauses on the map screen). The goal of this stage is to guide each man to one of the "X" symbols on the map. Each sniping spot lets you target one of the three walls of the building, letting you take out some of the terrorists before sending your men in, so getting them there is crucial.
This part of the game plays like a regular platform game. You can run about as well as crouching and crawling (on the NES version you can also roll by pushing ![]() ). The only dangers during this section are the searchlights: if a searchlight touches you when you are out in the open the terrorists will open fire, and unless you dodge out of the way you'll be quickly gunned down. You don't have any health, so all it takes is a few direct hits. If a sniper dies he can no longer be used, and if all three are killed it's game over. Scattered around the map are various open windows and doorways which you can hide in by pushing up (to jump out simply push down). The searchlights can't see you when you are hiding. The searchlights move in predictable patterns, so with patience you can get around them. On the computer versions you can change men when hidden by pressing for Delta, for Echo, and for Mike; in the NES version you can only control them in order.
). The only dangers during this section are the searchlights: if a searchlight touches you when you are out in the open the terrorists will open fire, and unless you dodge out of the way you'll be quickly gunned down. You don't have any health, so all it takes is a few direct hits. If a sniper dies he can no longer be used, and if all three are killed it's game over. Scattered around the map are various open windows and doorways which you can hide in by pushing up (to jump out simply push down). The searchlights can't see you when you are hiding. The searchlights move in predictable patterns, so with patience you can get around them. On the computer versions you can change men when hidden by pressing for Delta, for Echo, and for Mike; in the NES version you can only control them in order.
As you move, consult the map to see where you are going (you can only open the map when hiding). The doorways you are looking for are larger than the ones you can only hide in, and the first has a sign saying "hot club". Once a man is in the proper place the map will show a picture of him in a sniping position rather than standing up. If you wish you can place more than one man in a particular sniping spot, but this will reduce the number of walls you can target. Once all your men in position open the map and hit to continue, or to restart the game (on the NES version you will proceed to the next stage automatically).
Stage 2: Sniping and rappelling


A helicopter will drop your SWAT team off on the roof. You are now presented with a different map. Here you can change between men with - (on the NES version hit ![]() and choose a man from the list). First, select one of your snipers.
and choose a man from the list). First, select one of your snipers.
In the sniper mode you move your view around the side of the building. There are three rows of windows on each side, and each has three windows (making a total of nine windows). Ignore the building itself and focus on the windows: when a single silhouette shows up in the window shoot him immediately ( or ![]() ). If you see two silhouettes do not shoot because one of them is a hostage. You have unlimited ammo so don't worry about taking careful shots. Terrorists will still enter rooms with broken windows, so don't rule them out when looking for targets. You can only shoot at the outer rooms of the building; the terrorists move around inside and won't always be in rooms you can see from a sniper spot. If a figure disappears from view try a window on either side and there's a chance he's moved there. Once you have taken out a few men on this side change to a different sniper and repeat the process. Once you haven't seen any terrorists for a while it's likely their forces have been depleted (or else they are on the sides where you don't have snipers), so it's time to send in your SWAT team.
). If you see two silhouettes do not shoot because one of them is a hostage. You have unlimited ammo so don't worry about taking careful shots. Terrorists will still enter rooms with broken windows, so don't rule them out when looking for targets. You can only shoot at the outer rooms of the building; the terrorists move around inside and won't always be in rooms you can see from a sniper spot. If a figure disappears from view try a window on either side and there's a chance he's moved there. Once you have taken out a few men on this side change to a different sniper and repeat the process. Once you haven't seen any terrorists for a while it's likely their forces have been depleted (or else they are on the sides where you don't have snipers), so it's time to send in your SWAT team.

Select one of your SWAT men and push a direction or until he moves to a side of the building with (ideally choose one for which you have a sniper). There are three spots on each side, just as there are three rows of windows. If you want him in a particular place keep moving him around until you're satisfied, then confirm his placement with or ![]() . Now it's time to rappel down to a window. To drop, push or
. Now it's time to rappel down to a window. To drop, push or ![]() , and then quickly stop with or
, and then quickly stop with or ![]() ; if you don't do this you'll fall off the rope. The computer versions give a reasonable amount of time to halt your progress (meaning you can rappel to a window within a few jumps) but the NES version has a very small margin of error, so for the NES it's best to go down in tiny, rapid jumps rather than long ones.
; if you don't do this you'll fall off the rope. The computer versions give a reasonable amount of time to halt your progress (meaning you can rappel to a window within a few jumps) but the NES version has a very small margin of error, so for the NES it's best to go down in tiny, rapid jumps rather than long ones.
When you get to a window you may spot a terrorist's silhouette. If you try to enter the window he'll kill you, so you need to change to a sniper (if you have one on that side) to take him out or else wait for him to leave. Note that if you hit your SWAT member when doing you will kill him, so be sure to aim around him (or ideally make sure the SWAT man is out of the way before you change to the sniper). In the NES version the SWAT member will sit on the upper part of the window when in sniper mode (regardless of where he is actually sitting on the window) so he can't be shot.
Once you're in front of a window you can break in. Even if you've already broken it you must break it again in order to enter. To do this position your man directly over the window and hold , then tap . On the NES version simply hit ![]() to break the window automatically.
to break the window automatically.
Stage 3: The embassy


You'll now change to the third stage, a first- and third-person exploration mode in the manner of Dungeon Master (the perspective used is chosen based on what room you are in). The embassy has three floors, just as you saw in sniper mode. You also have a mini-map, showing you rooms, stairs, terrorists, and hostages (on higher difficulty levels not all terrorists and hostages show up on the map); terrorists are yellow dots (green on the NES version) while hostages are white (blue on the NES version), and your position and perspective is shown as a red arrow. The NES version also has a useful list of the number of terrorists on each floor as well as a total. Moving and turning changes the entire view, rather than gradually moving the camera as in an FPS. The movement and firing controls work as you would expect. Just like the sniper placement mode you don't have health, so it only takes a few hits from the terrorists to take you down. If all three SWAT members die it's game over.
Doors are always shut but can be moved through at will; the exception is if a terrorist is trying to go through the door at the same time as you (in which case neither will get through and you will have to choose another way into that room). In addition you can aim your gun around the room by holding the fire button and using the movement controls. Note that the terrorists can shoot you from a distance or when your back is turned; if you don't want to hunt them down a reasonable solution is to choose a place where they aren't likely to come around behind you and let them come to you. You can also change to other men at any time through the map or function keys to have multiple men in the building or even snipe off targets you can see on the mini-map, but you may find it's better to control one at a time so the terrorists can kill your men when you're not looking. It takes a while for your men to die so it is possible to leave one somewhere and quickly bring in backup if necessary, but you have to know exactly where you're going to and how to get there in time. Note that if you enter sniping mode while you have men in the building their shadows will show up just the same as terrorists and hostages, so be careful not to kill them. When one of your men is being attacked by the terrorists his name will flash rapidly whether you are controlling him or not, and on the computer versions it will also be displayed in sniping/rappelling mode along with the function key used to quickly jump to him.
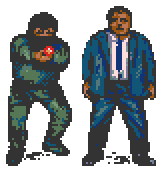
Terrorists move freely about the building and between floors, but hostages stay where they are unless moved by you or a terrorist. When leading a hostage, the terrorist will use him as a human shield. Terrorists take a few shots before they die but hostages don't take as many. When you go meet a hostage he will follow along behind you, and it is up to you to lead him to safety (note that you can only lead one hostage at a time). In order to rescue the hostages you must lead them one by one to the small room in the upper right corner of the third floor (this room has no windows). Once there he will stop following you. Note that once you have moved a hostage there a terrorist may decide to go there to secure the hostage, in which case you will have to fight him while trying not to hit any hostages you have already left there. To make matters worse if you are leading a hostage when you enter the room he will join in the human shield around the terrorist.
To win the game either rescue all the hostages or kill all the terrorists. You will be shown a picture of the outcome. Push to advance to the outcome (the NES version advances automatically).
Stage 4: The press
After the photo you will see a newspaper (except for the Training mission) describing how successful you were, how much time you took, and how many men and hostages you lost (if any). Killing hostages or losing men reflects badly on the outcome. On very rare occasions the terrorists will leave hostages in rooms with windows so there is a small chance you have unknowingly killed a hostage. If you did a perfect job the newspaper will say "total victory!" If you failed the mission you will be able to start over from Stage 2 to try again.
Cheats
Sinclair ZX Spectrum POKEs
| Description | 48k POKEs | 128k POKEs |
| Infinite Time Stage 1 | 37359,0 | 41396,0 |
| Enemies Don't Shoot Stage 1 | 36528,201 | 39667,201 |
| Infinite Time Stage 2 | 37132,0 | 36028,0 |
| Immunity Stage 2 | 39570,0 | 39402,0 |
| Hostages Never Die Stage 2 | 37020,1 | 35887,1 |