(Cragalanche Crush!) |
(Chapter 11 done) |
||
| Line 2: | Line 2: | ||
== Air Section == | == Air Section == | ||
The level starts off as a tour of a human battlefield, with Underworld forces sending in occasional waves to harvest souls. Shoot down their Monoeyes and Reapettes, but don't worry too much. This is the easy part of the level. After a large explosion, you get to meet a new group of enemies: the Goddess Viridi, and her Forces of Nature. You'll find the Forces of Nature to function similarly to the Underworld Army, but analogous enemies aside, they do have their differences. For example, Trynamites, a type of floating mines, have no equivalent in the Underworld. Shoot them before they get too close. | |||
Inside the Reset Bomb's ground zero, you'll get to meet a whole variety of new enemy types. They won't do anything too unpredictable, but now is a good time to learn which enemies do what. You'll receive a few Recovery Orbs, but will likely not need them. This Air Section serves mostly as an introduction to your new foes. | |||
== Ground Section == | == Ground Section == | ||
Collect the nearby food and prepare for the level ahead. Be careful not to touch any of the thorny vines; they hurt. In this chapter, you'll occasionally see humans trapped by thorny vines. Shoot the vines to release them, and they'll leave items, usually food, for you to collect. The first barrier will clear once you've defeated the enemies in the area. Then, proceed along the path, shooting enemies along the way. Eventually, you'll come across a room with vine-like enemies. Leave them alone for too long, and they'll dig towards you through the ground. Try finishing them off from a distance and dodging when necessary. | |||
To the left is a miniature hot spring. It's so small, it will only recover a little health. Ahead is a room with a Treasure Chest and a jump pad. Grab the chest, but be careful about the Urgle on the way back. This enemy will charge at you and flip you in the air, so try to keep your distance. Then, go along the path up the series of jump pads. There will be a larger room on this path with a soldier to free, but there is nothing of interest there. | |||
On the other side of the grind rail is a Jitterthug. Melee him while he's green and shoot him when he's red to do damage. So long as you keep that straight, it shouldn't cause too much harm. Don't forget to stop by the treasure chest to the left and free the soldier before moving onto the next rail. Drive the Aether Ring you find along the path, shooting enemies and grabbing hearts along the way. When you reach a jump pad, head right to find another treasure chest. Use the jump pad to get to a large hot spring, and then use the next pad to progress. | |||
There's a maze up ahead. One way to get through is to use the jump pad, get to the next pad, turn around and go right, and then go left. Here, you'll fight a few waves of enemies, including a Boom Stomper. Make sure not to be below it when it falls. Ahead, there's a jump pad leading to a Drink of the Gods. Grab it and get ready for the boss. | |||
== Boss:Cragalanche == | == Boss:Cragalanche == | ||
Latest revision as of 21:07, 9 May 2012
Air Section[edit]
The level starts off as a tour of a human battlefield, with Underworld forces sending in occasional waves to harvest souls. Shoot down their Monoeyes and Reapettes, but don't worry too much. This is the easy part of the level. After a large explosion, you get to meet a new group of enemies: the Goddess Viridi, and her Forces of Nature. You'll find the Forces of Nature to function similarly to the Underworld Army, but analogous enemies aside, they do have their differences. For example, Trynamites, a type of floating mines, have no equivalent in the Underworld. Shoot them before they get too close.
Inside the Reset Bomb's ground zero, you'll get to meet a whole variety of new enemy types. They won't do anything too unpredictable, but now is a good time to learn which enemies do what. You'll receive a few Recovery Orbs, but will likely not need them. This Air Section serves mostly as an introduction to your new foes.
Ground Section[edit]
Collect the nearby food and prepare for the level ahead. Be careful not to touch any of the thorny vines; they hurt. In this chapter, you'll occasionally see humans trapped by thorny vines. Shoot the vines to release them, and they'll leave items, usually food, for you to collect. The first barrier will clear once you've defeated the enemies in the area. Then, proceed along the path, shooting enemies along the way. Eventually, you'll come across a room with vine-like enemies. Leave them alone for too long, and they'll dig towards you through the ground. Try finishing them off from a distance and dodging when necessary.
To the left is a miniature hot spring. It's so small, it will only recover a little health. Ahead is a room with a Treasure Chest and a jump pad. Grab the chest, but be careful about the Urgle on the way back. This enemy will charge at you and flip you in the air, so try to keep your distance. Then, go along the path up the series of jump pads. There will be a larger room on this path with a soldier to free, but there is nothing of interest there.
On the other side of the grind rail is a Jitterthug. Melee him while he's green and shoot him when he's red to do damage. So long as you keep that straight, it shouldn't cause too much harm. Don't forget to stop by the treasure chest to the left and free the soldier before moving onto the next rail. Drive the Aether Ring you find along the path, shooting enemies and grabbing hearts along the way. When you reach a jump pad, head right to find another treasure chest. Use the jump pad to get to a large hot spring, and then use the next pad to progress.
There's a maze up ahead. One way to get through is to use the jump pad, get to the next pad, turn around and go right, and then go left. Here, you'll fight a few waves of enemies, including a Boom Stomper. Make sure not to be below it when it falls. Ahead, there's a jump pad leading to a Drink of the Gods. Grab it and get ready for the boss.
Boss:Cragalanche[edit]

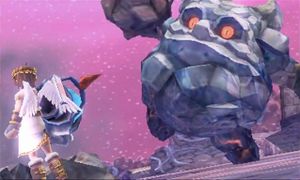
Cragalanche may be intimidating, but it's only dangerous if approached incorrectly. First of all, it has a variety of attacks. These include simply charging or rolling into you, which can easily be dodged. When it goes into the air, simply run away to avoid being squished. Cragalanche also has a couple of projectiles, but these are fairly easy to dodge. The one exception is a move where it surrounds itself with large rocks and then shoots them in every direction. This attack is hard to avoid in general, so just try to get as much distance as possible between the two of you to work with when you see this move start.
Although it is tempting to snipe Cragalanche from a distance, this fight is actually best suited for melee combat. Cragalanche is vulnerable from the behind and strong from the front, making it ideal for side-dashing around and hitting. Shooting from afar prolongs the battle, giving Cragalanche more chances to do heavy damage. That said, if your weapon is designed for Ranged combat, there's no sense in forcing it into melee.
Cragalanche is, one way or another, usually a quick boss. Either you will skillfully dodge and attack it from behind, or you may charge at it up front and get crushed. So long as you react appropriately though, this should be a simpler fight than the Phoenix.
