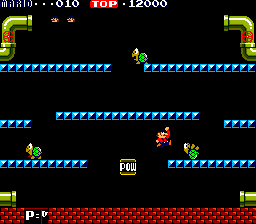
Throughout the game, Mario and Luigi's scenery stays constant. Early in the game, the pattern on the platforms changes every few rounds, but the layout never changes.
At the top of the screen are two S shaped pipes from which the pests pour out. At the bottom are two pipes which the pests use to exit out of the screen before pouring out of the same side pipe at the top and continuing on.
Pests walk in one direction, and drop down to the next level when they reach the end of the pipe they are crawling on. The pests will continue in their direction unless they hit another pest, a coin, or one of the brothers, at which point they will about face and head off in the other direction.
In order for Mario and Luigi to clear each round, they must eliminate every pest that the round contains. To do so, they must jump up and punch the platform directly underneath the pest until they flip over on their head, and then jump up and kick the pests off the screen by running in to them. If Mario kicks off multiple pests consecutively within a second or two, he scores bonus points in multiples of 800 (800, 1600, 2400, up to 3200.)
Every time one of the brothers removes a pest, a coin enters the level from one of the top pipes and moves in the same fashion as the pests. However, once they reach the bottom pipe, they exit the screen and disappear for good, so collect them if it is safe to do so for 800 points. As soon as the last pest is removed, though, all coins on the screen disappear.
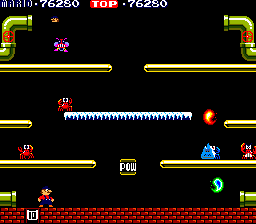
The Sewers
After Mario and Luigi have occupied a round for a long period of time, fireballs begin to appear. Red fireballs continue to ricochet around the sewer while green fireballs bounce from one side of the screen to the other. At higher levels multiple fireballs begin to appear making it more urgent for the brothers to complete their work quickly.
After the second Bonus stage, Slipice begins to appear in search of a location to plant itself and freeze a platform. Until it manages to completely freeze the platform, the brothers may interrupt it and punch it from underneath. The platform will only remain frozen if Slipice has been given enough time to do its work, and will reset itself once the stage is completed. Destroying a Slipice awards 500 points.
Slipices do not count toward the total number of enemies that must be defeated to clear the stage, and coins do not appear after they are destroyed. As soon as one freezes a platform or is destroyed, another one pops out to take its place.
After the third Bonus stage, Icicles begin to form on the underside of the highest platform, and the pipes that sit above it. The icicles drop and fall directly to the ground and disappear at the bottom. It's important to monitor their position and make sure that Mario or Luigi aren't situated beneath them when they begin their descent. As long as an icicle has not fully formed, it can be destroyed by jumping up and hitting it.
The POW block in the center should only be used in the case of emergencies since it's presence creates a relatively safe island for Mario to stand on and punch pests from underneath. It can be hit three times before it disappears. It is replenished after every bonus stage, with the single exception of the first bonus stage.
Another semi safe place for the brothers to rest is the middle ledge that occupies the sides of the screen. Other than fireballs, only flies will infrequently make it to this ledge on their own accord.
Work quickly. The longer it takes you to clear a stage, the more likely you are to become overwhelmed by fireballs or ice.
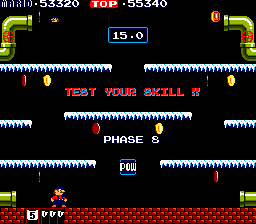
In round 3, 8 and every seven rounds thereafter (or in the Japanese version, round 4, 9, and every seven rounds thereafter), the brothers are presented with a bonus stage. In here, they will have 20 in the first bonus stage and 15 seconds in second and subsequent bonus stages to collect 10 coins that are placed throughout the stage. The coins will always be in the same place every time.
A bonus of 800 points is provided for every coin captured, while an additional bonus is awarded if all ten coins are obtained. The first bonus stage gives 5000 points, and every bonus stage thereafter rewards you with 8000 points.
The second bonus stage is frozen, so you must plan carefully because it will be much harder to stop and turn around if you've made a mistake. Often it is better to continue going in the direction you are and loop back around to pick up a missed coin than to try and reverse your direction.
In the third bonus stage and every bonus stage beyond, the platforms become invisible. However, this shouldn't be a tremendous problem, as the layout of the board never changes. The board appears to start out frozen, but you will not slide on the platforms as you would if they were visibly frozen (you will have normal traction with the ground.)
↑ 1.01.1The Japanese version of the game has one extra phase not present in the American version. After the first phase, the Japanese version includes another phase with four shellcreepers, which was removed from the American version to make the first Bonus Stage appear more quickly.
↑ 2.02.1The game keeps count in which phase the player is with flags in the form of "tally marks" and showing it on the lower-left corner of the screen. However, when the player reaches Phase 25, the game will display a "K.O." mark instead, and will keep counting the following phases the same way. And every time it sums a group of five, it will show the same "K.O." mark by itself, meaning that Phase 30 looks exactly as Phase 25, 31 as 26, and so on.
↑ 3.03.1After clearing Phase 35 (or 36 in the Japanese version), the game basically loops between the last Bonus Stage and this last point (i.e., phases 29-35 in the US version, 30-36 in the JP version).